
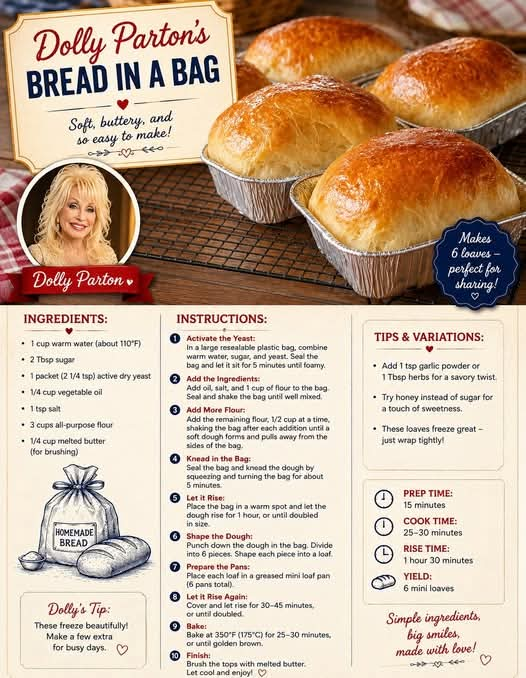
Dolly Parton’s Bread in a Bag
Introduction
Dolly Parton’s Bread in a Bag is a wonderfully simple approach to homemade bread, especially for anyone who loves the smell and taste of freshly baked bread but does not want flour scattered across the kitchen counter.
The clever part of this method is that much of the mixing and kneading happens directly inside a sturdy food-safe bag. Instead of working the dough on a heavily floured countertop, you can combine the ingredients, develop the dough, and keep the cleanup to a minimum.
The result is a soft, tender loaf with a lightly golden crust and a comforting homemade flavor. It is particularly enjoyable warm from the oven with butter, honey, jam, or alongside a hearty dinner.
Ingredients
For the Bread
- 3 cups (375 g) all-purpose flour, divided
- 2 1/4 teaspoons (1 packet) active dry yeast
- 1 tablespoon granulated sugar
- 1 teaspoon salt
- 1 cup (240 ml) warm water, approximately 105–110°F (40–43°C)
- 2 tablespoons vegetable oil or melted butter
- 1 large egg, optional, for a slightly richer loaf
For Finishing
- 1 tablespoon melted butter
- A little flour for shaping, if necessary
- Optional: sesame seeds, poppy seeds, or rolled oats for the top
Equipment
- One large, sturdy food-safe resealable plastic bag
- Measuring cups and spoons
- 8 x 4-inch or 9 x 5-inch loaf pan
- Small bowl
- Pastry brush
- Clean kitchen towel
Use a food-safe bag large enough to allow the dough to expand. Do not use a thin disposable produce bag or any plastic bag that is not intended for food contact.
Instructions
Step 1: Prepare the Yeast
Pour the warm water into a small bowl.
Add the sugar and active dry yeast. Stir gently and let the mixture stand for approximately 5–10 minutes.
The yeast should begin to foam or look creamy on the surface. This indicates that the yeast is active.
The water should be warm rather than hot. Water that is too hot can damage the yeast.
Step 2: Begin the Bread in the Bag
Place approximately 2 cups of the flour into the large food-safe bag.
Add the salt and mix gently by moving the bag around.
Pour in the activated yeast mixture and add the vegetable oil or melted butter.
If you are using the egg, add it at this stage.
Seal the bag securely, leaving enough room for the ingredients to move around.
Step 3: Mix the Dough
Gently squeeze and massage the outside of the bag to combine the ingredients.
As the flour absorbs the liquid, the mixture will begin forming a sticky dough.
Open the bag and add another 1/2 cup of flour.
Seal it again and continue gently squeezing and kneading the dough through the bag.
Add the remaining flour gradually, using only as much as necessary to produce a soft dough.
Step 4: Knead the Dough in the Bag
Once the dough has come together, continue kneading it through the bag for approximately 5–8 minutes.
You are looking for a dough that becomes smoother, elastic, and less sticky.
If the dough is extremely sticky, add flour 1 tablespoon at a time. Avoid adding too much flour because a stiff dough can produce a dry loaf.
The dough should remain soft and slightly tacky.
Step 5: Let the Dough Rise
Leave the dough inside the sealed bag, making sure there is plenty of room for it to expand.
Place the bag in a warm, draft-free location.
Allow the dough to rise for approximately 45–60 minutes, or until it has roughly doubled in size.
The exact rising time depends on the temperature of your kitchen. A warmer environment will usually speed up fermentation, while a cooler kitchen will take longer.
Step 6: Shape the Loaf
Lightly grease an 8 x 4-inch or 9 x 5-inch loaf pan.
Open the bag and gently remove the risen dough.
Place it on a lightly floured surface if necessary.
Gently press the dough into a rough rectangle, then roll it tightly into a loaf.
Place the shaped dough seam-side down in the prepared loaf pan.
Step 7: Second Rise
Cover the pan loosely with a clean kitchen towel.
Allow the dough to rise again for approximately 25–40 minutes.
The dough should become noticeably puffy and rise toward the top of the pan.
Do not worry if it does not exactly double during this second rise.
Step 8: Prepare for Baking
Preheat the oven to 375°F (190°C).
Brush the surface of the dough lightly with melted butter.
If desired, sprinkle the top with sesame seeds, poppy seeds, or oats.
For a traditional appearance, you can make one shallow cut down the center of the loaf with a sharp knife.
Step 9: Bake
Place the loaf in the preheated oven.
Bake for approximately 25–35 minutes, depending on the size and shape of your loaf.
The bread should develop a beautiful golden-brown crust.
A properly baked loaf should sound hollow when gently tapped on the bottom. If using a thermometer, the center should generally reach about 190–200°F (88–93°C).
Step 10: Cool
Remove the bread from the pan and place it on a wire rack.
Brush the hot crust with a little melted butter for a softer, richer finish.
Allow the loaf to cool for at least 20–30 minutes before slicing.
Although it can be tempting to cut into it immediately, allowing the bread to cool helps the interior finish setting and makes cleaner slices.
The Bread-in-a-Bag Method
The main attraction of this method is the way it simplifies the mixing and kneading process.
Traditional bread making usually involves mixing ingredients in a bowl, transferring the dough to a work surface, kneading it, and then washing several utensils and surfaces.
With the bread-in-a-bag technique, much of that work happens inside the bag.
The flour and other ingredients are combined without covering the kitchen counter with flour. The dough can then be kneaded through the bag, keeping your hands relatively clean.
Once the dough has developed enough gluten, it is removed from the bag for shaping and placed into the loaf pan.
The method does not change the basic science of yeast bread. The yeast still ferments the dough, produces carbon dioxide, and contributes to the bread’s characteristic flavor and texture.
History of Bread in a Bag
Bread-making itself is one of the oldest culinary traditions in the world. For centuries, people have mixed flour and water by hand and relied on natural fermentation or added yeast to create bread.
The bread-in-a-bag method is much more modern. It represents a practical adaptation of traditional bread making for contemporary home kitchens.
The idea became particularly popular in home baking because it makes the process approachable for children, beginners, busy cooks, and anyone who dislikes handling sticky dough.
The method also fits perfectly with the American tradition of practical homemade cooking: simple ingredients, straightforward techniques, and recipes designed to make everyday meals easier.
Although the bag is simply a tool, the underlying process remains traditional yeast bread making.
Formation of the Bread
Several important processes take place while this bread is being prepared.
Gluten Development
When flour comes into contact with water, proteins in the flour begin forming gluten.
Kneading helps these proteins develop an elastic network capable of trapping the gases produced by yeast.
Fermentation
The yeast consumes available sugars and produces carbon dioxide and other fermentation products.
The carbon dioxide becomes trapped inside the gluten network, causing the dough to expand.
First Rise
During the first rise, the dough develops both volume and flavor.
This is why allowing enough time for fermentation is important even though the actual hands-on preparation is minimal.
Second Rise
The second rise takes place after shaping.
It gives the dough another opportunity to expand and creates a lighter final texture.
Baking
Once the loaf enters the hot oven, the yeast becomes increasingly active for a short period before heat stops its activity.
The gases expand, the dough rises, and the crust begins developing its characteristic golden-brown color.
Tips for the Best Bread in a Bag
Use Warm Water
The water should feel pleasantly warm, not hot. Excessively hot water can harm the yeast.
Do Not Add Too Much Flour
One of the most common mistakes in homemade bread is adding excessive flour.
A slightly sticky dough is usually preferable to a very stiff one.
Give the Dough Enough Time
Bread cannot always be rushed. If your kitchen is cool, the dough may need more time to rise.
Look at the dough rather than relying only on the clock.
Knead Thoroughly
Even though the dough is kneaded inside a bag, it still needs sufficient kneading to develop structure.
Give the Loaf Space
Choose a bag large enough to accommodate the dough as it rises.
Avoid Cutting Hot Bread
Fresh bread continues to finish cooking internally after it comes out of the oven. Allowing it to cool before slicing produces a better texture.
Variations
Garlic Herb Bread
Add 1 teaspoon garlic powder and 1–2 teaspoons dried Italian herbs to the flour.
Brush the finished loaf with garlic butter immediately after baking.
Cheddar Bread
Add approximately 1 cup of shredded cheddar cheese during the final stage of mixing.
You can also sprinkle additional cheese over the loaf before baking.
Honey Bread
Replace the granulated sugar with 2 tablespoons of honey.
This produces a gently sweet loaf that is particularly delicious with butter.
Cinnamon Raisin Bread
Add 1 teaspoon ground cinnamon and approximately 1/2 cup raisins.
For a sweeter version, increase the sugar slightly and serve the finished bread toasted with butter.
How to Serve It
This bread is at its best when served slightly warm.
Spread a thick layer of butter over a freshly cut slice and let it melt into the soft crumb.
For breakfast, serve it with:
- Butter and honey
- Fruit preserves
- Peanut butter
- Scrambled eggs
- Cream cheese
For lunch or dinner, pair it with:
- Homemade soup
- Chicken noodle soup
- Beef stew
- Chili
- Roast chicken
- Pasta
- Salads
- Vegetable casseroles
It also makes excellent toast the following morning.
Storage
Once completely cool, store the bread in an airtight container or tightly wrapped at room temperature.
For the best quality, enjoy it within 2–3 days.
If you need to keep it longer, slice the cooled loaf and freeze the slices in a well-sealed freezer bag. Individual slices can then be removed as needed and warmed in a toaster or oven.
Conclusion
Dolly Parton’s Bread in a Bag is a charming and practical way to make homemade bread while keeping the kitchen considerably cleaner. The method takes the traditional process of yeast bread making and turns much of the messy mixing and kneading into a simple hands-on activity inside a food-safe bag.
The finished loaf is soft, flavorful, warm, and satisfying, with a golden crust and a tender homemade crumb.
For bread lovers, this is the kind of recipe that makes homemade baking feel less intimidating. You get the pleasure of working with fresh dough, the wonderful aroma of bread baking in the oven, and the satisfaction of serving a loaf made from scratch, without turning the entire kitchen into a flour-covered workspace.