
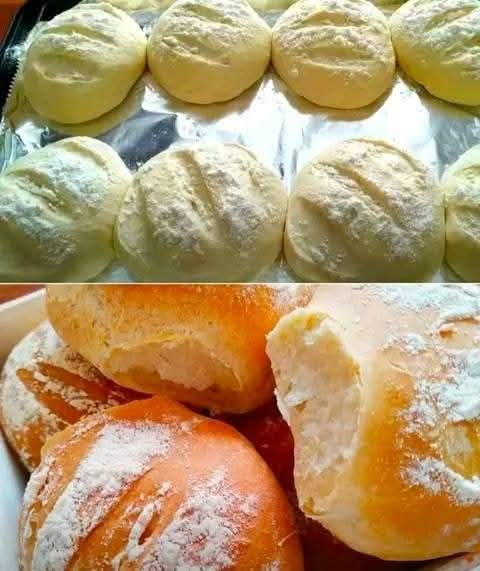
Crispy Bread Rolls Recipe
Introduction
There is something wonderfully satisfying about freshly baked bread rolls with a crisp, golden crust and a soft, tender interior. These Crispy Bread Rolls are simple, rustic, and made with a handful of everyday ingredients. The dough requires no complicated techniques or special equipment, making this a wonderful recipe for both beginners and experienced home bakers.
The combination of flour, water, salt, olive oil, and fresh brewer’s yeast creates a beautifully balanced dough. After rising, the dough becomes light and airy, while baking at a high temperature develops a deliciously crisp exterior.
These rolls are perfect for breakfast, lunch, dinner, sandwiches, soups, salads, or simply served warm with butter, cheese, olive oil, or your favorite spread.
Ingredients
For the Bread Dough
- 600 g all-purpose or bread flour
- 350 g lukewarm water
- 15 g salt, preferably sifted
- 25 g extra virgin olive oil
- 12 g fresh brewer’s yeast
For Finishing
- A little additional flour for dusting
- A small amount of water for handling the dough if needed
Instructions
1. Prepare the Flour
Place the flour into a large mixing bowl. Add the sifted salt and mix thoroughly so the salt is evenly distributed throughout the flour.
Keeping the salt evenly mixed into the flour helps prevent concentrated areas of salt from coming into direct contact with the yeast later.
2. Activate the Fresh Yeast
Pour the lukewarm water into a separate container. Crumble the fresh brewer’s yeast into the water and gently stir until it has dissolved.
The water should be comfortably warm rather than hot. Water that is too hot can damage the yeast and interfere with fermentation.
Add the extra virgin olive oil to the yeast mixture and stir gently.
3. Make the Dough
Gradually pour the liquid mixture into the bowl containing the flour and salt. Begin mixing with a wooden spoon, dough scraper, or your hands.
Continue mixing until all of the flour has been incorporated and a rough dough forms.
Transfer the dough to a lightly floured work surface if necessary. Knead it until it becomes smooth, soft, and reasonably elastic.
The finished dough should feel soft and supple rather than extremely dry or stiff.
4. First Rise
Place the dough into a lightly oiled bowl. Cover it with a clean kitchen towel, plastic wrap, or another suitable cover.
Leave the dough in a warm, draft-free place for at least 2 hours.
During this time, the yeast ferments the dough, producing carbon dioxide that causes it to expand. Depending on the temperature of your kitchen, the dough may rise faster or slower.
The dough is ready when it has noticeably increased in volume and looks airy and inflated.
5. Divide the Dough
Turn the risen dough onto a lightly floured work surface.
Gently press out some of the excess air without aggressively kneading the dough.
Divide the dough into approximately 8 portions.
The original measurements and portion size may not correspond exactly to eight 120 g pieces, so for accurate portions, use a kitchen scale and divide the total dough weight evenly.
6. Shape the Rolls
Take one piece of dough and gently flatten it.
Fold the edges toward the center and then roll or shape the dough into a compact oval or small loaf.
Place each shaped roll onto a baking tray lined with parchment paper, leaving enough space between them for expansion.
Repeat with the remaining pieces of dough.
7. Make the Incisions
Using a very sharp knife or bread lame, make one or more shallow cuts across the surface of each roll.
These cuts allow the bread to expand in a controlled way during baking and also give the finished rolls their attractive rustic appearance.
Dust the tops lightly with flour.
8. Second Rise
Cover the shaped rolls loosely and allow them to rise again until they have visibly increased in size.
This second fermentation is important because it helps create a lighter interior and improves the texture of the finished bread.
Do not rush this stage. The rolls should look noticeably puffed before they go into the oven.
9. Bake the Rolls
Preheat the oven to 200°C.
Place the tray in the preheated oven and bake for approximately 30 to 40 minutes.
The exact baking time will depend on the size of the rolls and the characteristics of your oven.
The rolls should develop a deep golden-brown crust and sound hollow when gently tapped on the bottom.
If they brown too quickly before they are fully baked inside, reduce the oven temperature slightly and continue baking until done.
10. Cool Before Serving
Remove the rolls from the oven and transfer them to a wire rack.
Allow them to cool for several minutes before serving. This gives the interior time to finish setting while allowing the crust to remain crisp.
For the best texture, enjoy them while they are still slightly warm.
Method
The method behind these rolls is based on traditional yeast fermentation.
First, flour and salt are combined. Fresh yeast is dissolved in lukewarm water, then combined with olive oil before being incorporated into the flour.
The dough is kneaded until it becomes smooth and cohesive. The first fermentation gives the yeast time to develop the dough and create air pockets.
After the first rise, the dough is divided and shaped into individual rolls. The shaped dough receives a second rise, allowing the rolls to become lighter and more aerated.
Finally, the rolls are scored, lightly dusted with flour, and baked at 200°C. The heat causes the water in the dough to turn into steam while the yeast produces its final burst of activity. This contributes to the expansion of the rolls and helps create their characteristic crust.
The History of Homemade Bread Rolls
Bread is one of the oldest prepared foods in human history. Long before modern ovens and commercial yeast became common, people learned that mixtures of flour and water could be transformed into nourishing bread.
Yeast fermentation eventually became an important part of breadmaking because it produced lighter and more flavorful loaves.
Small individual bread rolls developed as practical alternatives to large loaves. They were convenient to serve at family meals, carry for work or travel, and use for sandwiches.
Across Europe and the Mediterranean, rustic breadmaking traditions have produced countless variations of crusty rolls. Simple ingredients such as flour, water, salt, yeast, and olive oil remain at the heart of many traditional breads.
These Crispy Bread Rolls follow that same philosophy: simple ingredients, careful fermentation, gentle shaping, and a hot oven.
Formation and Texture
The formation of these rolls happens in several important stages.
During mixing and kneading, gluten-forming proteins in the flour develop into a network that gives the dough structure.
During fermentation, yeast produces carbon dioxide. The gluten network holds much of this gas, allowing the dough to expand.
When the dough is divided and shaped, the baker creates surface tension around each roll. This helps the individual breads maintain their shape as they rise and bake.
During baking, the heat causes rapid expansion. Moisture turns into steam, the dough sets, and the outer surface develops a golden crust.
The result should be a roll with a crisp exterior and a soft, pleasantly chewy center.
Helpful Baking Tips
Use the Correct Water Temperature
Lukewarm water is ideal for dissolving fresh yeast. Avoid very hot water because excessive heat can damage the yeast.
Give the Dough Enough Time
The two-hour minimum rising period is a useful guideline, but fermentation depends on room temperature. A cool kitchen may require additional time.
Do Not Add Too Much Flour
It can be tempting to add extra flour if the dough feels sticky. However, too much flour can produce dense rolls. Keep the dough soft and use only enough flour to make it manageable.
Score the Rolls Properly
A sharp blade makes clean cuts. Shallow scoring is generally sufficient; cutting too deeply can cause the rolls to spread.
Preheat the Oven
A fully preheated oven is essential. Starting with insufficient heat can prevent the rolls from developing their desired crust and volume.
Allow Them to Cool Slightly
Fresh bread continues to develop its interior texture after leaving the oven. Give the rolls a few minutes to cool before cutting into them.
Serving Ideas
These crispy rolls are extremely versatile.
Serve them warm alongside soups, stews, pasta, roasted vegetables, or grilled meats.
They can also be sliced and filled with cheese, vegetables, eggs, chicken, tuna, roasted meat, or other sandwich fillings.
For a simple breakfast or snack, split a warm roll and serve it with butter, olive oil, jam, honey, or cheese.
They are also excellent for dipping into soups and sauces because the crisp crust provides texture while the soft interior absorbs flavorful liquids.
Storage
Fresh bread is best enjoyed on the day it is baked.
If you have leftovers, allow them to cool completely before storing them in a bread bag or airtight container for short-term storage.
For longer storage, the baked rolls can be frozen. Wrap them securely and place them in a freezer-safe bag or container.
To refresh frozen rolls, allow them to thaw and then warm them briefly in a hot oven. This can help restore some of the crispness of the crust.
For the Lovers of Homemade Bread
Bread lovers will appreciate these rolls because they combine the simplicity of a traditional dough with the satisfying texture of freshly baked bread.
The crisp crust makes them especially enjoyable straight from the oven, while the soft center makes them suitable for sandwiches and family meals.
They are also an excellent recipe for anyone who wants to begin making homemade bread without starting with an overly complicated formula.
Conclusion
Crispy Bread Rolls are a simple example of how a few basic ingredients can create something incredibly satisfying.
With flour, water, salt, olive oil, and fresh yeast, you can create beautifully rustic rolls with a golden crust and soft interior. The most important ingredients are patience and proper fermentation.
Allow the dough enough time to rise, shape the rolls gently, give them a second rise, score the tops, and bake them in a properly heated oven.
Whether served alongside dinner, used for sandwiches, or enjoyed warm with butter and olive oil, these homemade bread rolls are a comforting addition to almost any meal.