
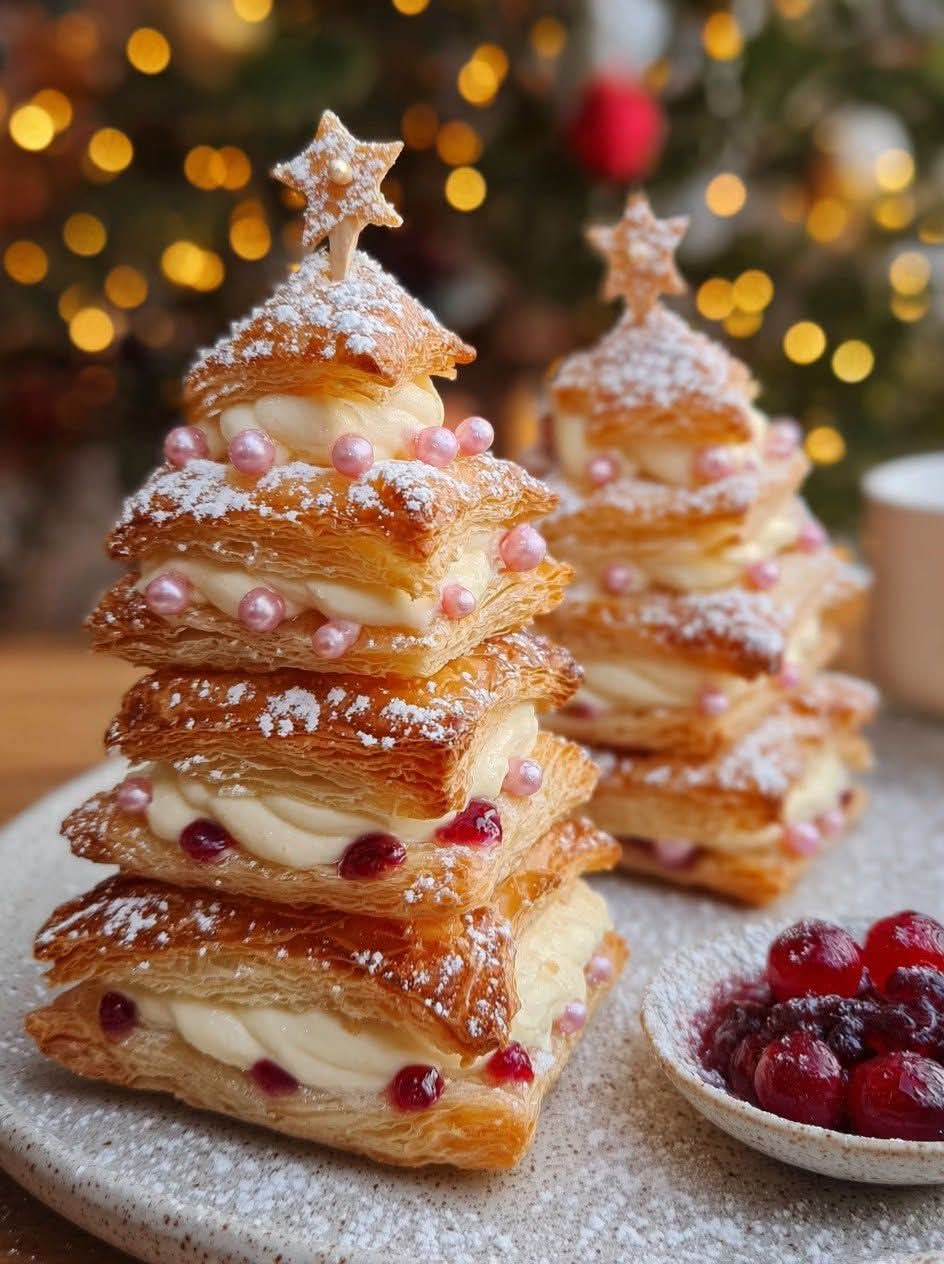
Golden Puff Pastry Christmas Trees with Silky Vanilla Cream and Sweet Berry Filling


Introduction
Golden Puff Pastry Christmas Trees with Silky Vanilla Cream and Sweet Berry Filling are a beautiful festive dessert that brings elegance, sweetness, and Christmas magic to any holiday table. Made with crisp, buttery puff pastry, smooth homemade vanilla cream, and a bright, fruity berry filling, these charming little trees look impressive but are surprisingly simple to prepare.
Each pastry features delicate, flaky layers that turn beautifully golden in the oven. Inside, the silky vanilla cream provides a rich, comforting sweetness, while the berry filling adds a refreshing fruity flavor that balances every bite. A light dusting of powdered sugar creates the appearance of freshly fallen snow, making these pastries especially lovely for Christmas celebrations.
These Christmas tree pastries are perfect for holiday breakfasts, Christmas Eve gatherings, winter parties, dessert platters, and family baking afternoons. They can be prepared with store-bought puff pastry, allowing you to create a bakery-style dessert without spending hours making dough from scratch.
Whether you serve them as individual desserts, arrange them on a festive platter, or enjoy them with a warm cup of tea or coffee, these golden pastry trees are guaranteed to make your holiday table feel extra special.
Preparation and Cooking Information
- Preparation time: 30 minutes
- Chilling time: 20 minutes
- Baking time: 15–20 minutes
- Total time: Approximately 1 hour 10 minutes
- Servings: 8 individual pastry trees
- Difficulty: Easy to moderate
- Cuisine: European-inspired festive baking
- Best occasion: Christmas, winter celebrations, and holiday parties
Ingredients

For the puff pastry Christmas trees
- 2 sheets frozen puff pastry, approximately 17 oz (480 g) total, thawed but still cold
- 1 large egg
- 1 tablespoon milk
- 1 tablespoon granulated sugar, optional
- 2 tablespoons powdered sugar, for decoration
- 8 small wooden skewers or sturdy paper cake picks, optional for presentation
For the silky vanilla cream
- 2 cups whole milk (480 ml)
- 4 large egg yolks
- ½ cup granulated sugar (100 g)
- 3 tablespoons cornstarch
- 2 tablespoons unsalted butter (28 g)
- 2 teaspoons vanilla extract
- 1 small pinch of salt
For the sweet berry filling
- ¾ cup raspberry or strawberry jam (approximately 240 g)
- ½ cup fresh raspberries, chopped strawberries, or mixed berries
- 1 teaspoon fresh lemon juice
- 1 teaspoon cornstarch, optional if the jam is particularly runny
- 1 tablespoon water, if needed
Optional finishing touches
- Fresh raspberries or small strawberries
- White chocolate curls
- Finely chopped pistachios
- Extra powdered sugar
- A little melted white chocolate for drizzling
Instructions
Step 1: Prepare the silky vanilla cream
- Pour the milk into a medium saucepan and heat over medium-low heat until steaming. Do not allow it to boil vigorously.
- In a separate mixing bowl, whisk together the egg yolks, granulated sugar, cornstarch, and salt until the mixture becomes smooth and pale.
- Slowly pour approximately half a cup of the warm milk into the egg mixture while whisking continuously. This gradually warms the yolks and helps prevent scrambling.
- Slowly whisk the egg mixture back into the saucepan with the remaining milk.
- Cook over medium-low heat, stirring constantly with a whisk, until the mixture thickens into a smooth custard. Once bubbling gently, continue cooking for approximately 30–60 seconds while whisking.
- Remove the saucepan from the heat. Stir in the butter and vanilla extract until completely incorporated.
- Transfer the cream to a shallow bowl. Cover the surface directly with plastic wrap to prevent a skin from forming.
- Refrigerate until completely cold and firm enough to pipe or spread, approximately 1–2 hours.
Important tip: The cream must be cold before filling the pastries. Warm custard can soften the pastry and make the finished trees difficult to handle.
Step 2: Prepare the sweet berry filling
- Place the berry jam in a small saucepan with the lemon juice.
- Add the chopped fresh berries and stir gently.
- Warm over low heat for 2–3 minutes, just until the mixture becomes slightly looser and the fruit begins to release its juices.
- If the mixture is too runny, mix the optional cornstarch with one tablespoon of cold water. Stir it into the berries and simmer briefly until thickened.
- Remove from the heat and allow the filling to cool completely.
The berry filling should be thick enough to stay inside the pastry trees without running down the sides.
Step 3: Prepare the puff pastry
- Preheat the oven to 400°F (200°C), or 375°F (190°C) for a fan-assisted oven.
- Line two baking trays with parchment paper.
- Lightly flour your work surface and unfold the thawed puff pastry sheets.
- If necessary, gently roll the pastry to smooth out the folds without making it too thin.
- Cut each sheet into Christmas tree shapes using a sharp knife or a tree-shaped cutter. Aim for approximately 16 tree shapes in total, depending on the size of your pastry sheets.
- Pair the shapes into matching sets of two for each pastry tree.
- Place half of the shapes on the prepared baking trays. If desired, place a small wooden skewer vertically through the center of each base, leaving enough of the skewer exposed to serve as a handle. Use only oven-safe skewers.
- Keep the remaining pastry shapes cold while you work.
For a more decorative appearance, use a knife to cut small branches along the edges of each tree without cutting all the way through the center.
Step 4: Assemble the pastry trees
- Beat the egg with the tablespoon of milk to make an egg wash.
- Brush a thin layer of egg wash around the edges of each pastry base.
- Spoon a small amount of the cooled berry filling into the center, leaving a clear border around the edges.
- Add a small spoonful of chilled vanilla cream over the berry layer. Do not overfill, because too much filling can leak during baking.
- Place a matching pastry tree on top and gently press around the edges to seal.
- Use the back of a fork to press the edges lightly if needed.
- Brush the tops with egg wash. Sprinkle with a little granulated sugar if you want a slightly crisp, sparkling finish.
- Refrigerate the assembled pastries for 15–20 minutes before baking. This helps the pastry hold its shape and puff up beautifully.
Baker’s tip: Keep the filling away from the outer edges. A clean border helps the pastry layers rise and keeps the trees looking neat.
Step 5: Bake until golden and flaky


- Place the chilled pastries in the preheated oven.
- Bake for 15–20 minutes, or until the pastry has puffed up and turned a deep golden brown.
- Rotate the trays halfway through baking if your oven heats unevenly.
- If the pastry browns too quickly, reduce the oven temperature slightly and continue baking until the layers are fully cooked.
- Remove the trays from the oven and let the pastries rest for 5 minutes.
- Transfer them carefully to a wire rack and allow them to cool.
The pastry should be crisp and golden on the outside, with the filling hot and fully cooked inside.
Because the custard is already cooked before assembly, the baking time is intended primarily to puff and brown the pastry. Avoid using excessive filling, which can prevent the center from baking properly.
Step 6: Decorate the Christmas trees
- Once the pastries have cooled, dust them lightly with powdered sugar to create a snowy effect.
- Add a small fresh raspberry or strawberry piece to the top of each tree if desired.
- Drizzle with melted white chocolate for an elegant bakery-style finish.
- Sprinkle with finely chopped pistachios for a little color and crunch.
- Arrange the pastries on a serving platter with fresh berries around the edges.
For the prettiest presentation, keep the decoration simple. The golden pastry, white vanilla cream, and ruby-red berry filling already create a beautiful Christmas color combination.
Methods for the Best Results
Method 1: The traditional layered method
This method uses a bottom pastry layer, a small amount of berry filling, vanilla cream, and a second pastry layer. It produces a filled pastry that resembles a miniature Christmas tree hand pie.
It is ideal when you want the filling enclosed inside the pastry for easy serving.
Method 2: The open-faced Christmas tree method
For a lighter and more decorative dessert, bake the Christmas tree pastry shapes without filling. Let them cool completely, then pipe vanilla cream onto each tree and spoon the berry filling over the cream.
This approach gives the dessert a more delicate, patisserie-style appearance and prevents the custard from affecting the pastry during baking.
Method 3: The sandwich pastry method
Bake the pastry trees separately, then split each tree horizontally once completely cool. Pipe vanilla cream and berry jam between the layers.
This method gives you particularly crisp pastry because the filling is added after baking. It is also an excellent choice if you want clearly visible layers of cream and fruit.
My recommendation: Choose the sandwich pastry method if your priority is maximum crispness. Choose the enclosed method if you prefer a neat, portable pastry for a Christmas buffet.
The History and Inspiration Behind the Recipe
Puff pastry has a long history in European baking, where layers of dough and butter have been used to create delicate, airy pastries for both sweet and savory dishes. Its distinctive texture comes from the repeated layering of dough and fat, which produces steam in the oven and separates the dough into thin, crisp sheets.
Vanilla custard is another classic element of European pastry making. Known in different forms as pastry cream or crème pâtissière, it is used in cream puffs, fruit tarts, éclairs, layered cakes, and many other traditional desserts.
Fruit preserves have long been paired with custards because their sweetness and gentle acidity complement the rich flavor of dairy and eggs. Raspberry and strawberry fillings are especially popular for festive desserts because their deep red color contrasts beautifully with pale cream and golden pastry.
The Christmas tree shape is a modern festive presentation inspired by one of the most recognizable symbols of the holiday season. Home bakers and pastry chefs frequently adapt familiar recipes into seasonal shapes to make desserts more memorable and visually appealing.
These Golden Puff Pastry Christmas Trees combine those classic ideas into one approachable holiday treat. They are not presented as a single historic traditional recipe, but rather as a festive creation inspired by European pastry techniques and Christmas baking traditions.
Formation and Presentation
The secret to a beautiful Christmas tree pastry is the balance between its shape, texture, filling, and decoration.
- The tree silhouette: Cut matching shapes so the tops and branches line up neatly.
- The golden exterior: Egg wash helps the pastry develop a shiny, appetizing finish.
- The flaky layers: Cold pastry and a hot oven help create a light, crisp texture.
- The creamy center: Properly chilled vanilla custard gives the filling a smooth, luxurious consistency.
- The berry contrast: Raspberry or strawberry filling provides a fruity flavor and a festive red color.
- The snowy finish: Powdered sugar gives the trees a simple winter-inspired appearance.
For a Christmas dessert platter, arrange the trees in rows on a white serving plate and scatter a few fresh berries around them. You can also place them upright in small dessert holders, provided the pastries are sturdy enough to stand.
For a more luxurious presentation, add a little white chocolate drizzle and a few chopped pistachios. Avoid decorating the pastries while they are warm, because the powdered sugar will dissolve and the cream may soften.
Helpful Tips and Common Mistakes
1. Do not use warm filling. Hot berry jam or vanilla cream can melt the butter in the pastry before it enters the oven.
2. Avoid overfilling. Too much custard or jam can escape through the seams and leave the pastry soggy.
3. Keep the pastry cold. If the dough becomes soft while cutting or assembling, refrigerate it briefly before baking.
4. Seal the edges gently. Pressing too hard can flatten the pastry layers and prevent them from rising evenly.
5. Bake until deeply golden. Pale puff pastry may look finished on the outside while remaining underbaked in thicker areas.
6. Chill the custard thoroughly. Cold custard is easier to handle and reduces the risk of a runny filling.
7. Add powdered sugar at the end. Wait until the pastries are cool to achieve the best snowy appearance.
Variations to Try

Raspberry Vanilla Christmas Trees
Use seedless raspberry jam and fresh raspberries for a bright, slightly tart filling that balances the sweet vanilla cream.
Strawberry Cream Christmas Trees
Replace the raspberry filling with strawberry preserves and small pieces of fresh strawberry for a sweeter, softer fruit flavor.

White Chocolate Christmas Trees
Drizzle cooled pastries with melted white chocolate and finish with a few finely chopped pistachios.

Mixed Berry Christmas Trees
Combine raspberry, blueberry, and strawberry preserves for a colorful fruit filling with a deeper berry flavor.
Storage and Make-Ahead Instructions
- Vanilla cream: Prepare up to 2 days ahead and refrigerate in an airtight container with plastic wrap touching its surface.
- Berry filling: Prepare up to 4–5 days ahead and store in a clean, sealed container in the refrigerator.
- Unfilled baked pastry shapes: Store in an airtight container at room temperature for up to 2 days, provided they are completely cool and kept dry.
- Assembled pastries: Because they contain custard, refrigerate promptly and consume within 2 days for best quality. Do not leave them at room temperature for more than 2 hours.
- Reheating: If you have baked filled pastries, reheat them briefly in a low oven only if needed, then cool before serving. The cream may soften, so the best texture is usually achieved fresh.
- Freezing: Freeze unfilled baked pastry shapes for better results. Thaw and crisp them in the oven, then add the chilled cream and berry filling.
Frequently Asked Questions
Can I use store-bought puff pastry?
Yes. Store-bought puff pastry is ideal for this recipe and makes the preparation much easier. Thaw it according to the package instructions while keeping it cold.
Can I use instant vanilla pudding instead of homemade cream?
Yes. Prepare a thick vanilla pudding according to the package directions and chill it completely before using. Homemade pastry cream generally offers a richer flavor and more traditional custard texture.
Can I make these pastries without fresh berries?
Absolutely. Thick raspberry, strawberry, or mixed berry jam works well on its own. Fresh fruit is an optional addition rather than a requirement.
Why did my pastry trees become soggy?
The most common reasons are overly wet filling, warm custard, insufficient baking, or storing the pastries while they are still warm. Allow the filling to cool, keep the layers thin, and bake until the pastry is thoroughly golden.
Can I prepare the whole dessert the day before Christmas?
You can prepare the custard and berry filling in advance. For the best crispness, bake the pastry and assemble the dessert as close to serving time as possible. If you assemble the pastries ahead, refrigerate them because of the custard filling.
Can I make smaller trees for a party?
Yes. Cut smaller tree shapes and begin checking them after about 10–12 minutes of baking. The exact time depends on their thickness and your oven.
Conclusion
Golden Puff Pastry Christmas Trees with Silky Vanilla Cream and Sweet Berry Filling are the perfect combination of festive appearance and comforting flavor. Their crisp, buttery layers, smooth vanilla custard, and sweet berry center make every bite feel special.
The recipe is flexible enough for beginner bakers, yet elegant enough to serve at a Christmas dinner or holiday party. With a little preparation and a few simple ingredients, you can create a dessert that looks as though it came straight from a pastry shop.
Serve these beautiful trees with coffee, tea, hot chocolate, or a glass of cold milk. Whether you choose raspberry, strawberry, or mixed berry filling, the result will be a delightful addition to your Christmas traditions.
For the Lovers of Christmas Baking
If you love desserts that combine golden pastry, creamy vanilla filling, and fruity sweetness, this recipe deserves a place in your holiday collection. It is a wonderful way to bring family and friends together in the kitchen, share the joy of homemade baking, and create something beautiful for the most wonderful time of the year.
These Christmas tree pastries are more than just a sweet treat. They are an opportunity to make memories, decorate a festive table, and share a little homemade happiness with the people you love.
Baking note: For the crispest pastry and the cleanest layers, the open-faced or sandwich method is the most reliable choice when using homemade custard. If you prefer fully enclosed pastries, use a modest amount of filling and seal the edges carefully.
Enjoy your Golden Puff Pastry Christmas Trees with Silky Vanilla Cream and Sweet Berry Filling, and make them part of your sweetest holiday traditions.