
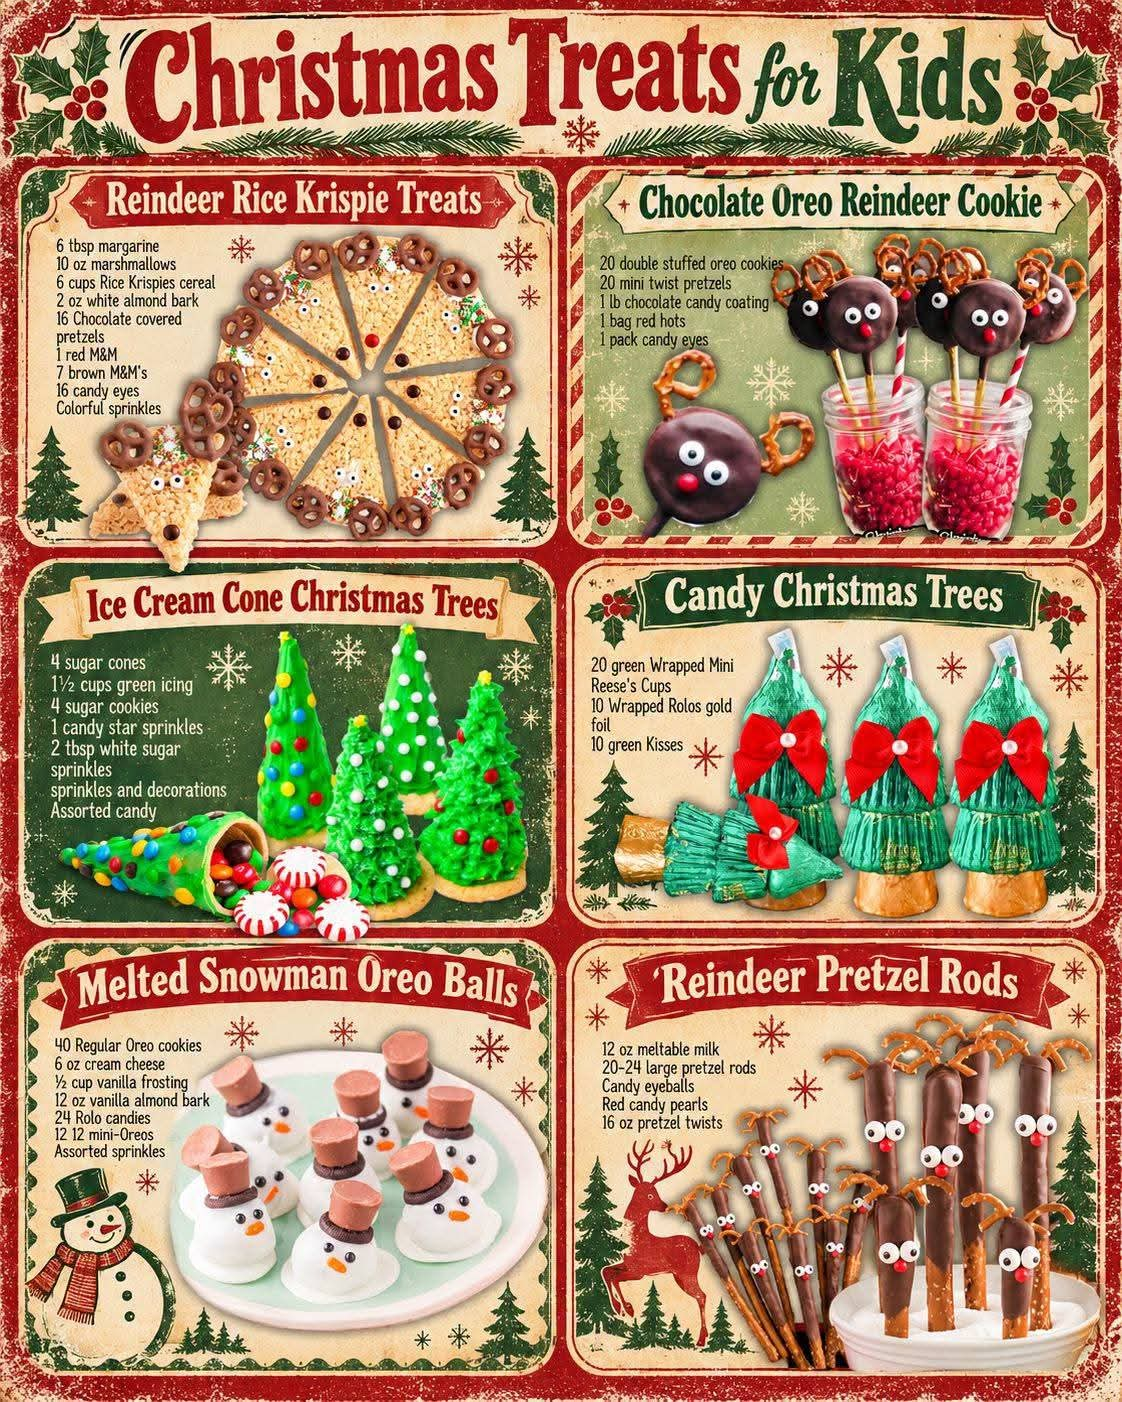
Kid-Friendly Christmas Treats: Reindeer, Snowmen, and Christmas Trees
Introduction
Christmas is the perfect time to gather the family in the kitchen and create sweet, festive treats that everyone will remember. From adorable reindeer with chocolate-covered pretzel antlers to Oreo snowmen that look as if they have melted in the winter sun, these Christmas desserts bring holiday magic to every table.
This collection features six fun and delicious Christmas treats: Reindeer Rice Krispies Treats, Oreo Reindeer Cookies, Ice Cream Cone Christmas Trees, Candy Christmas Trees, Melted Snowman Oreo Balls, and Reindeer Pretzel Rods. Each recipe uses familiar ingredients, colorful candies, chocolate, cookies, or crispy cereal to create playful holiday desserts.
These treats are ideal for Christmas parties, school celebrations, family gatherings, cookie exchanges, holiday dessert tables, and homemade edible gifts. Children can help decorate the treats with candy eyes, pretzels, sprinkles, and colorful candies, making the preparation just as enjoyable as eating them.
Whether you are planning a Christmas baking afternoon or simply looking for easy holiday sweets, this collection has something for everyone.
1. Reindeer Rice Krispies Treats

These adorable reindeer treats combine crispy rice cereal, gooey marshmallows, and melted margarine with chocolate-covered pretzels, candy eyes, and red noses. They are easy to shape, fun to decorate, and perfect for children who love festive snacks.
Ingredients
- 6 tablespoons margarine
- 10 ounces marshmallows
- 6 cups Rice Krispies cereal
- 2 ounces white almond bark
- 16 chocolate-covered pretzels
- 1 red M&M candy
- 7 brown M&M candies
- 16 candy eyes
- Colorful sprinkles, as desired
Instructions
- Prepare the pan: Lightly grease a rectangular baking pan or line it with parchment paper.
- Melt the margarine: Place the margarine in a large saucepan over low heat and stir until completely melted.
- Add marshmallows: Add the marshmallows and stir continuously until smooth and melted. Avoid overheating the mixture.
- Mix in cereal: Remove the saucepan from the heat. Add the Rice Krispies cereal and stir until every piece is coated.
- Shape the treats: Transfer the mixture to the prepared pan. Lightly grease your hands or a spatula and gently press the cereal mixture into an even layer without packing it too tightly.
- Cool and cut: Allow the mixture to cool until firm enough to handle. Cut it into rectangular or square pieces.
- Prepare the decorations: Melt the white almond bark according to the package directions. Use a little melted coating to attach the candy eyes, red or brown M&M noses, and chocolate-covered pretzel antlers.
- Add sprinkles: Decorate with colorful sprinkles while the coating is still soft.
- Set and serve: Allow the decorations to harden before arranging the reindeer treats on a serving platter.
Method and preparation tips
The secret to soft, chewy Rice Krispies treats is to melt the marshmallows gently and avoid pressing the cereal mixture too firmly into the pan. Greased hands make shaping much easier.
For a neat appearance, position the pretzel antlers at the top of each piece, the eyes just below them, and the candy nose near the center.
Yield: Approximately 12–16 treats, depending on how large you cut them.
2. Oreo Reindeer Cookies

Oreo Reindeer Cookies are a wonderful no-bake Christmas dessert made with sandwich cookies, chocolate candy coating, pretzel antlers, and bright red noses. They look impressive on a holiday platter but require only a handful of simple decorating steps.
Ingredients
- 20 double-stuffed Oreo cookies
- 20 mini twist pretzels
- 1 pound chocolate candy coating
- 1 bag red hots candies
- 1 package candy eyes
Instructions
- Line a baking sheet with parchment paper.
- Break or carefully separate the mini pretzels into antler shapes if necessary.
- Melt the chocolate candy coating according to the package directions, stirring until smooth.
- Dip each Oreo cookie into the melted chocolate, using a fork to lift it out and allow excess coating to drip away.
- Place the coated cookies on the prepared baking sheet.
- While the coating is still wet, insert two pretzel pieces at the top of each cookie to create antlers.
- Attach two candy eyes near the upper center of each cookie.
- Add one red hot candy near the lower center to create the reindeer’s nose.
- Repeat with the remaining cookies.
- Allow the chocolate coating to set completely before removing the cookies from the parchment paper.
Method and decorating tips
For a smooth chocolate finish, make sure the cookies are at room temperature and the coating is fully melted. If the chocolate becomes too thick while decorating, gently rewarm it according to the package instructions.
Work in small batches so the coating remains soft enough to hold the antlers, eyes, and noses. If a decoration slips, use a tiny dab of melted chocolate as edible glue.
Yield: 20 reindeer cookies.
3. Ice Cream Cone Christmas Trees

These charming edible Christmas trees transform ordinary sugar cones into colorful holiday decorations. Green icing creates the branches, while sprinkles, small candies, and star toppers turn each cone into a miniature Christmas tree.
This recipe is particularly enjoyable for children because they can decorate their own trees and choose their favorite candy ornaments.
Ingredients
- 4 sugar cones
- 1½ cups green icing
- 4 sugar cookies
- 4 candy star sprinkles
- 2 tablespoons white sugar sprinkles
- Additional sprinkles and decorations
- Assorted candies
Instructions
- Arrange the sugar cookies on a tray or serving platter. These will serve as the bases for the trees.
- Turn each sugar cone upside down so its wide opening faces downward.
- Place a small amount of green icing around the edge of the cone and position it on a sugar cookie.
- Transfer the remaining green icing into a piping bag fitted with a small star or round tip. A resealable bag with a tiny corner cut off can also work.
- Pipe small dots, stars, or short zigzag lines of green icing around the cone, starting at the bottom and working upward.
- Decorate the icing with colorful sprinkles and assorted candies to resemble Christmas ornaments.
- Sprinkle white sugar decorations over the trees to create a snowy effect.
- Place one candy star sprinkle on the top of each tree.
- Allow the icing to set slightly before moving the trees to the dessert table.
Method and decorating tips
Use icing that is thick enough to cling to the cones without sliding. If the icing is too soft, refrigerate it briefly before piping.
Small candies, mini chocolate pieces, and edible pearls make excellent tree decorations. For a winter scene, arrange the finished trees on a platter dusted with powdered sugar.
Adult supervision is recommended when young children handle small candies and fragile sugar cones.
Yield: 4 decorated Christmas trees.
4. Candy Christmas Trees

Candy Christmas Trees are a simple festive treat that combines individually wrapped chocolates into miniature holiday decorations. Their layered appearance makes them an attractive addition to a dessert table, party favor basket, or Christmas candy display.
This recipe is especially convenient when you want something festive without baking or melting large quantities of chocolate.
Ingredients
- 20 green-wrapped mini Reese’s Cups
- 10 gold-foil-wrapped Rolo candies
- 10 green Hershey’s Kisses
Instructions
- Check that the candy wrappers are clean and undamaged.
- Unwrap the green mini peanut butter cups if the green packaging refers to a decorative outer wrapper rather than an edible candy coating.
- Arrange the peanut butter cups, Rolos, and green chocolate kisses on a clean work surface.
- Create small tree-shaped arrangements by stacking or positioning the candies from widest at the bottom to narrowest at the top.
- Use the green mini peanut butter cups as the base, gold-wrapped Rolos as decorative middle pieces, and green chocolate kisses as pointed tree tops.
- If you want the pieces to stay together, use a small amount of melted chocolate between the candy components, ensuring that all wrappers are removed from the pieces being joined.
- Let any melted chocolate set before serving.
- Arrange the candy trees on a festive platter or place them in small treat bags for gifting.
Method and decorating tips
The exact arrangement depends on the size and shape of the candies available. For a more stable display, assemble the treats on a small paper or chocolate base.
Important: Remove all wrappers from candy that will be eaten together. Foil-wrapped Rolos and wrapped peanut butter cups should never be stacked in a way that conceals foil or plastic inside a bite-sized treat.
Yield: Approximately 10 small candy-tree arrangements, depending on the design.
5. Melted Snowman Oreo Balls

Melted Snowman Oreo Balls are playful holiday truffles made with crushed Oreo cookies, cream cheese, vanilla frosting, and a smooth vanilla coating. Their intentionally uneven white coating gives them the appearance of snowmen melting in the winter sunshine.
Finished with chocolate candy hats and colorful sprinkles, these sweet treats are perfect for Christmas parties and family dessert platters.
Ingredients
- 40 regular Oreo cookies
- 6 ounces cream cheese, softened
- ½ cup vanilla frosting
- 12 ounces vanilla almond bark
- 24 Rolo candies
- 12 mini Oreo cookies
- Assorted sprinkles
Instructions
- Crush the cookies: Place the Oreo cookies in a food processor and pulse until finely crushed. Alternatively, place them in a sealed bag and crush them with a rolling pin.
- Make the filling: Transfer the crumbs to a bowl. Add the softened cream cheese and vanilla frosting.
- Mix thoroughly: Stir until the ingredients form a thick, evenly combined mixture.
- Shape the balls: Roll the mixture into small balls and place them on a parchment-lined baking sheet.
- Chill: Refrigerate the balls for approximately 30–60 minutes, or until firm.
- Melt the almond bark: Follow the package directions, stirring until the coating is smooth.
- Coat the Oreo balls: Dip each chilled ball into the melted almond bark. Place it back on the parchment paper and allow some coating to spread around the base to create the melted-snow effect.
- Make the hats: Use the Rolo candies and mini Oreo cookies to create small snowman hats. Remove all wrappers from the candies before assembly. Attach each hat with a little melted coating.
- Add decorations: Sprinkle the soft coating with colorful edible decorations.
- Chill again: Refrigerate until the coating has completely set.
Method and decorating tips
Chilling the Oreo mixture is essential because it makes the balls easier to dip and helps them retain their shape.
For the melted appearance, do not worry about making the coating perfectly round. Let a little extra coating pool around the base of each ball.
Keep the finished Oreo balls refrigerated because the filling contains cream cheese. Store them in an airtight container and avoid leaving them at room temperature for extended periods.
Yield: Approximately 20–24 Oreo balls, depending on their size.
6. Reindeer Pretzel Rods

Reindeer Pretzel Rods combine the salty crunch of pretzels with a sweet chocolate coating and adorable reindeer decorations. They are easy to serve, simple to package, and ideal for homemade Christmas gifts.
Their long shape makes them especially appealing for children who enjoy handheld treats.
Ingredients
- 12 ounces meltable milk chocolate
- 20–24 large pretzel rods
- Candy eyeballs
- Red candy pearls
- 16 ounces pretzel twists
Instructions
- Line a baking sheet with parchment paper.
- Break the pretzel twists into small antler-shaped pieces. Prepare two antler pieces for each reindeer.
- Melt the milk chocolate according to the package directions, stirring until smooth.
- Dip each pretzel rod into the melted chocolate, covering approximately half to two-thirds of its length. Leave enough of the bottom uncovered for easy handling.
- Lay the coated rods on the parchment-lined baking sheet.
- While the chocolate is still soft, position two candy eyes near the top of each coated section.
- Add one red candy pearl below the eyes to create the nose.
- Carefully press two pretzel pieces into the chocolate near the top to form antlers.
- Repeat with the remaining pretzel rods, working in small batches.
- Allow the chocolate to set completely before lifting the pretzel rods from the parchment paper.
Method and decorating tips
If the pretzel antlers do not stay in place, add a small amount of melted chocolate where each antler meets the rod. Hold the pieces in place briefly until they begin to set.
For an attractive gift, wrap each finished rod individually in food-safe cellophane and tie with a festive ribbon. Store in a cool, dry place.
Yield: Approximately 20–24 reindeer pretzel rods.
The History of Christmas Treats
Christmas sweets have long been part of winter celebrations around the world. In many European traditions, families prepared biscuits, gingerbread, fruitcakes, and spiced pastries to share with relatives and neighbors. Over time, these customs developed into the familiar holiday baking traditions enjoyed today.
In the United States, Christmas cookies, fudge, candy canes, and homemade confectionery became popular additions to family celebrations. The development of convenient packaged cookies, breakfast cereals, marshmallows, and ready-to-melt chocolate coatings made it easier for home cooks to create festive treats without complicated baking techniques.
Rice Krispies treats became a popular no-bake dessert during the twentieth century, while Oreo-based desserts and chocolate-covered pretzel snacks offered new ways to combine familiar flavors with creative decorations.
The modern tradition of decorating food as reindeer, snowmen, and Christmas trees reflects a playful side of holiday cooking. These treats are less about elaborate pastry techniques and more about imagination, family participation, and the joy of sharing something homemade.
Although these six recipes are modern interpretations rather than ancient traditional dishes, they carry forward the same spirit of generosity and celebration that makes Christmas desserts special.
Formation and Presentation: Creating a Christmas Dessert Table
The presentation of these treats can turn a simple collection of sweets into a beautiful Christmas centerpiece.
Step 1: Choose a festive arrangement
Use a large serving tray or several smaller platters. Group similar treats together so guests can easily identify the reindeer, snowmen, and Christmas trees.
Step 2: Create different heights
Place the Rice Krispies reindeer and Oreo cookies on flat platters. Arrange the Christmas tree cones toward the back of the table or on a raised stand. Place the pretzel rods in a tall jar or standing holder, ensuring they remain stable and protected.
Step 3: Add seasonal colors
Green, red, white, brown, and gold work beautifully together. Use red candy noses for the reindeer, white coatings for the snowmen, and green icing for the Christmas trees.
Step 4: Include homemade gift packages
Place a few cookies or pretzel rods in food-safe bags. Add a simple label with the treat’s name and the date it was prepared. These make thoughtful gifts for teachers, neighbors, friends, and family members.
Step 5: Make decorating a family activity
Prepare the ingredients in advance and give each child a small selection of decorations. Younger children can add sprinkles and candies, while adults handle hot melted chocolate and any cutting that requires sharp tools.
Step 6: Keep the treats fresh
- Store Rice Krispies treats and chocolate-coated cookies in airtight containers.
- Keep cream-cheese Oreo balls refrigerated.
- Protect sugar-cone trees from moisture so they remain crisp.
- Store chocolate treats in a cool, dry location away from direct sunlight.
- Check ingredient labels for allergens, particularly dairy, peanuts, wheat, and soy.
Methods for Successful Christmas Treat Making
A few simple techniques can make all six recipes easier and more enjoyable to prepare.
Melt chocolate gently. Use short microwave intervals or a double boiler, following the coating manufacturer’s instructions. Chocolate that overheats can become thick and difficult to work with.
Prepare decorations first. Place candy eyes, pretzel pieces, noses, sprinkles, and other decorations in separate bowls before melting the chocolate. This makes assembly faster and reduces the risk of the coating setting before the decorations are attached.
Work in small batches. Decorate a few pieces at a time so the chocolate remains soft enough to hold the candy securely.
Use parchment paper. It prevents sticking and makes cleanup easier. It also allows the treats to be moved after the chocolate has set.
Keep children’s tasks age-appropriate. Children can mix cooled ingredients, place sprinkles, and decorate finished shapes. Adults should handle hot pans, melted coatings, and sharp utensils.
Plan for food allergies. Oreo products, peanut butter cups, candy coatings, and pretzels may contain or come into contact with common allergens. Check packaging carefully and choose suitable alternatives when necessary.
Conclusion
These six kid-friendly Christmas treats prove that holiday desserts do not have to be complicated to be memorable. Reindeer Rice Krispies Treats offer a chewy cereal base, Oreo Reindeer Cookies bring chocolatey charm, and Ice Cream Cone Christmas Trees add color and creativity to the dessert table.
Candy Christmas Trees provide a quick no-bake option, Melted Snowman Oreo Balls deliver rich cookie-and-cream flavor, and Reindeer Pretzel Rods balance sweet chocolate with salty crunch.
Together, they create a festive collection suitable for Christmas parties, school celebrations, family baking days, and homemade gifts. Most importantly, these recipes give children and adults an opportunity to spend time together, share ideas, and make delicious memories during the holiday season.
For Christmas Treat Lovers
If you love easy Christmas desserts, colorful candy decorations, and recipes that bring the whole family into the kitchen, this collection is a wonderful place to start.
Make one treat for a quiet afternoon at home, prepare several for a Christmas party, or create all six for a spectacular holiday dessert table. You can even turn the decorating process into a friendly family competition to see who creates the cutest reindeer, the funniest snowman, or the prettiest Christmas tree.
Which treat would you make first: Reindeer Rice Krispies Treats, Oreo Reindeer Cookies, Ice Cream Cone Christmas Trees, Candy Christmas Trees, Melted Snowman Oreo Balls, or Reindeer Pretzel Rods?
The best Christmas treats are the ones made with care, shared with loved ones, and remembered long after the holiday decorations come down.