
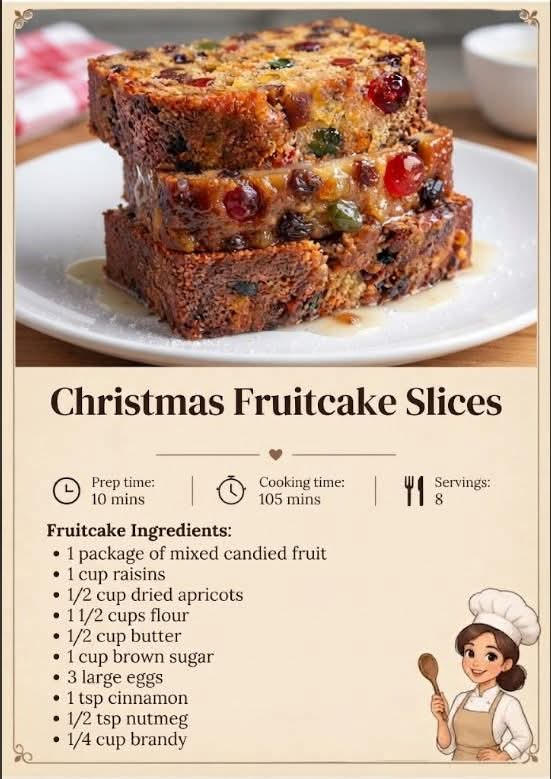
Classic Christmas Fruitcake
Introduction
Christmas Fruitcake is one of those traditional desserts that brings back memories of family gatherings, holiday tables, and festive baking. Rich, moist, fragrant, and filled with colorful dried fruits and nuts, this classic cake is made for slicing and sharing.
The secret to a wonderful fruitcake is patience. The dried fruit needs time to soften, the spices need time to blend, and the finished cake benefits from resting after baking. The result is a deeply flavored cake with a tender crumb and a beautiful combination of fruit, nuts, warm spices, and buttery sweetness.
This recipe is perfect for Christmas celebrations, holiday parties, homemade food gifts, or simply enjoying a slice with tea or coffee.
Ingredients
For the Fruit Mixture
- 2 cups mixed dried fruit
- 1 cup raisins
- 1 cup dried cranberries
- 1 cup chopped dates or dried figs
- 1/2 cup candied cherries
- 1/2 cup candied orange or lemon peel
- 1 cup orange juice
- 1/2 cup water
- 2 tablespoons honey or maple syrup
For the Cake
- 2 1/2 cups all-purpose flour
- 1 teaspoon baking powder
- 1/2 teaspoon baking soda
- 1/2 teaspoon salt
- 2 teaspoons ground cinnamon
- 1 teaspoon ground nutmeg
- 1/2 teaspoon ground ginger
- 1/4 teaspoon ground cloves
- 1 cup unsalted butter, softened
- 1 cup brown sugar
- 1/2 cup granulated sugar
- 4 large eggs
- 2 teaspoons vanilla extract
- 1 tablespoon orange zest
- 1/2 cup milk
- 1 cup chopped walnuts or pecans
- 1/2 cup chopped almonds, optional
For Finishing
- 2 to 3 tablespoons orange juice or apple juice
- A small amount of powdered sugar for dusting, optional
Instructions
Step 1: Prepare the Fruit
Place the dried fruit, raisins, cranberries, dates or figs, candied cherries, and candied citrus peel in a saucepan.
Add the orange juice, water, and honey or maple syrup. Warm the mixture over medium-low heat until the liquid is hot and the fruit begins to soften.
Do not boil aggressively. The goal is simply to hydrate the fruit and allow it to absorb some of the citrus flavor.
Remove from the heat and allow the fruit mixture to cool completely.
For an even richer flavor, the fruit can be prepared several hours ahead or soaked overnight in the refrigerator.
Step 2: Prepare the Oven and Pan
Preheat the oven to 325°F (165°C).
Grease a deep 9-inch round cake pan or a loaf pan. Line the bottom with parchment paper and lightly grease the parchment.
Because fruitcake is dense and requires a longer baking time, parchment helps prevent sticking and makes the finished cake easier to remove.
Step 3: Mix the Dry Ingredients
In a large bowl, whisk together the flour, baking powder, baking soda, salt, cinnamon, nutmeg, ginger, and cloves.
Set the mixture aside.
The combination of warm spices is an important part of the traditional Christmas fruitcake flavor.
Step 4: Cream the Butter and Sugar
In another large bowl, beat the softened butter, brown sugar, and granulated sugar until light and creamy.
This may take several minutes.
Add the eggs one at a time, beating well after each addition. Stir in the vanilla extract and orange zest.
The mixture may look slightly uneven after adding the eggs, but it will come together when the dry ingredients are added.
Step 5: Combine the Batter
Add approximately one-third of the dry ingredients to the butter mixture.
Mix gently.
Add half of the milk and continue mixing.
Repeat with another portion of the flour mixture, followed by the remaining milk, and finish with the remaining dry ingredients.
Do not overmix. Stop as soon as the batter is combined.
Step 6: Add the Fruit and Nuts
Drain any excess liquid from the cooled fruit mixture if necessary.
Fold the prepared fruit and chopped nuts into the batter using a large spatula.
Make sure the fruit and nuts are distributed evenly throughout the mixture.
The batter should be thick and packed with fruit.
Step 7: Fill the Pan
Transfer the batter to the prepared cake pan.
Spread the top evenly with a spatula and gently tap the pan against the counter a few times to remove large air pockets.
Do not press the batter down too firmly.
Step 8: Bake
Place the cake in the center of the preheated oven.
Bake for approximately 75 to 100 minutes, depending on the size and depth of your pan.
Begin checking toward the end of the baking time. A toothpick inserted into the center should come out mostly clean, although it may have a little moisture from the fruit.
If the top becomes too dark before the center is completely baked, loosely cover the cake with aluminum foil and continue baking.
Step 9: Cool
Remove the cake from the oven and allow it to cool in the pan for approximately 20 to 30 minutes.
Then carefully transfer it to a wire rack and allow it to cool completely.
Do not slice the cake while it is still hot. The texture becomes firmer and easier to slice as it cools.
Step 10: Add Extra Moisture
Once the cake has cooled, lightly brush the surface with orange juice or apple juice.
Wrap the cake tightly in parchment paper and then in plastic wrap or place it in an airtight container.
Allowing the cake to rest overnight gives the flavors time to develop and creates an even richer texture.
Methods
Traditional Soaking Method
For a classic fruitcake with particularly soft and flavorful fruit, prepare the fruit mixture one day before baking.
Combine the dried fruit with orange juice and allow it to rest overnight in the refrigerator.
The fruit absorbs the liquid and becomes plump and tender.
Slow-Baking Method
Fruitcake is best baked at a moderate temperature rather than at very high heat.
Slow baking allows the center to cook while helping prevent the outside from becoming excessively dry or dark.
If necessary, cover the cake loosely with foil during the final portion of baking.
Resting Method
Fruitcake improves after resting.
After cooling, wrap the cake tightly and leave it overnight before serving. For an even more developed flavor, it can be stored for several days in an airtight container.
Before serving, bring it to room temperature.
Serving Method
Use a sharp serrated knife to cut the cake into thin slices.
Serve it plain, with a cup of tea or coffee, or alongside whipped cream, vanilla ice cream, or a light dusting of powdered sugar.
The History of Christmas Fruitcake
Fruitcake has a long history in European baking traditions. Cakes containing dried fruits, nuts, spices, and sweeteners developed as a way of preserving valuable ingredients and creating rich desserts for special occasions.
Over time, different countries developed their own versions. In Britain and other parts of Europe, fruitcake became closely associated with Christmas and other celebrations. The tradition later spread to many other parts of the world, where families adapted the recipe according to local ingredients and customs.
The Christmas fruitcake became especially popular because dried fruits and nuts were considered special ingredients. A cake containing so many rich ingredients was naturally suited to holidays and celebrations.
Today, recipes vary enormously. Some versions are very dark and heavily spiced, while others are lighter and packed with colorful fruit. Some families add nuts, citrus, cherries, dates, or raisins, while others create their own special combinations.
Formation and Texture
A good Christmas fruitcake should be dense but not dry.
The butter contributes richness, the eggs provide structure, and the flour creates the framework that holds the fruit and nuts together. The dried fruits provide sweetness and moisture, while the spices give the cake its characteristic holiday aroma.
The finished cake should hold together when sliced without crumbling excessively.
The fruit should be tender rather than hard, and the nuts should provide a pleasant contrast to the soft cake.
Allowing the cake to rest after baking is particularly helpful because the moisture and flavors have time to distribute throughout the cake.
Helpful Tips
Use good-quality dried fruit because it makes a noticeable difference in the finished cake.
Chop larger pieces of fruit into smaller pieces so that every slice contains a balanced amount of fruit.
Do not add wet fruit directly to the batter without considering the extra moisture. Excess liquid can make the cake difficult to bake properly.
Avoid overmixing the batter after adding the flour.
Bake the cake slowly and check it toward the end of the recommended baking time.
If the top becomes dark too quickly, cover it loosely with foil.
Always allow the cake to cool completely before slicing.
For the best flavor, prepare the cake at least one day before serving.
Make It Your Own
This recipe is easy to customize.
For a more citrus-forward fruitcake, increase the amount of orange zest and candied citrus peel.
For a nut-filled version, add extra walnuts, pecans, or almonds.
For a softer fruitcake, use more dates, raisins, and cranberries.
For a more traditional spice profile, increase the cinnamon and add a small amount of allspice.
You can also replace some of the orange juice with apple juice for a softer, fruitier flavor.
How to Store Christmas Fruitcake
Once completely cooled, wrap the fruitcake tightly and store it in an airtight container.
At room temperature, it is best enjoyed within several days. For longer storage, refrigerate it in a well-sealed container.
Allow refrigerated fruitcake to come to room temperature before serving so the texture becomes softer and the flavors become more noticeable.
Individual slices can also be wrapped and frozen for longer storage.
Christmas Fruitcake Lovers
This recipe is especially enjoyable for people who love traditional holiday desserts, dried fruit, warm spices, nuts, and old-fashioned family recipes.
It is also a wonderful recipe for anyone who enjoys preparing Christmas food ahead of time. Instead of rushing to make dessert on the day of the celebration, the fruitcake can be prepared in advance and allowed to rest.
It makes a beautiful homemade gift when wrapped in parchment paper, placed in a decorative container, and shared with family, friends, neighbors, or coworkers.
Conclusion
Christmas Fruitcake is more than just a holiday dessert. It is a recipe built around tradition, patience, and sharing.
The combination of tender dried fruit, crunchy nuts, fragrant spices, orange zest, and buttery cake creates a rich dessert that feels perfectly suited to the Christmas season.
Prepare it ahead of time, allow the flavors to develop, and serve it in thin slices alongside your favorite holiday drink.
For families who love traditional Christmas baking, this is the kind of fruitcake that can become part of the holiday tradition year after year.
Christmas Oreo Balls
Introduction
Christmas Oreo Balls are one of the easiest and most festive no-bake treats you can make during the holiday season. With only a few simple ingredients, these bite-sized desserts combine crushed Oreo cookies with smooth cream cheese, then coat the mixture in creamy white candy melts.
The result is a rich, chocolatey center surrounded by a crisp candy coating. A simple green drizzle gives the Oreo balls a beautiful Christmas-inspired finish, making them perfect for cookie trays, holiday parties, family gatherings, edible gifts, and Christmas dessert tables.
Because there is no traditional baking involved, this recipe is especially convenient when you want a homemade holiday treat without spending hours in the kitchen.
Ingredients
For the Oreo Filling
- 36 Oreo cookies, about 1 standard package
- 8 ounces (226 g) cream cheese, softened
For the Coating
- 12 ounces (340 g) white candy melts
For the Decoration
- 1/2 cup green candy melts
- Optional: red or green holiday sprinkles
- Optional: crushed Oreo cookies for garnish
Instructions
1. Prepare the Oreo Cookies
Place the Oreo cookies into a food processor and pulse until they become very fine crumbs. The cookies should resemble moist chocolate-colored sand, with no large pieces remaining.
If you do not have a food processor, place the cookies in a sturdy zip-top bag and crush them with a rolling pin until finely ground.
There is no need to remove the Oreo filling. The cream inside the cookies helps create the rich texture of the truffle mixture.
2. Mix With the Cream Cheese
Place the softened cream cheese in a large mixing bowl. Add the finely crushed Oreo cookies.
Using a sturdy spatula, electric mixer, or clean hands, mix everything together until completely combined. The mixture should become thick, smooth, and easy to shape.
Make sure there are no visible streaks of cream cheese remaining.
3. Chill the Mixture
Cover the bowl and refrigerate the Oreo mixture for approximately 30 minutes.
Chilling makes the mixture firmer and much easier to roll into neat balls. If your kitchen is warm, you can chill it a little longer.
4. Form the Oreo Balls
Line a baking sheet with parchment paper or wax paper.
Scoop out approximately 1 tablespoon of the chilled mixture at a time and roll it between your palms to form a smooth ball.
Continue until all of the mixture has been used. You should have approximately 30 to 36 small Oreo balls, depending on the size you make them.
Place the formed balls on the prepared baking sheet.
For especially neat results, return the tray to the refrigerator for another 15 to 20 minutes before dipping.
5. Melt the White Candy
Place the white candy melts in a microwave-safe bowl.
Heat them in short intervals of about 20 to 30 seconds, stirring thoroughly after each interval. Continue until the candy melts are smooth and completely melted.
Do not overheat the candy melts. Gentle heating and frequent stirring help prevent them from becoming thick or scorched.
6. Coat the Oreo Balls
Using a fork, dipping tool, or toothpick, carefully place one chilled Oreo ball into the melted white candy.
Turn it gently until completely coated.
Lift the ball out and allow excess coating to drip back into the bowl. Place the coated Oreo ball onto the parchment-lined baking sheet.
Repeat with the remaining Oreo balls.
If the candy coating begins to thicken while you work, warm it again briefly and stir until smooth.
7. Add the Green Christmas Drizzle
Melt the green candy melts in a separate microwave-safe bowl using short intervals, stirring between each one.
Once smooth, transfer the melted green candy to a small piping bag, decorating bag, or zip-top bag with a tiny corner snipped off.
Drizzle thin green lines over the white-coated Oreo balls.
For an even more festive appearance, add holiday sprinkles while the green drizzle is still soft.
8. Allow the Coating to Set
Place the finished Oreo balls in the refrigerator for approximately 20 to 30 minutes, or until the candy coating is firm.
Once completely set, transfer them to a serving plate, decorative tray, or airtight container.
Methods
No-Bake Truffle Method
This recipe uses a simple no-bake truffle method. The Oreo cookies provide the chocolate cookie base, while cream cheese binds the crumbs together and creates a soft, rich center.
After chilling, the mixture becomes firm enough to shape into small balls. Each ball is then covered in melted candy coating, which hardens into a smooth shell.
Double-Chilling Method
Chilling the mixture before shaping makes rolling much easier. Chilling the formed balls again before dipping helps them maintain their shape and prevents them from becoming too soft during coating.
Decorative Coating Method
The white candy coating creates a clean winter appearance, while the green drizzle provides a simple Christmas decoration. You can also add red sprinkles, crushed candy canes, or other seasonal decorations.
History
Oreo-based truffles and cookie balls became popular as simple no-bake desserts because they require very few ingredients and can be prepared without an oven.
The basic idea is similar to traditional chocolate truffles: a rich filling is shaped into small portions and covered with a chocolate or confectionery coating. Using crushed sandwich cookies and cream cheese makes the process especially easy and accessible.
Holiday versions became popular because the finished treats are naturally bite-sized and easy to decorate. White coating combined with Christmas-colored drizzles transforms a simple cookie mixture into an attractive seasonal dessert.
Formation and Texture
The formation of these Oreo balls is straightforward. First, the cookies are crushed into fine crumbs. The crumbs are combined with softened cream cheese until they form a thick dough-like mixture.
The mixture is then rolled into compact balls. Once chilled, the balls become firm enough to dip into melted candy.
The outer coating sets into a delicate shell, while the inside remains soft, creamy, and intensely chocolatey. The contrast between the firm exterior and rich Oreo center makes these treats especially satisfying.
Tips for Perfect Christmas Oreo Balls
Use softened cream cheese so it combines evenly with the Oreo crumbs.
Crush the cookies very finely. Large cookie pieces can make the mixture difficult to roll and can cause bumps in the finished balls.
Keep the mixture chilled whenever it becomes too soft.
Do not make the Oreo balls excessively large. Smaller portions are easier to dip and are more convenient for serving.
Melt candy melts slowly and stir frequently to keep the coating smooth.
Allow excess coating to drip away before placing each ball on the parchment paper.
If you want a more polished appearance, use a fork or dipping tool instead of your fingers.
Let the white coating set slightly before adding additional decorations if you want sharply defined designs.
Storage
Store the finished Oreo balls in an airtight container in the refrigerator.
Because the recipe contains cream cheese, refrigeration is recommended. Properly stored, the Oreo balls can be prepared ahead of time, making them an excellent choice for Christmas parties and holiday gatherings.
They can also be frozen in an airtight freezer-safe container. Separate layers with parchment paper to prevent them from sticking together. Allow them to thaw in the refrigerator before serving.
Serving Ideas
Christmas Oreo Balls are perfect for:
- Christmas cookie exchanges
- Holiday dessert tables
- Family gatherings
- Christmas parties
- School celebrations
- Homemade edible gifts
- Holiday brunches
- Cookie platters
- Christmas movie nights
- Festive gift boxes
Arrange them on a white or festive serving platter for an elegant presentation. They can also be placed in small candy cups and packaged in decorative boxes as homemade holiday gifts.
Variations
Red and Green Oreo Balls
Use both red and green candy melts to create alternating Christmas designs.
Peppermint Oreo Balls
Add a small amount of finely crushed peppermint candy to the Oreo mixture or sprinkle crushed peppermint over the freshly coated balls.
Chocolate-Coated Oreo Balls
Replace some or all of the white candy coating with melted chocolate or chocolate-flavored candy melts.
Snowy Oreo Balls
Keep the coating completely white and finish with white sprinkles or finely crushed coconut for a snow-inspired appearance.
Christmas Sprinkle Oreo Balls
Instead of green drizzle, immediately add red, green, and white Christmas sprinkles while the white coating is still wet.
Conclusion
Christmas Oreo Balls are a simple, delicious, and beautifully festive holiday dessert. The combination of crushed Oreo cookies and cream cheese creates a soft, rich center, while the white candy coating provides a smooth outer shell.
The green drizzle gives each bite a cheerful Christmas appearance without requiring complicated decorating skills. Best of all, the recipe is no-bake, requires only a handful of ingredients, and can be prepared ahead of time.
Whether you are making a holiday dessert platter, preparing treats for a Christmas party, or looking for an easy homemade gift, these Oreo balls are a dependable addition to the holiday table.
For Oreo Ball Lovers
If you love chocolate cookies, creamy truffles, and easy no-bake desserts, these Christmas Oreo Balls are an especially enjoyable holiday treat. They are small enough for one or two bites but rich enough to satisfy a chocolate craving.
They are also a wonderful recipe to make with family because the preparation is simple: crush the cookies, mix the filling, roll the balls, dip them in the coating, and decorate.
Once you make one batch, it is easy to create different colors and decorations for different holidays and celebrations.
Here is a complete, expanded recipe collection for all four trifles, written as a polished recipe article without emojis.
Four Beautiful Trifle Recipes for Every Occasion
Trifles are among the easiest desserts to prepare when you want something that looks impressive without requiring complicated baking techniques. Their beauty comes from simple layers: soft cake, creamy pudding or custard, fresh fruit, and a generous layer of whipped cream. Each spoonful brings together different textures and flavors, making trifles especially popular for family gatherings, holidays, birthdays, potlucks, and summer celebrations.
This collection includes four delicious variations: Mixed Berry Cream Trifle, Tropical Mango Pineapple Trifle, Strawberry Banana Chocolate Trifle, and Peach Berry Cheesecake Trifle. Each one has its own character, but all follow the same basic idea of building a beautiful dessert in layers.
1. Mixed Berry Cream Trifle
Introduction
Mixed Berry Cream Trifle is a classic fruit dessert featuring tender vanilla cake, smooth vanilla custard, fresh strawberries, blueberries, raspberries, and fluffy whipped cream.
The combination of sweet cake and creamy custard balances beautifully with the natural tartness of fresh berries. Because the dessert is assembled rather than baked from scratch, it is an excellent choice when you need an elegant dessert without spending hours in the kitchen.
Ingredients
For the trifle
- 2 cups strawberries, washed, hulled, and sliced
- 1 1/2 cups fresh blueberries
- 1 cup fresh raspberries
- 3 cups vanilla cake, cut into cubes
- 2 cups vanilla custard
- 2 cups whipped cream
- 1 teaspoon vanilla extract
Optional additions
- 1 tablespoon powdered sugar
- 1 tablespoon lemon juice
- Extra berries for decoration
- A few mint leaves for garnish, if desired
Preparation Method
Begin by preparing the berries. Wash the strawberries, blueberries, and raspberries carefully and allow them to drain completely. Slice the strawberries into bite-sized pieces.
If the whipped cream is homemade, beat it until soft peaks form. Add the vanilla extract and, if desired, a small amount of powdered sugar for additional sweetness.
Cut the vanilla cake into cubes approximately one inch in size. Slightly stale cake works particularly well because it absorbs some of the custard without becoming immediately mushy.
Assembly Instructions
Place approximately one-third of the cake cubes into the bottom of a large glass trifle bowl.
Spoon approximately one-third of the vanilla custard over the cake. Spread it gently so that the cake is evenly covered.
Add a layer of strawberries, blueberries, and raspberries.
Spread a layer of whipped cream over the berries.
Repeat the layers until the ingredients are used. Ideally, the final layer should be whipped cream decorated with several fresh berries.
Cover the trifle and refrigerate for at least 1 to 2 hours before serving.
Serving Method
Serve the trifle chilled. Use a large serving spoon so that each portion contains cake, custard, berries, and cream.
For the best appearance, serve the trifle in a clear glass bowl so the colorful layers remain visible.
History and Formation
Trifle is traditionally associated with British dessert-making and developed from earlier layered cream and cake preparations. Over time, many variations appeared, incorporating different cakes, custards, fruits, creams, and flavorings.
The modern fruit trifle has become especially popular because it is flexible and can easily be adapted to seasonal ingredients.
Conclusion
Mixed Berry Cream Trifle is a refreshing and colorful dessert that combines softness, creaminess, sweetness, and fresh fruit in every serving. It is simple enough for an ordinary family meal but attractive enough for celebrations.
For Trifle Lovers
This version is especially enjoyable for people who love fresh berries and light creamy desserts. For a more sophisticated flavor, you can add a thin layer of lemon curd between the custard and berries.
2. Tropical Mango Pineapple Trifle
Introduction
Tropical Mango Pineapple Trifle brings together the flavors of mango, pineapple, kiwi, banana, coconut cream, vanilla pudding, cake, and whipped cream.
It is bright, creamy, fruity, and refreshing, making it particularly suitable for warm-weather gatherings. The tropical fruit provides plenty of natural sweetness and acidity, while coconut cream adds richness.
Ingredients
For the trifle
- 2 cups ripe mango chunks
- 2 cups pineapple chunks
- 3 kiwis, peeled and sliced
- 2 bananas, sliced
- 3 cups vanilla cake, cubed
- 2 cups vanilla pudding
- 1 cup coconut cream
- 2 cups whipped cream
Optional additions
- 1/2 cup shredded coconut
- Extra mango and pineapple for decoration
- Toasted coconut
- 1 teaspoon vanilla extract
Preparation Method
Prepare all the fruit before beginning assembly.
Cut the mango and pineapple into bite-sized pieces. Peel and slice the kiwis. Slice the bananas shortly before assembling the dessert to help prevent excessive browning.
Prepare the vanilla pudding according to the package directions if using a prepared mix. Allow it to cool completely.
Combine the vanilla pudding with coconut cream until smooth and creamy.
Cut the vanilla cake into cubes and set aside.
Assembly Instructions
Place a layer of vanilla cake cubes into the bottom of a large trifle bowl.
Spoon a portion of the vanilla pudding and coconut cream mixture over the cake.
Add a layer of mango, pineapple, kiwi, and banana.
Spread a layer of whipped cream over the fruit.
Repeat the layers until the bowl is full.
Finish with whipped cream and decorate with pieces of mango, pineapple, kiwi, or toasted coconut.
Cover and refrigerate for approximately 1 to 2 hours before serving.
Preparation Method for the Best Texture
Do not assemble this trifle too far in advance. Although the cake benefits from absorbing some of the creamy mixture, several hours of soaking can make it overly soft.
For the best texture, assemble it a few hours before serving and keep it refrigerated.
Bananas should preferably be added closer to serving time because they can darken as they sit.
History and Formation
Tropical trifles are modern adaptations of traditional layered desserts. Instead of relying primarily on berries and custard, tropical versions use fruits associated with warmer climates, including mango, pineapple, kiwi, banana, and coconut.
The combination works because the creamy components soften the acidity of the fruit while the fruit prevents the dessert from becoming excessively heavy.
Conclusion
Tropical Mango Pineapple Trifle is a refreshing dessert filled with bright fruit and creamy coconut flavor. Its colorful appearance makes it particularly attractive on a dessert table.
For Trifle Lovers
If you enjoy coconut, sprinkle toasted shredded coconut between the layers. You can also replace some of the vanilla cake with coconut cake for an even stronger tropical flavor.
3. Strawberry Banana Chocolate Trifle
Introduction
Strawberry Banana Chocolate Trifle is the richest and most indulgent dessert in this collection. It combines fudgy brownie pieces with chocolate pudding, fresh strawberries, bananas, whipped cream, chocolate sauce, and chocolate pieces.
The contrast between rich chocolate and fresh fruit makes this trifle especially satisfying.
Ingredients
For the trifle
- 2 cups strawberries, sliced
- 3 bananas, sliced
- 2 cups chocolate pudding
- 3 cups brownies, cut into cubes
- 2 cups whipped cream
- 1/4 cup chocolate sauce
- 1/2 cup chocolate pieces or chocolate shavings
Optional additions
- 1 teaspoon vanilla extract
- 1/2 cup mini chocolate chips
- Chopped nuts
- Additional strawberries for decoration
Preparation Method
Prepare the chocolate pudding and allow it to cool completely.
Cut the brownies into bite-sized cubes. Homemade brownies, bakery brownies, or leftover brownies can all be used.
Wash and slice the strawberries. Slice the bananas shortly before assembly.
Prepare the whipped cream and keep it chilled until needed.
Assembly Instructions
Begin with a layer of brownie cubes at the bottom of the trifle bowl.
Add a layer of strawberries and banana slices.
Spoon chocolate pudding over the fruit.
Add a layer of whipped cream.
Repeat the brownie, fruit, pudding, and whipped cream layers until the bowl is full.
Finish with a generous layer of whipped cream.
Drizzle chocolate sauce over the top.
Sprinkle with chocolate pieces or chocolate shavings.
Refrigerate for at least 1 hour before serving.
Method for Perfect Layers
Do not press the brownie pieces down too firmly. Keeping them loosely arranged allows the pudding and cream to move between the pieces.
For a more pronounced strawberry flavor, a thin layer of strawberry preserves can be added between the brownie and fruit layers.
For an extra creamy dessert, combine part of the chocolate pudding with whipped cream to create a chocolate mousse-style layer.
History and Formation
The combination of chocolate, strawberries, and bananas has become popular in many modern desserts because the flavors complement one another naturally.
The trifle format provides a particularly effective way to combine these ingredients. The brownies supply richness, the pudding provides creaminess, the fruit contributes freshness, and the whipped cream creates a light finish.
Conclusion
Strawberry Banana Chocolate Trifle is a decadent dessert designed for chocolate lovers. It is excellent for birthdays, family celebrations, holiday dessert tables, and special weekend meals.
For Trifle Lovers
For the richest version, use fudgy brownies and dark chocolate pudding. For a lighter version, use chocolate cake instead of brownies and reduce the amount of chocolate sauce.
4. Peach Berry Cheesecake Trifle
Introduction
Peach Berry Cheesecake Trifle combines tender vanilla cake with creamy cheesecake filling, fresh peaches, strawberries, blueberries, honey, and whipped cream.
The peaches bring a soft floral sweetness, while strawberries and blueberries provide freshness and color. The cheesecake cream gives the dessert a rich, tangy flavor that balances the fruit.
Ingredients
For the trifle
- 3 cups fresh peaches, sliced
- 2 cups strawberries, sliced
- 1 1/2 cups blueberries
- 3 cups vanilla cake, cubed
- 2 cups cheesecake cream
- 2 cups whipped cream
- 2 tablespoons honey
Optional cheesecake cream
- 8 ounces cream cheese, softened
- 1/2 cup powdered sugar
- 1 teaspoon vanilla extract
- 1 cup whipped cream
Preparation Method
If preparing homemade cheesecake cream, beat the softened cream cheese until smooth. Add powdered sugar and vanilla extract and continue mixing until creamy.
Fold in the whipped cream gently until the mixture becomes light and fluffy.
Wash and slice the peaches and strawberries. Keep the blueberries whole.
If the peaches are very firm, allow them to ripen before preparing the dessert.
Assembly Instructions
Place a layer of vanilla cake cubes into the bottom of the trifle bowl.
Spread a generous layer of cheesecake cream over the cake.
Add peaches, strawberries, and blueberries.
Drizzle a small amount of honey over the fruit.
Add a layer of whipped cream.
Repeat the layers until all the ingredients have been used.
Finish with whipped cream and arrange several slices of peach, strawberries, and blueberries on top.
Cover and refrigerate for 1 to 2 hours before serving.
Method for the Best Flavor
Choose ripe but firm peaches. Very soft peaches can release excessive liquid and make the cake soggy.
Fresh berries should be completely dry before being added to the trifle.
For a stronger cheesecake flavor, allow the cream cheese mixture to chill for at least 30 minutes before assembling the dessert.
History and Formation
Peach and berry desserts have long been popular in American and European home baking, particularly during summer when fresh fruit is plentiful.
Combining these ingredients with cheesecake-style cream and vanilla cake creates a modern layered dessert that borrows the structure of traditional trifle while incorporating the flavors of a fruit cheesecake.
Conclusion
Peach Berry Cheesecake Trifle is a beautiful combination of creamy cheesecake flavor and fresh summer fruit. The soft vanilla cake absorbs just enough of the cream to create a tender texture while the fruit adds freshness.
For Trifle Lovers
If you love cheesecake, this variation is an excellent choice. A layer of crushed graham crackers can also be added between the cheesecake cream and fruit to give the dessert a texture similar to a traditional fruit cheesecake.
General Trifle Method
Although each recipe has its own flavor combination, the basic method is the same.
First, prepare and cut the cake into cubes.
Second, prepare the custard, pudding, cheesecake cream, or other creamy filling.
Third, wash, dry, and cut the fruit.
Fourth, place a layer of cake into the bottom of a clear trifle bowl.
Fifth, add the creamy filling.
Sixth, add the fruit.
Seventh, add whipped cream.
Repeat the layers until the bowl is filled.
Finish with an attractive layer of whipped cream and fresh fruit.
Refrigerate before serving so the flavors have time to blend.
Final Conclusion
These four trifle recipes demonstrate how one simple dessert format can be transformed into completely different creations.
The Mixed Berry Cream Trifle is fresh and classic. The Tropical Mango Pineapple Trifle is bright and refreshing. The Strawberry Banana Chocolate Trifle is rich and indulgent. The Peach Berry Cheesecake Trifle combines creamy cheesecake flavor with fresh summer fruit.
The greatest advantage of trifles is their flexibility. Cake can be replaced with brownies, pound cake, sponge cake, or cookies. Custard can be replaced with vanilla, chocolate, banana, or cheesecake pudding. Seasonal fruits can be changed according to what is available.
Whether prepared for a holiday, birthday, family dinner, potluck, or simply as a weekend dessert, a well-made trifle is both easy to prepare and beautiful to serve.
Cranberry Pecan Chicken Salad
Introduction
Cranberry Pecan Chicken Salad is a creamy, colorful, and satisfying dish that brings together tender chicken, juicy red grapes, sweet dried cranberries, crunchy toasted pecans, crisp celery, and a lightly sweetened Greek yogurt dressing. The combination of sweet, savory, creamy, tangy, and crunchy textures makes this chicken salad especially enjoyable for lunches, picnics, potlucks, family gatherings, and easy make-ahead meals.
The Greek yogurt and light mayonnaise create a smooth dressing without making the salad excessively heavy, while lemon juice adds freshness and helps balance the sweetness of the cranberries, grapes, and honey. Toasted pecans provide a warm nutty flavor that makes the finished salad taste more developed and satisfying.
This recipe is also flexible. It can be served chilled over lettuce, spooned into croissants or sandwiches, piled onto crackers, or enjoyed directly from a bowl.
Ingredients
For the Chicken Salad
- 3 cups cooked chicken breast, shredded or diced
- 1 cup red grapes, halved
- 1/2 cup dried cranberries
- 1/2 cup celery, finely diced
- 1/3 cup pecans, chopped and toasted
- 1/4 cup red onion, finely diced, optional
For the Creamy Dressing
- 1/2 cup plain Greek yogurt
- 1/4 cup light mayonnaise
- 1 tablespoon honey
- 1 tablespoon fresh lemon juice
- 1/2 teaspoon salt
- 1/4 teaspoon black pepper
- 1/4 teaspoon poppy seeds, optional
Instructions
Step 1: Prepare the Chicken
Begin with fully cooked chicken breast. Allow the chicken to cool before preparing the salad.
You can shred the chicken using two forks for a traditional chicken salad texture, or dice it into small bite-sized pieces. For the best texture, avoid cutting the chicken into pieces that are either extremely large or too finely minced.
Place the prepared chicken into a large mixing bowl.
Step 2: Toast the Pecans
Place the chopped pecans in a dry skillet over medium-low heat. Toast them for approximately 3 to 5 minutes, stirring frequently.
The pecans should become fragrant and lightly toasted. Watch them carefully because nuts can burn quickly.
Remove them from the skillet and allow them to cool completely before adding them to the salad.
Toasting the pecans is an important step because it intensifies their natural nuttiness and gives the chicken salad a more complex flavor.
Step 3: Prepare the Fresh Ingredients
Wash and dry the grapes thoroughly before cutting them in half.
Dice the celery into small pieces so that it distributes evenly throughout the chicken salad. If using red onion, mince it finely. A small amount of onion provides a pleasant savory contrast to the sweet cranberries and grapes.
Add the grapes, dried cranberries, celery, red onion, and cooled toasted pecans to the bowl with the chicken.
Step 4: Make the Dressing
In a separate bowl, combine the Greek yogurt, light mayonnaise, honey, lemon juice, salt, black pepper, and poppy seeds if using.
Whisk until the mixture is smooth and creamy.
Taste the dressing before combining it with the chicken mixture. If you prefer more tanginess, add a little additional lemon juice. For a sweeter salad, add a small amount of honey.
Step 5: Combine Everything
Pour the dressing over the chicken, grapes, cranberries, celery, onion, and pecans.
Using a large spoon or spatula, gently fold everything together.
Mix carefully rather than aggressively stirring. This helps keep the grapes intact and prevents the chicken from becoming mashed.
Continue folding until the dressing evenly coats all of the ingredients.
Step 6: Chill the Salad
Cover the bowl and refrigerate the chicken salad for at least 30 minutes before serving.
For even better flavor, allow it to rest for approximately 1 to 2 hours. This gives the ingredients time to blend together while allowing the chicken to absorb some of the creamy dressing.
Before serving, stir gently and taste again. Adjust the salt, pepper, lemon juice, or honey if necessary.
Method
The method behind this chicken salad is based on layering contrasting ingredients.
First, the cooked chicken provides the hearty and savory foundation. The grapes and dried cranberries add natural sweetness and a pleasant chewy or juicy texture. Celery contributes freshness and crunch, while red onion gives the mixture a sharper savory note.
The toasted pecans are particularly important because they provide a crisp, buttery texture that contrasts with the creamy dressing.
The dressing combines Greek yogurt and mayonnaise. Greek yogurt contributes creaminess and tang, while mayonnaise provides richness and a familiar chicken-salad texture. Honey softens the acidity of the lemon juice and complements the fruit.
The final chilling period allows all of these flavors to come together.
History
Chicken salad has a long history in American home cooking and has become one of the most recognizable prepared salads in the United States. Traditional chicken salad generally combines cooked chicken with a creamy dressing and may include ingredients such as celery, onion, nuts, grapes, or dried fruit.
Over time, cooks began creating regional and family variations according to available ingredients and personal preferences.
The addition of grapes and pecans became especially popular in sweet-and-savory chicken salad variations. Dried cranberries offer another layer of sweetness and color, making them a natural addition to this style of recipe.
Modern versions often use Greek yogurt alongside mayonnaise to create a lighter, tangier dressing while maintaining the creamy character people expect from chicken salad.
This cranberry pecan version represents that evolution: familiar chicken salad ingredients are combined with fruit, toasted nuts, and a fresh yogurt-based dressing.
Formation and Flavor Balance
The formation of this salad is built around contrast.
The chicken is tender and savory. The grapes are juicy and refreshing. The cranberries are sweet and slightly chewy. The celery provides crispness, while the toasted pecans contribute a rich, crunchy texture.
The dressing brings everything together.
The lemon juice prevents the salad from tasting overly sweet, while the honey provides a gentle sweetness that connects the fruit and creamy ingredients. Greek yogurt contributes acidity, and mayonnaise adds richness.
The result is a balanced mixture in which no single ingredient has to dominate.
Serving Suggestions
This chicken salad can be served in several different ways.
Classic Sandwich
Spoon the chilled chicken salad between two slices of your favorite bread. Add lettuce for extra freshness and crunch.
Croissant Sandwich
For a special lunch or brunch, serve the chicken salad inside a buttery croissant. The richness of the croissant pairs particularly well with the fruit and pecans.
Lettuce Cups
For a lighter presentation, spoon the chicken salad into crisp lettuce leaves. Romaine, butter lettuce, or iceberg lettuce all work well.
Salad Plate
Serve a generous scoop over mixed greens with additional grapes and toasted pecans.
Cracker Appetizer
Spoon small portions onto sturdy crackers for an easy party appetizer.
Wrap
Spread the chicken salad inside a tortilla with lettuce and additional vegetables, then roll tightly and slice into portions.
Make-Ahead Method
Cranberry Pecan Chicken Salad is well suited to preparing ahead of time.
Prepare the chicken salad, cover it tightly, and refrigerate it until needed. The flavors become more developed as the salad rests.
If preparing it significantly ahead of serving, reserve some of the toasted pecans and add them shortly before serving. This helps maintain their crunch.
For the freshest texture, grapes should be firm and the celery should be crisp.
Helpful Tips
Use chicken that is moist and tender. Roasted, poached, or leftover cooked chicken breast can all work well.
Do not skip toasting the pecans if you have the extra few minutes. Toasting brings out their natural flavor and makes the finished salad more aromatic.
Allow the pecans to cool before adding them to the salad. Warm pecans can soften the dressing.
Use fresh lemon juice when possible. Its bright acidity gives the dressing a fresher flavor.
If the dressing seems too thick, add a small amount of lemon juice or Greek yogurt until the desired consistency is reached.
If the salad seems too tart, add a little more honey.
For a more savory version, reduce the honey and add a little extra black pepper.
For a sweeter version, increase the dried cranberries or grapes slightly.
Storage
Keep the finished chicken salad refrigerated in a tightly covered container.
Because this recipe contains cooked chicken and dairy-based dressing, it should not be left sitting at room temperature for extended periods. When serving it at a gathering, keep the bowl chilled and return leftovers to the refrigerator promptly.
Give the salad a gentle stir before serving leftovers. If the dressing has thickened after refrigeration, a small spoonful of Greek yogurt or lemon juice can help restore the desired consistency.
Variations
Apple Cranberry Chicken Salad
Replace part of the grapes with finely diced crisp apple. The apple adds another layer of freshness and crunch.
Almond Chicken Salad
Replace the pecans with toasted sliced or slivered almonds.
Walnut Version
Use toasted walnuts instead of pecans for a slightly more earthy flavor.
Extra-Creamy Version
Increase the Greek yogurt slightly and adjust the seasoning to create a softer, creamier consistency.
Savory Version
Reduce the honey and add extra celery, black pepper, and a little finely chopped green onion.
Holiday Version
Add additional dried cranberries and toasted pecans and serve the salad on a platter surrounded by leafy greens and fresh grapes.
Why People Love This Recipe
People love this chicken salad because it combines so many textures and flavors in one simple dish.
The chicken makes it filling enough for lunch, while the grapes and cranberries give it a naturally sweet character. The pecans provide crunch, and the creamy dressing ties everything together.
It is also an excellent recipe for using leftover cooked chicken. Instead of serving the same chicken again, you can transform it into a completely different meal.
The recipe is easy enough for a weekday lunch but attractive enough for a brunch, shower, picnic, holiday gathering, or potluck.
Conclusion
Cranberry Pecan Chicken Salad is a classic-style creamy chicken salad with a delicious combination of savory chicken, sweet fruit, crisp vegetables, and toasted nuts.
The creamy Greek yogurt and mayonnaise dressing brings the ingredients together while lemon juice adds brightness and honey provides a gentle sweetness. Toasted pecans finish the dish with a satisfying crunch.
Whether served in sandwiches, croissants, lettuce cups, wraps, over greens, or simply enjoyed by the spoonful, this chicken salad is an easy and versatile recipe that can be prepared ahead and enjoyed throughout the week.
It is the kind of dish that feels familiar and comforting while still offering enough contrast to make every bite interesting.
Christmas Sugar Cookies – 6 Delicious Ways
Introduction
Christmas sugar cookies are one of those classic holiday treats that bring together everything wonderful about seasonal baking: buttery flavor, soft or crisp textures, festive decorations, and the opportunity to make every batch look completely different.
This collection gives you six ways to turn one beloved cookie tradition into a beautiful Christmas assortment: Cut-Out Sugar Cookies, Chocolate Sugar Cookies, Brown Sugar Cookies, Soft Sugar Cookies, Christmas Sprinkle Cookies, and Peppermint Sugar Cookies.
Whether you are preparing cookies for a Christmas party, filling a holiday cookie tray, making edible gifts for family and friends, or simply baking with children, these recipes provide plenty of variety while keeping the basic techniques simple and dependable.
1. Cut-Out Christmas Sugar Cookies
Ingredients
- 1 cup unsalted butter, softened
- 1 cup granulated sugar
- 1 large egg
- 2 teaspoons vanilla extract
- 3 cups all-purpose flour
- 1 teaspoon baking powder
- 1/2 teaspoon salt
Optional icing
- 2 cups powdered sugar
- 2 to 3 tablespoons milk
- 1/2 teaspoon vanilla extract
- Food coloring, as desired
- Christmas sprinkles, optional
Instructions
- Preheat the oven to 350°F (175°C).
- Line baking sheets with parchment paper.
- Beat the softened butter and sugar until light and creamy.
- Add the egg and vanilla and mix until fully incorporated.
- In a separate bowl, whisk together the flour, baking powder, and salt.
- Gradually add the dry ingredients to the butter mixture.
- Mix just until a soft dough forms.
- Divide the dough into two portions and flatten each into a disk.
- Wrap and refrigerate for at least 30 minutes.
- Roll the chilled dough on a lightly floured surface to approximately 1/4-inch thickness.
- Cut into Christmas shapes such as stars, trees, bells, snowflakes, and gingerbread-style figures.
- Transfer the cookies to prepared baking sheets.
- Bake for approximately 8 to 10 minutes, or until the edges are just beginning to turn lightly golden.
- Allow the cookies to cool on the baking sheet for several minutes before transferring them to a cooling rack.
Decorating Method
Mix the powdered sugar, milk, and vanilla until smooth. Add a little more milk for a thinner icing or more powdered sugar for a thicker consistency.
Divide the icing into bowls and tint with different colors. Decorate completely cooled cookies with icing and sprinkles.
2. Chocolate Sugar Cookies
Ingredients
- 3/4 cup unsalted butter, softened
- 1 cup granulated sugar
- 1 large egg
- 2 teaspoons vanilla extract
- 2 cups all-purpose flour
- 1/2 cup unsweetened cocoa powder
- 1 teaspoon baking powder
- 1/2 teaspoon salt
- 2 tablespoons milk, if needed
Instructions
- Preheat the oven to 350°F (175°C).
- Cream the butter and sugar together until smooth and fluffy.
- Add the egg and vanilla.
- In another bowl, combine flour, cocoa powder, baking powder, and salt.
- Gradually incorporate the dry mixture into the wet ingredients.
- If the dough appears too dry, add milk one tablespoon at a time.
- Cover the dough and refrigerate for about 30 minutes.
- Roll the dough to approximately 1/4-inch thickness.
- Cut into festive shapes or simply scoop into small rounds.
- Place on parchment-lined baking sheets.
- Bake for 8 to 10 minutes.
- Cool completely before decorating.
Decorating Method
Chocolate cookies pair beautifully with vanilla icing, white drizzle, powdered sugar, crushed peppermint, or red and green sprinkles.
For an especially festive appearance, dip half of each cooled cookie into melted white chocolate and allow it to set.
3. Brown Sugar Christmas Cookies
Ingredients
- 1 cup unsalted butter, softened
- 1 1/4 cups packed light brown sugar
- 1 large egg
- 2 teaspoons vanilla extract
- 2 1/2 cups all-purpose flour
- 1 teaspoon baking soda
- 1/2 teaspoon salt
- 1 teaspoon ground cinnamon
- 1/4 teaspoon ground nutmeg
Instructions
- Preheat the oven to 350°F (175°C).
- Beat the butter and brown sugar until creamy.
- Add the egg and vanilla and mix well.
- In another bowl, whisk together the flour, baking soda, salt, cinnamon, and nutmeg.
- Gradually add the dry ingredients to the butter mixture.
- Mix until just combined.
- Chill the dough for 20 to 30 minutes.
- Scoop portions of dough and roll them into balls.
- Place them on a lined baking sheet, leaving room for spreading.
- Flatten slightly with the bottom of a glass or measuring cup.
- Bake for approximately 9 to 11 minutes.
- Let the cookies cool on the baking sheet for a few minutes before transferring them to a rack.
Method
The brown sugar gives these cookies a deeper caramel-like flavor and a pleasantly tender texture. Cinnamon and nutmeg add a subtle warmth that makes them particularly appropriate for Christmas.
4. Soft Christmas Sugar Cookies
Ingredients
- 1 cup unsalted butter, softened
- 1 cup granulated sugar
- 1 large egg
- 1 teaspoon vanilla extract
- 1/2 teaspoon almond extract, optional
- 2 3/4 cups all-purpose flour
- 1 teaspoon baking powder
- 1/2 teaspoon salt
- 1/4 cup sour cream
Instructions
- Preheat the oven to 350°F (175°C).
- Beat butter and sugar until very light and creamy.
- Add the egg, vanilla, and almond extract.
- Mix in the sour cream.
- In a separate bowl, combine flour, baking powder, and salt.
- Gradually add the dry ingredients.
- Mix until a soft dough forms.
- Chill the dough for approximately 30 minutes.
- Scoop rounded tablespoons of dough onto a parchment-lined baking sheet.
- Flatten each mound slightly.
- Bake for 9 to 11 minutes.
- Do not overbake. The centers should remain pale and soft.
- Cool completely before decorating.
Method
The key to these cookies is removing them from the oven before they become deeply golden. The cookies continue setting as they cool, which helps preserve their soft, tender center.
5. Christmas Sprinkle Cookies
Ingredients
- 1 cup unsalted butter, softened
- 1 cup granulated sugar
- 1 large egg
- 2 teaspoons vanilla extract
- 2 3/4 cups all-purpose flour
- 1 teaspoon baking powder
- 1/2 teaspoon salt
- 1/2 cup Christmas sprinkles
Instructions
- Preheat the oven to 350°F (175°C).
- Cream the butter and sugar until fluffy.
- Beat in the egg and vanilla.
- Whisk together flour, baking powder, and salt.
- Slowly add the dry ingredients to the butter mixture.
- Fold in approximately half of the sprinkles.
- Scoop the dough into small portions.
- Roll each portion gently into a ball.
- Press the remaining sprinkles onto the outside of the dough balls.
- Place on a parchment-lined baking sheet.
- Bake for 9 to 11 minutes.
- Allow the cookies to cool before serving.
Decorating Method
Use a mixture of red, green, white, gold, or silver sprinkles. For a more traditional appearance, choose nonpareils. Larger decorative sprinkles can also be pressed into the tops immediately after baking.
6. Peppermint Sugar Cookies
Ingredients
- 1 cup unsalted butter, softened
- 1 cup granulated sugar
- 1 large egg
- 1 teaspoon vanilla extract
- 1/2 to 1 teaspoon peppermint extract
- 2 3/4 cups all-purpose flour
- 1 teaspoon baking powder
- 1/2 teaspoon salt
- 1/3 cup crushed peppermint candies or candy canes
Optional topping
- 1 cup powdered sugar
- 2 tablespoons milk
- 1/2 teaspoon vanilla extract
- Crushed peppermint candies
Instructions
- Preheat the oven to 350°F (175°C).
- Cream the butter and sugar until light and fluffy.
- Beat in the egg, vanilla, and peppermint extract.
- In a separate bowl, combine flour, baking powder, and salt.
- Gradually mix the dry ingredients into the wet ingredients.
- Fold in the crushed peppermint candies.
- Scoop the dough into rounded portions and place them on a lined baking sheet.
- Flatten gently.
- Bake for approximately 9 to 11 minutes.
- Allow the cookies to cool completely.
- Drizzle with vanilla icing if desired.
- Sprinkle crushed peppermint over the icing before it sets.
Method
Peppermint extract is powerful, so a small amount is usually enough. The crushed peppermint candies provide additional flavor and a festive appearance.
The History of Christmas Sugar Cookies
Sugar cookies have a long history connected to European baking traditions. Simple sweetened butter cookies evolved in different forms as ingredients such as refined sugar, butter, eggs, and wheat flour became more widely available.
The tradition of shaping and decorating cookies became especially popular during holidays and celebrations. Christmas provided a natural occasion for bakers to create stars, trees, bells, snowflakes, angels, and other seasonal designs.
Decorated sugar cookies eventually became a familiar part of Christmas baking in many American households. Families developed their own versions, often passing recipes from one generation to the next.
Today, Christmas sugar cookies remain popular because they are both a dessert and a creative holiday activity.
Formation and Shaping Techniques
For cut-out cookies, chilling the dough is important because cold dough is easier to roll and cut. Avoid adding excessive flour while rolling because too much flour can make the cookies tough.
For round cookies, use a cookie scoop to keep portions approximately the same size. Uniform cookies bake more evenly.
For decorated cookies, always allow the cookies to cool completely before adding icing. Warm cookies can cause icing to melt and spread.
When making multiple varieties, prepare the basic dough first and then create separate flavored batches. This allows you to produce an attractive assortment without making every recipe completely from scratch.
Tips for Perfect Christmas Sugar Cookies
Use softened butter
Butter should be soft enough to mix easily but not melted. Melted butter can significantly change the texture of the cookies.
Measure flour carefully
Too much flour can produce dry cookies. Spoon flour into a measuring cup and level it rather than packing it tightly.
Chill when necessary
Chilling helps control spreading and makes many sugar-cookie doughs easier to handle.
Avoid overbaking
Sugar cookies often look slightly underdone when they first come out of the oven. They continue to set as they cool.
Cool before decorating
For clean icing and decorations, cookies should be completely cool.
Store properly
Place cooled cookies in an airtight container. Separate decorated layers with parchment paper to protect the designs.
Christmas Cookie Platter Ideas
A beautiful holiday platter can combine all six varieties.
Arrange the cut-out cookies in the center, surrounded by chocolate sugar cookies, brown sugar cookies, soft sugar cookies, sprinkle cookies, and peppermint cookies.
You can also package different varieties together in small holiday boxes or clear bags tied with ribbon. A mixed cookie assortment makes a thoughtful homemade gift for neighbors, teachers, coworkers, friends, and family.
Conclusion
Christmas sugar cookies are more than just a holiday dessert. They are part of the tradition of gathering in the kitchen, preparing something together, decorating with care, and sharing homemade food with the people we love.
With six different varieties, you can create a complete Christmas cookie collection featuring classic vanilla flavors, rich chocolate, warm brown sugar and spices, soft tender cookies, colorful sprinkles, and refreshing peppermint.
The best part is that each variety can be decorated and presented differently, making the final cookie tray colorful, varied, and perfect for the holiday season.
For Cookie Lovers
These recipes are especially enjoyable for anyone who loves traditional Christmas baking and homemade desserts. Cut-out cookies are perfect for decorators, chocolate cookies are ideal for cocoa lovers, brown sugar cookies bring warm seasonal flavor, soft sugar cookies offer a tender texture, sprinkle cookies provide festive color, and peppermint cookies bring a classic Christmas taste.
Bake one variety or make all six for a memorable holiday cookie collection that everyone can enjoy.