
Classic Butter Buttermilk Biscuits
Introduction
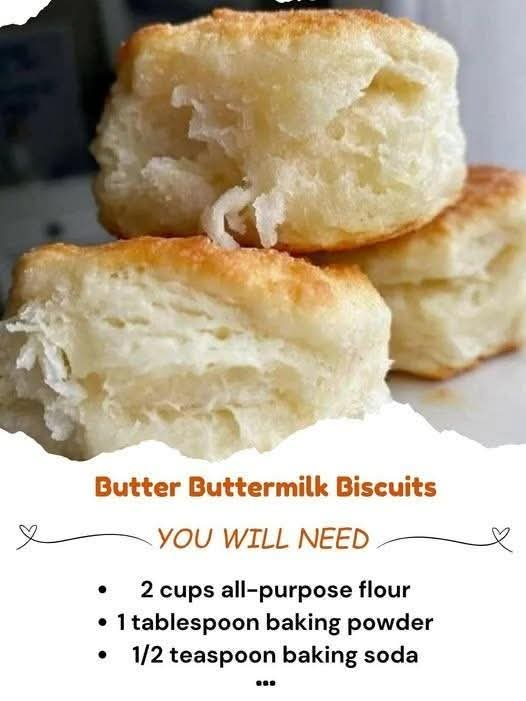
There are few things more comforting than a basket of freshly baked buttermilk biscuits. These classic butter buttermilk biscuits are tender on the inside, lightly crisp and golden on the outside, and rich with the unmistakable flavor of real butter.
The recipe uses simple pantry ingredients: flour, baking powder, salt, cold butter, and buttermilk. The secret to excellent biscuits is not complicated. Keep the butter cold, handle the dough gently, and avoid overworking it. Those simple techniques create layers that are light, flaky, and wonderfully tender.
These biscuits are perfect for breakfast, brunch, dinner, holidays, family gatherings, or simply served warm with butter and jam.
Ingredients
Main Ingredients
- 2 cups all-purpose flour
- 1 tablespoon baking powder
- 1 teaspoon salt
- 1/2 cup unsalted butter, very cold and cut into small cubes
- 3/4 cup cold buttermilk
For the Top
- 1 tablespoon melted butter, optional
Optional Additions
For a slightly richer biscuit, you can add:
- 1 teaspoon sugar for a very subtle sweetness
- 1/2 teaspoon garlic powder for savory biscuits
- 1 tablespoon chopped fresh chives
- 1/2 cup shredded cheddar cheese
- A pinch of black pepper
Equipment
- Large mixing bowl
- Pastry cutter or fork
- Measuring cups and spoons
- Rolling pin, optional
- Round biscuit cutter or drinking glass
- Baking sheet
- Parchment paper, optional
- Pastry brush, optional
Preparation
Begin by preheating the oven to 425°F (220°C).
Line a baking sheet with parchment paper if desired. You can also lightly grease the baking sheet.
Measure the flour carefully and place it in a large mixing bowl. Add the baking powder and salt. Whisk everything together thoroughly so that the baking powder and salt are evenly distributed throughout the flour.
Method 1: Preparing the Butter
Add the cold cubed butter to the flour mixture.
Using a pastry cutter, fork, or your fingertips, work the butter into the flour until the mixture resembles coarse crumbs.
Do not completely blend the butter into the flour. Small pieces of butter should remain visible.
Those pieces of cold butter are important because they melt during baking and create little pockets of steam. This helps form the flaky layers that make a great biscuit.
If your kitchen is warm or the butter begins to soften too much, place the bowl in the refrigerator for several minutes before continuing.
Method 2: Adding the Buttermilk
Make a small well in the center of the flour and butter mixture.
Pour in the cold buttermilk.
Using a wooden spoon or rubber spatula, gently stir until the ingredients are just combined.
The dough should look somewhat rough and slightly shaggy. Do not worry if it does not look perfectly smooth.
Avoid stirring excessively. Overmixing develops gluten in the flour, which can make biscuits tough instead of tender.
If the dough seems extremely dry, add another tablespoon of buttermilk at a time until it comes together.
If the dough seems sticky, sprinkle a small amount of flour over it.
Method 3: Forming the Dough
Lightly flour a clean work surface.
Turn the dough onto the surface.
Gently bring the dough together with your hands.
Pat it into a rectangle about 3/4-inch to 1-inch thick.
For especially flaky biscuits, fold the dough in half, gently press it down, and repeat the process two or three times.
Do not knead the dough like bread. The goal is simply to create layers without overworking it.
Method 4: Cutting the Biscuits
Lightly flour a round biscuit cutter.
Press the cutter straight down into the dough.
Do not twist the cutter.
Twisting can seal the edges of the dough and prevent the biscuits from rising as well.
Place each biscuit onto the prepared baking sheet.
For softer sides, place the biscuits close together so they touch slightly.
For crisper sides, leave a little space between each biscuit.
Gather any remaining dough gently, pat it out again, and cut additional biscuits. Try not to repeatedly work the dough because the later biscuits may become slightly less tender.
Method 5: Preparing for Baking
For an extra buttery finish, brush the tops lightly with melted butter.
Place the baking sheet in the fully preheated oven.
Bake for approximately 12 to 16 minutes, or until the biscuits have risen and the tops are beautifully golden brown.
The exact baking time will depend on the thickness and size of your biscuits.
Method 6: Finishing the Biscuits
Remove the biscuits from the oven when they are golden and fully risen.
Immediately brush the tops with a little additional melted butter if desired.
Allow them to cool for approximately 5 minutes before serving.
They are best enjoyed warm.
The Formation of Flaky Layers
The formation of layers is one of the most important parts of biscuit making.
Cold butter is distributed throughout the flour in small pieces. When the biscuits enter the hot oven, the butter melts. At the same time, the water contained in the butter and buttermilk turns into steam.
That steam pushes against the surrounding dough and helps separate the layers.
This is why cold butter and a hot oven are so important.
Another important factor is gentle handling. If the dough is heavily kneaded, the butter can become incorporated too thoroughly and the flour can develop too much gluten.
The result can be a dense, chewy biscuit instead of a soft and flaky one.
Why Buttermilk Is Important
Buttermilk gives these biscuits their characteristic slightly tangy flavor and tender texture.
It also reacts with the baking powder and contributes moisture to the dough.
The acidity of buttermilk helps create a pleasant flavor that balances the richness of the butter.
Cold buttermilk is particularly useful because it helps keep the butter cold while the dough is being prepared.
History of Buttermilk Biscuits
Biscuits have a long history in American cooking, particularly in the Southern United States, where they became an important part of everyday home cooking.
Early biscuits were made from basic ingredients that were relatively inexpensive and readily available, including flour, butter or other fats, milk or buttermilk, and leavening agents.
As baking powder became more widely available during the nineteenth century, quick biscuits became easier to prepare because they did not require yeast or a long rising period.
Buttermilk also became an important ingredient in Southern kitchens. Traditionally, it was the liquid left behind after churning cream into butter.
Rather than being discarded, this naturally tangy liquid was used in baking and cooking.
Over generations, buttermilk biscuits became associated with family breakfasts, Sunday meals, country kitchens, holiday tables, and comforting homemade food.
Today, variations can be found throughout the United States and beyond.
Traditional Serving Ideas
These biscuits can be served in many different ways.
For breakfast, split them open and serve them with:
- Butter
- Honey
- Strawberry jam
- Raspberry preserves
- Blueberry preserves
- Apple butter
- Sausage gravy
- Scrambled eggs
- Fried eggs
- Bacon
For dinner, serve them alongside:
- Roast chicken
- Fried chicken
- Beef stew
- Chicken soup
- Vegetable soup
- Mashed potatoes
- Green beans
- Barbecue
- Roasted vegetables
Sweet Buttermilk Biscuits
For a sweeter version, add 1 to 2 tablespoons of sugar to the dry ingredients.
After baking, brush the biscuits with melted butter and serve them with honey, jam, fresh berries, or whipped cream.
They can also be used as the base for a simple strawberry shortcake.
Savory Buttermilk Biscuits
For savory biscuits, add shredded cheddar cheese, chopped chives, black pepper, or a small amount of garlic powder.
A combination of cheddar cheese and chives makes an especially flavorful biscuit that works beautifully with soups and roasted meats.
Tips for Perfect Biscuits
Keep Everything Cold
Cold butter is one of the most important secrets.
If your butter becomes soft while preparing the dough, refrigerate the dough for 10 to 15 minutes before cutting the biscuits.
Do Not Overmix
Mix only until the dough comes together.
A rough-looking dough can produce beautiful biscuits.
Do Not Use Too Much Flour
Use just enough flour to prevent excessive sticking.
Too much flour can make the biscuits dry.
Use a Hot Oven
A properly preheated oven gives the biscuits a strong initial burst of heat and helps them rise quickly.
Cut Straight Down
Press the biscuit cutter straight down rather than twisting.
This helps preserve the edges and encourages better rising.
Bake Close Together
For biscuits with soft sides, arrange them so they are touching or nearly touching.
For crispier edges, space them farther apart.
Storage
Fresh biscuits are best served warm on the day they are made.
Store completely cooled leftovers in an airtight container at room temperature for up to 2 days.
For longer storage, wrap the biscuits well and freeze them.
To reheat, place them in a warm oven until heated through.
Make-Ahead Method
The biscuit dough can be prepared in advance.
Cut the biscuits and arrange them on a parchment-lined baking sheet.
Freeze them until firm, then transfer them to a freezer-safe container or bag.
When ready to bake, place the frozen biscuits directly onto a baking sheet and bake in a preheated oven. They may require a few additional minutes of baking time.
This makes homemade biscuits especially convenient for busy mornings and holiday meals.
Common Problems and Solutions
Biscuits Are Too Dense
The dough may have been overmixed, the baking powder may be old, or the dough may have been rolled too thin.
Handle the dough gently and make sure your baking powder is fresh.
Biscuits Did Not Rise
The oven may not have been hot enough, or the biscuit cutter may have been twisted while cutting.
Make sure the oven is fully preheated and press the cutter straight down.
Biscuits Are Dry
Too much flour is a common cause.
Measure the flour carefully and add the buttermilk gradually until a soft dough forms.
Butter Melted Before Baking
The dough may have become too warm.
Place the shaped biscuits in the refrigerator for 10 to 15 minutes before baking.
Biscuits Spread Too Much
The butter may have become too warm or the dough may contain too much liquid.
Keep the ingredients cold and add the buttermilk gradually.
Conclusion
These classic butter buttermilk biscuits prove that wonderful homemade food does not require complicated ingredients.
With flour, baking powder, salt, cold butter, and buttermilk, you can create biscuits that are tender, flaky, buttery, and full of comforting homemade flavor.
The most important lessons are simple: keep the butter cold, use a hot oven, handle the dough gently, and avoid overmixing.
Serve them warm with butter and honey for breakfast, alongside a hearty dinner, or with sausage gravy for a traditional Southern-style meal.
For the Lovers of Homemade Biscuits
For biscuit lovers, there is something special about making them from scratch. The smell of butter and warm flour filling the kitchen, the sound of a biscuit being pulled apart while still warm, and that first tender bite make these biscuits more than just a side dish.
They are the kind of food that belongs around a family table.
Whether served with breakfast, Sunday dinner, holiday meals, or a simple bowl of soup, these butter buttermilk biscuits are an easy classic worth making again and again.
Final Method at a Glance
- Preheat the oven to 425°F (220°C).
- Combine flour, baking powder, and salt.
- Cut cold butter into the flour until coarse crumbs form.
- Add cold buttermilk.
- Stir gently until a shaggy dough forms.
- Turn the dough onto a lightly floured surface.
- Pat the dough to about 3/4 to 1 inch thick.
- Fold the dough two or three times for additional layers.
- Cut biscuits without twisting the cutter.
- Arrange on a baking sheet.
- Brush with melted butter if desired.
- Bake for 12 to 16 minutes, until golden brown.
- Brush with additional butter if desired.
- Cool for about 5 minutes.
- Serve warm with your favorite toppings.