

Introduction
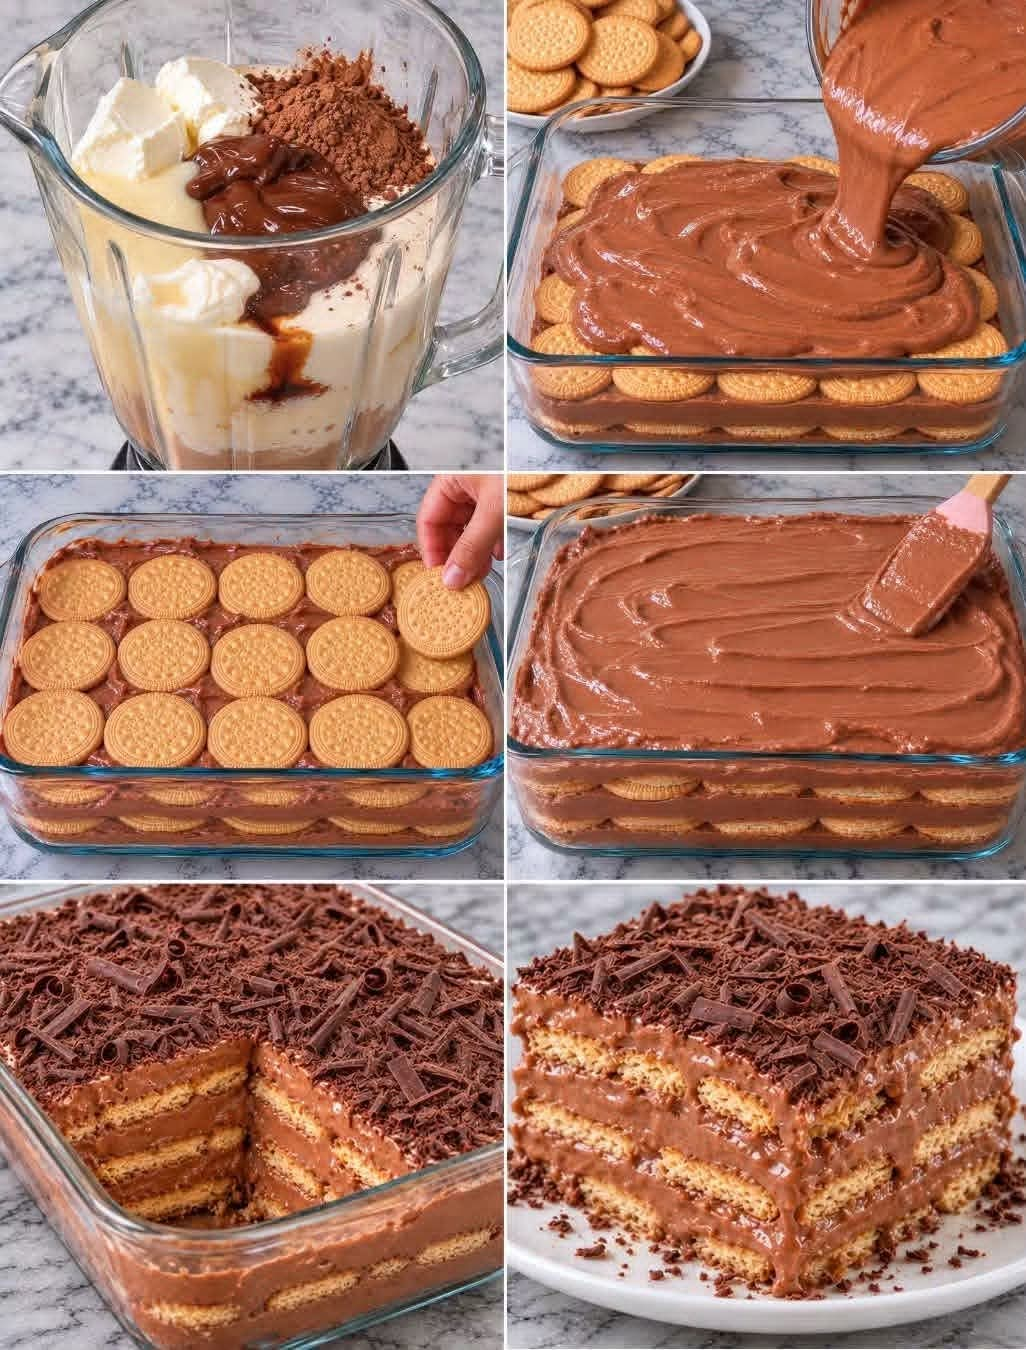
Creamy Chocolate Carlota is a delicious no-bake dessert made with layers of delicate María cookies and a rich, velvety chocolate cream. Every layer absorbs the chocolate mixture as the dessert rests in the refrigerator, creating a soft, cake-like texture that melts in your mouth.
This homemade chocolate Carlota combines the smooth richness of cream cheese, the sweetness of condensed milk, the light creaminess of evaporated milk, and the deep flavor of semi-sweet chocolate. Unsweetened cocoa powder adds an extra chocolatey taste, while a touch of vanilla brings all the flavors together.
The best part is that you do not need an oven, complicated baking techniques, or expensive equipment. Simply prepare the chocolate cream, arrange the cookies in layers, refrigerate, and finish with a generous topping of chocolate shavings.
Whether you are preparing a family dessert, celebrating a birthday, hosting guests, or satisfying a chocolate craving, this Creamy Chocolate Carlota is an excellent choice. It is elegant enough for special occasions and easy enough to make whenever you want something sweet and comforting.
Ingredients
Preparation: 25 minutes · Chilling: 6–8 hours · Difficulty: Easy
Servings: approximately 10–12 portions, depending on slice size
For the Chocolate Carlota
- 2 packages María cookies (approximately 340 g)
- 190 g cream cheese, softened
- 1 can sweetened condensed milk (397 g)
- 1 can evaporated milk (360 ml)
- 200 g semi-sweet chocolate
- ¼ cup unsweetened cocoa powder
- 1 cup whipping cream or Mexican-style table cream (240 ml)
- 1 teaspoon vanilla extract
For Decoration
– Grated or shaved semi-sweet chocolate, to taste
Optional Additions
- A small pinch of salt to enhance the chocolate flavor
- A little extra cocoa powder for dusting
- Chocolate curls for a more elegant presentation
Instructions
Step 1: Melt the Chocolate
Chop the 200 g of semi-sweet chocolate into small, even pieces. Place the chocolate in a heatproof bowl over a saucepan of gently simmering water, making sure the bottom of the bowl does not touch the water.
Stir occasionally until the chocolate is completely melted and smooth. Alternatively, microwave it in short intervals of 15–20 seconds, stirring between each interval to prevent burning.
Remove the chocolate from the heat and allow it to cool until lukewarm. It should remain fluid but must not be hot when added to the cream mixture.
Step 2: Prepare the Cream Cheese
Place the softened cream cheese in a blender. Blend briefly until smooth and creamy, scraping down the sides if necessary.
Softened cream cheese is important because it helps prevent lumps and gives the finished dessert a silky consistency.
Step 3: Make the Chocolate Cream
Add the condensed milk, evaporated milk, whipping cream or table cream, unsweetened cocoa powder, and vanilla extract to the blender.
Blend until all the ingredients are thoroughly combined.
Pour in the cooled melted chocolate and blend again until the mixture becomes smooth, rich, and evenly colored. Stop occasionally to scrape down the sides of the blender.
The finished mixture should be creamy and pourable, with enough body to create distinct layers. If the mixture is very thin, do not worry; chilling will help the dessert set, although the final firmness will depend on the ingredients used.
Step 4: Prepare the Baking Dish
Choose a rectangular glass or ceramic dish suitable for refrigeration. A medium-sized dish of approximately 9 × 13 inches works well, depending on how thick you want the layers to be.
Spread a thin layer of chocolate cream across the bottom. This helps the first layer of cookies stay in place and prevents dry edges.
Step 5: Arrange the First Layer of María Cookies
Place the María cookies side by side over the chocolate cream, covering the bottom of the dish as evenly as possible.
If necessary, break a few cookies into smaller pieces to fill the gaps around the edges. This creates a more uniform dessert and ensures that every portion contains cookies.
Avoid crushing the cookies completely. Keeping them whole or in large pieces gives the Carlota its traditional layered appearance.
Step 6: Add the Chocolate Cream
Pour a generous amount of chocolate cream over the cookies. Use a spatula or the back of a spoon to spread it evenly, making sure the cream reaches the edges.
The cookies need enough moisture to soften during refrigeration. Do not spread the cream too thinly, or the dessert may have dry sections.
Step 7: Continue Building the Layers
Repeat the process, alternating layers of María cookies with layers of chocolate cream.
Continue until the ingredients are used up, finishing with a thick, smooth layer of chocolate cream.
Gently tap the dish against the counter once or twice to help the cream settle into the gaps between the cookies. Do not press too hard, as you want the layers to remain intact.
Step 8: Smooth the Surface
Use a spatula to smooth the top layer of chocolate cream.
Wipe the edges of the dish if any mixture has spilled over the sides. A neat surface will make the finished dessert look more attractive when decorated.
Step 9: Refrigerate Until Firm
Cover the dish tightly with plastic wrap or a suitable lid.
Refrigerate for at least 6–8 hours. For the best texture, leave it in the refrigerator overnight.
During this time, the cookies absorb moisture from the chocolate cream and become tender. The layers settle together, and the dessert develops a rich, cohesive, almost truffle-like consistency.
Do not freeze the Carlota as a substitute for proper chilling, because freezing can change the texture of the cream and cookies.
Step 10: Decorate and Serve
Once the Carlota is fully chilled, remove the cover.
Generously sprinkle grated or shaved semi-sweet chocolate over the surface. You can create fine chocolate flakes with a grater or use a vegetable peeler to make decorative curls from a block of chocolate.
For the neatest slices, use a sharp knife dipped in warm water and wiped dry between cuts.
Serve cold and enjoy the combination of creamy chocolate filling and soft, tender cookie layers.
Methods for Making the Perfect Chocolate Carlota

1. The No-Bake Layering Method
This recipe uses refrigeration rather than baking to create its cake-like structure. The cookies gradually absorb moisture from the chocolate filling, becoming soft enough to slice while retaining their layered appearance.
The key is to distribute the cream evenly and allow enough time for the dessert to chill.
2. The Blender Cream Method
Blending the cream cheese with the milk products, cocoa, and chocolate creates a consistent filling with very little effort.
For the smoothest result, blend the cream cheese first, add the liquid ingredients, and incorporate the cooled melted chocolate last.
3. The Chocolate Flavor Method
Semi-sweet chocolate with at least 50% cocoa provides a balanced flavor that is rich without being excessively sweet.
Unsweetened cocoa powder deepens the chocolate taste, while vanilla softens the bitterness and adds warmth.
If you prefer a darker chocolate dessert, you can use chocolate with a higher cocoa percentage. Keep in mind that this may make the flavor more intense and less sweet.
4. The Overnight Chilling Method
Although the dessert may appear set after several hours, overnight refrigeration usually gives the best results.
The longer chilling period allows the cookies to soften evenly and the cream to firm up, making it easier to cut clean slices.
5. The Decorative Finishing Method
Chocolate shavings provide a simple but beautiful finish. For a more polished presentation, cover the entire surface with fine shavings and add a few larger curls in the center.
Decorate shortly before serving if you want the chocolate topping to remain particularly fresh and distinct.
The History of Chocolate Carlota
Carlota-style desserts are closely associated with the broader tradition of chilled, layered desserts made with cookies, cream, and sweetened fillings.
One especially well-known version is Carlota de limón, a popular Mexican no-bake dessert commonly prepared with María cookies and a creamy citrus filling. Its simplicity and refreshing flavor have made it a favorite in many homes.
Chocolate Carlota follows the same general idea but replaces the citrus-forward filling with a rich chocolate mixture. This variation appeals to chocolate lovers who prefer a deeper, more indulgent flavor.
The exact origin of chocolate Carlota is not firmly established, and recipes vary between households. Some use cocoa powder, others use melted chocolate, and many incorporate cream cheese or different combinations of sweetened and evaporated milk.
Today, chocolate Carlota remains an appealing homemade dessert because it requires few techniques, uses readily available ingredients, and can be prepared ahead of time.
Formation and Texture: What Makes It So Creamy?
The distinctive texture of Chocolate Carlota comes from the way its ingredients work together.
Cream cheese provides body and a smooth, slightly tangy richness that balances the sweetness of the condensed milk.
Condensed milk adds sweetness and a thick, creamy quality. It also contributes to the dessert’s dense, indulgent mouthfeel.
Evaporated milk loosens the mixture and helps provide the moisture that the cookies need to soften.
Whipping cream or table cream adds richness and helps create a more luxurious chocolate filling.
Melted semi-sweet chocolate and cocoa powder give the dessert its deep chocolate flavor and dark color.
María cookies create the structure. As they rest between the layers of cream, they absorb moisture and transform from crisp biscuits into soft, cake-like layers.
Refrigeration allows the entire dessert to settle and become easier to portion.
Together, these elements create a dessert that sits somewhere between a chilled chocolate cake, a creamy pudding, and a soft chocolate truffle. It is not a baked cake, but its layered structure makes it feel just as satisfying.
Tips for the Best Results
- Choose good-quality chocolate. Semi-sweet chocolate with at least 50% cocoa gives the dessert a balanced, rich flavor.
- Cool the melted chocolate. Adding very hot chocolate to the cream mixture can affect its texture.
- Use softened cream cheese. This makes blending easier and helps eliminate lumps.
- Blend thoroughly. A smooth filling produces cleaner, more attractive layers.
- Use enough cream between the cookies. This prevents dry patches and allows the cookies to soften evenly.
- Cover every layer. Spread the filling all the way to the edges so that the cookies do not remain exposed.
- Allow enough chilling time. Overnight refrigeration is ideal for a firm, sliceable dessert.
- Keep it refrigerated. Because the recipe contains dairy products, do not leave it sitting at room temperature for extended periods.
- Cut with a warm knife. Wiping the knife clean between slices helps create neat portions.
- Adjust the sweetness carefully. The condensed milk already provides considerable sweetness, so taste the chocolate mixture before adding any extra sugar.
Variations to Try

Dark Chocolate Carlota
Use a darker semi-sweet chocolate or bittersweet chocolate for a more intense cocoa flavor. Finish with unsweetened cocoa powder or dark chocolate curls.

Chocolate Strawberry Carlota
Add thinly sliced strawberries between selected layers or arrange fresh strawberries on top just before serving. Keep the fruit dry and refrigerate the dessert promptly.

Chocolate Cookie Carlota
Replace some of the María cookies with chocolate sandwich cookies or chocolate biscuits for an even richer flavor and a darker appearance.

Chocolate Hazelnut Carlota
Add a modest amount of chocolate-hazelnut spread to the filling and garnish with chopped toasted hazelnuts for a nutty finish.
How to Store Chocolate Carlota
Store the dessert covered in the refrigerator and consume it within approximately 3–4 days for the best quality. Use a clean utensil each time you serve it.
If you want to prepare it for a celebration, make it the day before and add the chocolate shavings shortly before serving.
Freezing is possible, but it may alter the texture of the dairy filling and softened cookies. If you choose to freeze it, wrap it well and thaw it in the refrigerator before serving.
Serving Suggestions
Creamy Chocolate Carlota is delicious on its own, but it also pairs beautifully with:
- Fresh strawberries or raspberries.
- A small serving of vanilla ice cream.
- Unsweetened coffee or espresso.
- Freshly brewed tea.
- A light dusting of cocoa powder.
- Extra chocolate curls or a small drizzle of chocolate sauce.
For a dinner party, serve each slice on a chilled plate with a few berries on the side. For a casual family gathering, the dessert can be served directly from the glass dish.
Conclusion
Creamy Chocolate Carlota is proof that an extraordinary dessert does not need to be complicated. With simple María cookies, cream cheese, condensed milk, evaporated milk, cream, cocoa, and melted chocolate, you can create a luxurious no-bake treat that looks beautiful and tastes wonderful.
Its soft cookie layers, smooth chocolate filling, and delicate chocolate-shaving topping make every slice a delight. The refrigerator does most of the work, allowing you to prepare the dessert ahead of time and enjoy more time with your family and guests.
For the best results, use quality chocolate, blend the filling until smooth, layer the cookies generously, and allow the dessert to chill overnight. These small details make a noticeable difference in the final texture.
For Chocolate Dessert Lovers
If you love creamy chocolate desserts, icebox cakes, chocolate puddings, and no-bake cheesecakes, this recipe deserves a place in your collection.
The combination of rich chocolate cream and tender cookies makes it an excellent choice for birthdays, holidays, weekend treats, potlucks, and family celebrations.
Prepare it the night before, decorate it with chocolate shavings, and serve it cold for a dessert that is simple, elegant, and deeply satisfying.
Recipe reminder: The secret to a delicious Chocolate Carlota is generous layers of chocolate cream and enough refrigeration time for the María cookies to become perfectly soft.
Enjoy every creamy, chocolate-filled slice of this homemade favorite.
Creamy Chocolate Carlota – A Rich, No-Bake Chocolate Dessert
Introduction
Creamy Chocolate Carlota is a delicious no-bake dessert made with layers of delicate María cookies and a rich, velvety chocolate cream. Every layer absorbs the chocolate mixture as the dessert rests in the refrigerator, creating a soft, cake-like texture that melts in your mouth.
This homemade chocolate Carlota combines the smooth richness of cream cheese, the sweetness of condensed milk, the light creaminess of evaporated milk, and the deep flavor of semi-sweet chocolate. Unsweetened cocoa powder adds an extra chocolatey taste, while a touch of vanilla brings all the flavors together.
The best part is that you do not need an oven, complicated baking techniques, or expensive equipment. Simply prepare the chocolate cream, arrange the cookies in layers, refrigerate, and finish with a generous topping of chocolate shavings.
Whether you are preparing a family dessert, celebrating a birthday, hosting guests, or satisfying a chocolate craving, this Creamy Chocolate Carlota is an excellent choice. It is elegant enough for special occasions and easy enough to make whenever you want something sweet and comforting.
Ingredients
Preparation: 25 minutes · Chilling: 6–8 hours · Difficulty: Easy
Servings: approximately 10–12 portions, depending on slice size
For the Chocolate Carlota
- 2 packages María cookies (approximately 340 g)
- 190 g cream cheese, softened
- 1 can sweetened condensed milk (397 g)
- 1 can evaporated milk (360 ml)
- 200 g semi-sweet chocolate
- ¼ cup unsweetened cocoa powder
- 1 cup whipping cream or Mexican-style table cream (240 ml)
- 1 teaspoon vanilla extract
For Decoration
– Grated or shaved semi-sweet chocolate, to taste
Optional Additions
- A small pinch of salt to enhance the chocolate flavor
- A little extra cocoa powder for dusting
- Chocolate curls for a more elegant presentation
Instructions
Step 1: Melt the Chocolate
Chop the 200 g of semi-sweet chocolate into small, even pieces. Place the chocolate in a heatproof bowl over a saucepan of gently simmering water, making sure the bottom of the bowl does not touch the water.
Stir occasionally until the chocolate is completely melted and smooth. Alternatively, microwave it in short intervals of 15–20 seconds, stirring between each interval to prevent burning.
Remove the chocolate from the heat and allow it to cool until lukewarm. It should remain fluid but must not be hot when added to the cream mixture.
Step 2: Prepare the Cream Cheese
Place the softened cream cheese in a blender. Blend briefly until smooth and creamy, scraping down the sides if necessary.
Softened cream cheese is important because it helps prevent lumps and gives the finished dessert a silky consistency.
Step 3: Make the Chocolate Cream
Add the condensed milk, evaporated milk, whipping cream or table cream, unsweetened cocoa powder, and vanilla extract to the blender.
Blend until all the ingredients are thoroughly combined.
Pour in the cooled melted chocolate and blend again until the mixture becomes smooth, rich, and evenly colored. Stop occasionally to scrape down the sides of the blender.
The finished mixture should be creamy and pourable, with enough body to create distinct layers. If the mixture is very thin, do not worry; chilling will help the dessert set, although the final firmness will depend on the ingredients used.
Step 4: Prepare the Baking Dish
Choose a rectangular glass or ceramic dish suitable for refrigeration. A medium-sized dish of approximately 9 × 13 inches works well, depending on how thick you want the layers to be.
Spread a thin layer of chocolate cream across the bottom. This helps the first layer of cookies stay in place and prevents dry edges.
Step 5: Arrange the First Layer of María Cookies
Place the María cookies side by side over the chocolate cream, covering the bottom of the dish as evenly as possible.
If necessary, break a few cookies into smaller pieces to fill the gaps around the edges. This creates a more uniform dessert and ensures that every portion contains cookies.
Avoid crushing the cookies completely. Keeping them whole or in large pieces gives the Carlota its traditional layered appearance.
Step 6: Add the Chocolate Cream
Pour a generous amount of chocolate cream over the cookies. Use a spatula or the back of a spoon to spread it evenly, making sure the cream reaches the edges.
The cookies need enough moisture to soften during refrigeration. Do not spread the cream too thinly, or the dessert may have dry sections.
Step 7: Continue Building the Layers
Repeat the process, alternating layers of María cookies with layers of chocolate cream.
Continue until the ingredients are used up, finishing with a thick, smooth layer of chocolate cream.
Gently tap the dish against the counter once or twice to help the cream settle into the gaps between the cookies. Do not press too hard, as you want the layers to remain intact.
Step 8: Smooth the Surface
Use a spatula to smooth the top layer of chocolate cream.
Wipe the edges of the dish if any mixture has spilled over the sides. A neat surface will make the finished dessert look more attractive when decorated.
Step 9: Refrigerate Until Firm
Cover the dish tightly with plastic wrap or a suitable lid.
Refrigerate for at least 6–8 hours. For the best texture, leave it in the refrigerator overnight.
During this time, the cookies absorb moisture from the chocolate cream and become tender. The layers settle together, and the dessert develops a rich, cohesive, almost truffle-like consistency.
Do not freeze the Carlota as a substitute for proper chilling, because freezing can change the texture of the cream and cookies.
Step 10: Decorate and Serve
Once the Carlota is fully chilled, remove the cover.
Generously sprinkle grated or shaved semi-sweet chocolate over the surface. You can create fine chocolate flakes with a grater or use a vegetable peeler to make decorative curls from a block of chocolate.
For the neatest slices, use a sharp knife dipped in warm water and wiped dry between cuts.
Serve cold and enjoy the combination of creamy chocolate filling and soft, tender cookie layers.
Methods for Making the Perfect Chocolate Carlota
1. The No-Bake Layering Method
This recipe uses refrigeration rather than baking to create its cake-like structure. The cookies gradually absorb moisture from the chocolate filling, becoming soft enough to slice while retaining their layered appearance.
The key is to distribute the cream evenly and allow enough time for the dessert to chill.
2. The Blender Cream Method
Blending the cream cheese with the milk products, cocoa, and chocolate creates a consistent filling with very little effort.
For the smoothest result, blend the cream cheese first, add the liquid ingredients, and incorporate the cooled melted chocolate last.
3. The Chocolate Flavor Method
Semi-sweet chocolate with at least 50% cocoa provides a balanced flavor that is rich without being excessively sweet.
Unsweetened cocoa powder deepens the chocolate taste, while vanilla softens the bitterness and adds warmth.
If you prefer a darker chocolate dessert, you can use chocolate with a higher cocoa percentage. Keep in mind that this may make the flavor more intense and less sweet.
4. The Overnight Chilling Method
Although the dessert may appear set after several hours, overnight refrigeration usually gives the best results.
The longer chilling period allows the cookies to soften evenly and the cream to firm up, making it easier to cut clean slices.
5. The Decorative Finishing Method
Chocolate shavings provide a simple but beautiful finish. For a more polished presentation, cover the entire surface with fine shavings and add a few larger curls in the center.
Decorate shortly before serving if you want the chocolate topping to remain particularly fresh and distinct.
The History of Chocolate Carlota
Carlota-style desserts are closely associated with the broader tradition of chilled, layered desserts made with cookies, cream, and sweetened fillings.
One especially well-known version is Carlota de limón, a popular Mexican no-bake dessert commonly prepared with María cookies and a creamy citrus filling. Its simplicity and refreshing flavor have made it a favorite in many homes.
Chocolate Carlota follows the same general idea but replaces the citrus-forward filling with a rich chocolate mixture. This variation appeals to chocolate lovers who prefer a deeper, more indulgent flavor.
The exact origin of chocolate Carlota is not firmly established, and recipes vary between households. Some use cocoa powder, others use melted chocolate, and many incorporate cream cheese or different combinations of sweetened and evaporated milk.
Today, chocolate Carlota remains an appealing homemade dessert because it requires few techniques, uses readily available ingredients, and can be prepared ahead of time.
Formation and Texture: What Makes It So Creamy?
The distinctive texture of Chocolate Carlota comes from the way its ingredients work together.
Cream cheese provides body and a smooth, slightly tangy richness that balances the sweetness of the condensed milk.
Condensed milk adds sweetness and a thick, creamy quality. It also contributes to the dessert’s dense, indulgent mouthfeel.
Evaporated milk loosens the mixture and helps provide the moisture that the cookies need to soften.
Whipping cream or table cream adds richness and helps create a more luxurious chocolate filling.
Melted semi-sweet chocolate and cocoa powder give the dessert its deep chocolate flavor and dark color.
María cookies create the structure. As they rest between the layers of cream, they absorb moisture and transform from crisp biscuits into soft, cake-like layers.
Refrigeration allows the entire dessert to settle and become easier to portion.
Together, these elements create a dessert that sits somewhere between a chilled chocolate cake, a creamy pudding, and a soft chocolate truffle. It is not a baked cake, but its layered structure makes it feel just as satisfying.
Tips for the Best Results
- Choose good-quality chocolate. Semi-sweet chocolate with at least 50% cocoa gives the dessert a balanced, rich flavor.
- Cool the melted chocolate. Adding very hot chocolate to the cream mixture can affect its texture.
- Use softened cream cheese. This makes blending easier and helps eliminate lumps.
- Blend thoroughly. A smooth filling produces cleaner, more attractive layers.
- Use enough cream between the cookies. This prevents dry patches and allows the cookies to soften evenly.
- Cover every layer. Spread the filling all the way to the edges so that the cookies do not remain exposed.
- Allow enough chilling time. Overnight refrigeration is ideal for a firm, sliceable dessert.
- Keep it refrigerated. Because the recipe contains dairy products, do not leave it sitting at room temperature for extended periods.
- Cut with a warm knife. Wiping the knife clean between slices helps create neat portions.
- Adjust the sweetness carefully. The condensed milk already provides considerable sweetness, so taste the chocolate mixture before adding any extra sugar.
Variations to Try
Dark Chocolate Carlota
Use a darker semi-sweet chocolate or bittersweet chocolate for a more intense cocoa flavor. Finish with unsweetened cocoa powder or dark chocolate curls.
Chocolate Strawberry Carlota
Add thinly sliced strawberries between selected layers or arrange fresh strawberries on top just before serving. Keep the fruit dry and refrigerate the dessert promptly.
Chocolate Cookie Carlota
Replace some of the María cookies with chocolate sandwich cookies or chocolate biscuits for an even richer flavor and a darker appearance.
Chocolate Hazelnut Carlota
Add a modest amount of chocolate-hazelnut spread to the filling and garnish with chopped toasted hazelnuts for a nutty finish.
How to Store Chocolate Carlota
Store the dessert covered in the refrigerator and consume it within approximately 3–4 days for the best quality. Use a clean utensil each time you serve it.
If you want to prepare it for a celebration, make it the day before and add the chocolate shavings shortly before serving.
Freezing is possible, but it may alter the texture of the dairy filling and softened cookies. If you choose to freeze it, wrap it well and thaw it in the refrigerator before serving.
Serving Suggestions
Creamy Chocolate Carlota is delicious on its own, but it also pairs beautifully with:
- Fresh strawberries or raspberries.
- A small serving of vanilla ice cream.
- Unsweetened coffee or espresso.
- Freshly brewed tea.
- A light dusting of cocoa powder.
- Extra chocolate curls or a small drizzle of chocolate sauce.
For a dinner party, serve each slice on a chilled plate with a few berries on the side. For a casual family gathering, the dessert can be served directly from the glass dish.
Conclusion
Creamy Chocolate Carlota is proof that an extraordinary dessert does not need to be complicated. With simple María cookies, cream cheese, condensed milk, evaporated milk, cream, cocoa, and melted chocolate, you can create a luxurious no-bake treat that looks beautiful and tastes wonderful.
Its soft cookie layers, smooth chocolate filling, and delicate chocolate-shaving topping make every slice a delight. The refrigerator does most of the work, allowing you to prepare the dessert ahead of time and enjoy more time with your family and guests.
For the best results, use quality chocolate, blend the filling until smooth, layer the cookies generously, and allow the dessert to chill overnight. These small details make a noticeable difference in the final texture.
For Chocolate Dessert Lovers
If you love creamy chocolate desserts, icebox cakes, chocolate puddings, and no-bake cheesecakes, this recipe deserves a place in your collection.
The combination of rich chocolate cream and tender cookies makes it an excellent choice for birthdays, holidays, weekend treats, potlucks, and family celebrations.
Prepare it the night before, decorate it with chocolate shavings, and serve it cold for a dessert that is simple, elegant, and deeply satisfying.
Recipe reminder: The secret to a delicious Chocolate Carlota is generous layers of chocolate cream and enough refrigeration time for the María cookies to become perfectly soft.
Enjoy every creamy, chocolate-filled slice of this homemade favorite.