
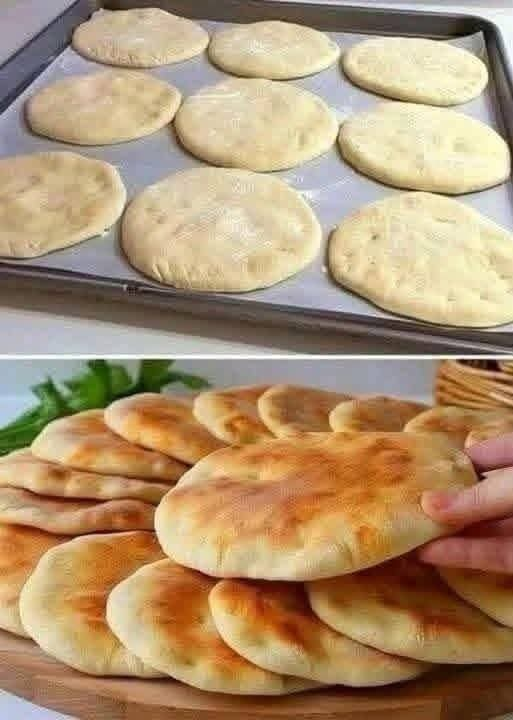
Easy No-Knead Bread Recipe — No Eggs, No Butter, No Mixer
Introduction
If you have ever wanted to make fresh, homemade bread without spending money at the bakery, this simple no-knead bread recipe is perfect for you. Made with a few basic ingredients, this bread is soft on the inside, lightly golden on the outside, and wonderfully delicious.
The best part? You don’t need eggs, butter, or complicated kneading techniques. Simply mix the ingredients, allow the dough to rise, and bake until your kitchen fills with the comforting smell of freshly baked bread.
This is an affordable recipe for beginners, busy families, and anyone who loves homemade bread without unnecessary effort. Serve it with breakfast, soup, cheese, jam, or your favorite meal.
Ingredients
- 3 cups (375 g) all-purpose flour or bread flour
- 1 cup plus 2 tablespoons (270 ml) lukewarm water
- 2 teaspoons instant yeast (about 7 g)
- 1 teaspoon sugar
- 1 teaspoon salt
- 1 tablespoon olive oil (optional)
Instructions
Step 1: Prepare the Yeast Mixture
Pour the lukewarm water into a large mixing bowl. Add the sugar and instant yeast, then stir gently. Let the mixture stand for about 5 minutes if you want to check that the yeast is active.
The water should feel comfortably warm, not hot, because excessive heat can damage the yeast.
Step 2: Mix the Ingredients
Add the flour and salt to the bowl. If desired, add the olive oil for a slightly softer texture.
Mix everything with a wooden spoon until no large patches of dry flour remain. The dough should be sticky and soft. You do not need to knead it by hand.
If the dough seems unusually dry, add water a teaspoon at a time. If it is very runny, add a little flour.
Step 3: Let the Dough Rise
Cover the bowl with a clean kitchen towel or plastic wrap. Leave it in a warm, draft-free place for approximately 60–90 minutes, or until the dough has noticeably doubled in size.
The exact rising time depends on the temperature of your kitchen.
Step 4: Shape the Bread
Lightly flour your work surface and transfer the dough onto it. Gently fold the edges toward the center a few times to form a round loaf.
Avoid adding too much extra flour, as this can make the finished bread dense.
Place the loaf on a piece of baking parchment or in a lightly greased loaf pan. Cover and allow it to rest for another 20–30 minutes.
Step 5: Preheat the Oven
Preheat your oven to 220°C (425°F). If you are using a baking tray, allow it to heat while the oven warms.
For a crispier crust, place a heatproof dish of hot water on the lower oven rack during baking. Be careful when handling hot water and steam.
Step 6: Bake the Bread
Place the loaf in the preheated oven and bake for approximately 25–35 minutes, depending on its size and shape.
The bread should develop a golden-brown crust and sound hollow when tapped on the bottom. If you have a food thermometer, the center should reach approximately 93–96°C (200–205°F).
If the crust browns too quickly, reduce the oven temperature slightly.
Step 7: Cool Before Slicing
Transfer the bread to a wire rack and allow it to cool for at least 30 minutes before cutting.
Although the smell may make you want to slice it immediately, cooling helps the inside finish setting and gives you a better texture.
Method: The Secret to Soft, Homemade Bread
The secret to this recipe is keeping the dough moist and allowing enough time for the yeast to work.
- No kneading: A sticky dough and a proper rising period help develop the bread’s structure without traditional kneading.
- No eggs: Yeast, flour, and water provide the basic structure.
- No butter: The recipe relies on simple pantry ingredients. Olive oil is optional.
- Affordable ingredients: Flour, yeast, water, salt, and a little sugar are all you need.
- A good crust: Baking at a relatively high temperature helps create a golden exterior.
For a softer crust, brush the loaf lightly with olive oil after baking and cover it with a clean towel while it cools.
A Little History of Homemade Bread
Bread has been a staple food for thousands of years. Early communities made simple flatbreads from ground grains and water, cooking them over hot stones or in basic ovens.
As bread-making techniques developed, people discovered the benefits of fermentation. Yeast helped dough rise, creating lighter loaves with a more open texture.
For generations, families have prepared bread at home using affordable ingredients and methods passed down through their households. No-knead bread follows the same practical tradition: simple ingredients, patience, and a little heat can produce something delicious.
Modern no-knead methods became especially popular because they make homemade bread accessible to people who do not have much time or baking experience.
Formation: How the Bread Develops Its Texture
The formation of this bread happens in three main stages.
1. Gluten development
When flour absorbs water, its proteins begin forming a gluten network. Mixing the dough and allowing it to rest helps create the structure needed to hold the gases produced by yeast.
2. Fermentation and rising
The yeast consumes available sugars and releases carbon dioxide. These gas bubbles become trapped in the dough, making it expand and creating a lighter crumb.
3. Baking and crust formation
As the bread heats, the dough’s structure sets. Moisture evaporates from the surface, and browning reactions help produce the golden crust and characteristic baked-bread aroma.
The result is a loaf with a tender interior and a delicious outer crust, without eggs or butter.
Tips for Perfect Results
- Measure the flour carefully. Too much flour can make the bread heavy.
- Use lukewarm water rather than hot water.
- Check the yeast’s expiration date if the dough does not rise.
- Give the dough enough time to double in size.
- Avoid cutting the bread while it is steaming hot.
- Store completely cooled bread in an airtight bag or container at room temperature for about 2–3 days.
- Freeze sliced bread for longer storage, ideally for up to 2–3 months for good quality.
Serving Suggestions
This homemade bread is delicious in many ways.
- Serve warm with olive oil and herbs.
- Spread with jam, honey, or peanut butter.
- Pair with cheese, olives, and tomatoes.
- Use it to accompany soups, stews, and roasted vegetables.
- Toast leftover slices for breakfast.
- Make sandwiches with eggs, vegetables, cheese, or your favorite fillings.
Conclusion
Homemade bread does not have to be expensive or complicated. With a handful of basic ingredients, no eggs, no butter, and no traditional kneading, you can prepare a delicious loaf right in your own kitchen.
The dough needs time to rise, but the preparation itself is simple enough for beginners. Once you have tried this method, you may find yourself making fresh bread regularly instead of buying it every day.
Save this recipe, try it with your next meal, and enjoy the wonderful taste of homemade bread made from scratch.
For Bread Lovers
If you love the smell of fresh bread coming out of the oven, this recipe deserves a place in your kitchen collection. It is simple, economical, and easy to customize with dried herbs, sesame seeds, rosemary, or a little garlic.
Have you ever made bread without kneading it? Give this easy recipe a try, and share it with friends and family who enjoy homemade baking.