
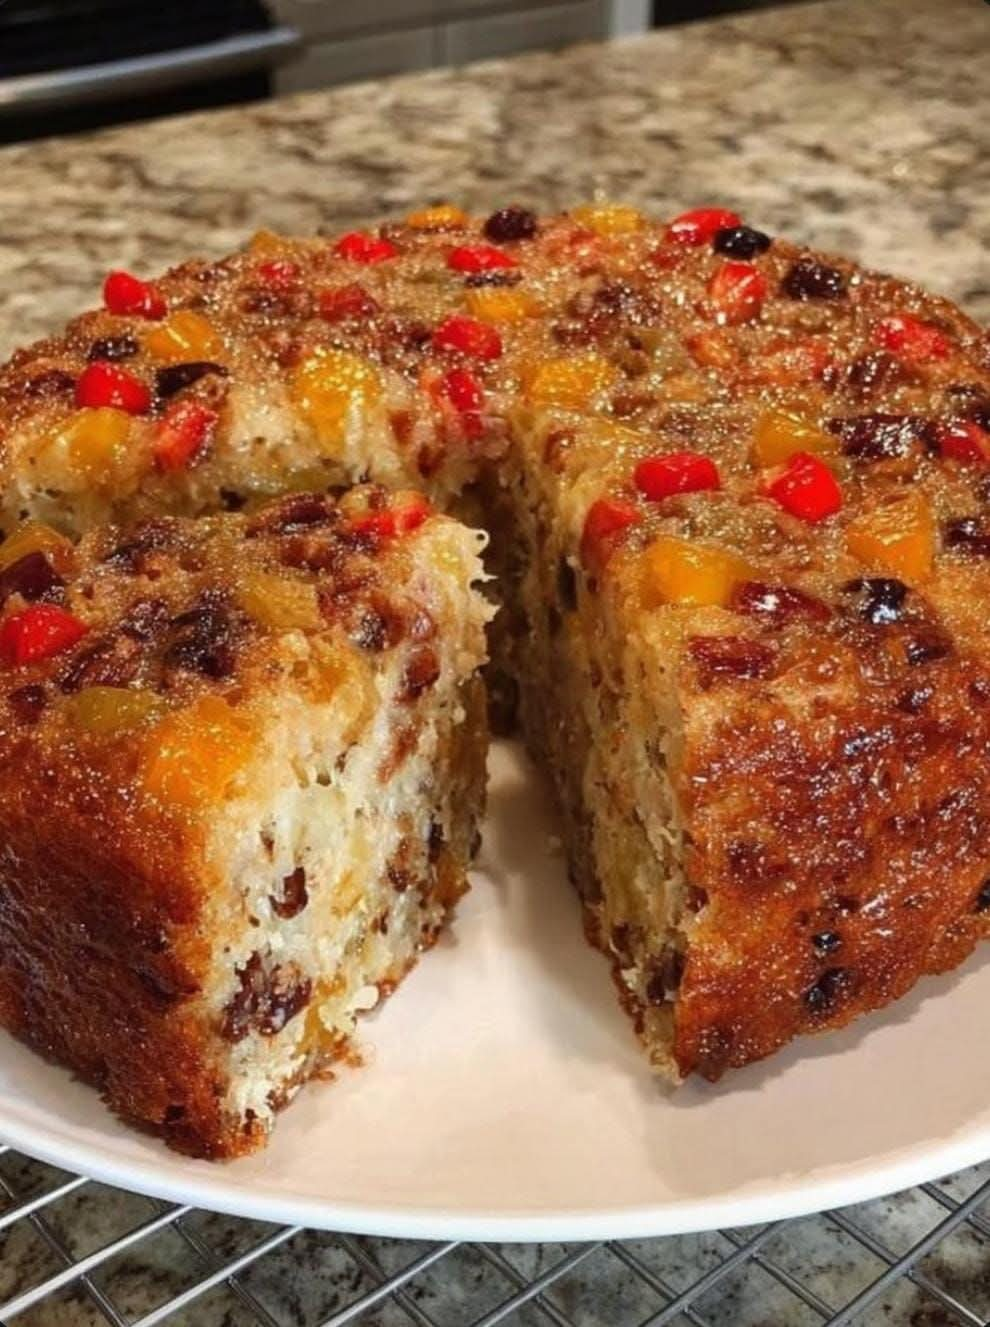
Jeweled Cherry, Pineapple and Toasted Nut Holiday Loaf
Introduction
There is something wonderfully nostalgic about a rich fruit-and-nut loaf. This jeweled holiday loaf combines colorful candied cherries, sweet pineapple, and toasted nuts in a tender, buttery cake. Every slice is filled with little pieces of fruit that look like jewels, while the toasted nuts add a pleasant crunch and depth of flavor.
It is the kind of loaf that feels made for the holiday season, but it is delicious enough to enjoy with coffee or tea any time of year. The aroma of butter, vanilla, toasted nuts, and fruit fills the kitchen as it bakes, creating the comforting feeling of an old-fashioned family gathering.
Ingredients
For the Loaf
- 1 1/2 cups all-purpose flour
- 1 teaspoon baking powder
- 1/4 teaspoon baking soda
- 1/2 teaspoon salt
- 1 cup unsalted butter, softened
- 1 cup granulated sugar
- 3 large eggs, room temperature
- 2 teaspoons vanilla extract
- 1/2 teaspoon almond extract, optional
- 1/2 cup sour cream or full-fat plain yogurt
- 1 cup candied red cherries, halved
- 1 cup candied pineapple, finely chopped
- 1 cup toasted pecans or walnuts, roughly chopped
- 2 tablespoons all-purpose flour, for coating the fruit and nuts
For the Optional Glaze
- 1 cup powdered sugar
- 2 tablespoons milk or heavy cream
- 1/2 teaspoon vanilla extract
- 1 tablespoon finely chopped candied cherries, optional
- 1 tablespoon finely chopped toasted nuts, optional
Equipment
- 9 x 5-inch loaf pan
- Mixing bowls
- Electric mixer
- Rubber spatula
- Cooling rack
- Parchment paper
Instructions
Step 1: Prepare the Pan
Preheat the oven to 325°F (165°C).
Grease a 9 x 5-inch loaf pan thoroughly. Line the bottom and two long sides with parchment paper, leaving a little overhang to make the finished loaf easier to remove.
Step 2: Toast the Nuts
Place the pecans or walnuts in a dry skillet over medium-low heat. Toast for approximately 4 to 6 minutes, stirring frequently.
The nuts should become fragrant and lightly golden, but they should not be allowed to burn.
Remove them from the skillet and allow them to cool completely before chopping.
Toasting the nuts is an important part of the recipe because it brings out their natural oils and gives the loaf a deeper, richer flavor.
Step 3: Prepare the Fruit and Nuts
Place the chopped cherries, pineapple, and cooled toasted nuts in a bowl.
Sprinkle them with 2 tablespoons of flour and toss until everything is lightly coated.
This helps distribute the heavier fruit and nuts throughout the batter instead of allowing them all to sink toward the bottom of the loaf.
Step 4: Combine the Dry Ingredients
In a medium bowl, whisk together:
- 1 1/2 cups flour
- Baking powder
- Baking soda
- Salt
Set the mixture aside.
Step 5: Cream the Butter and Sugar
In a large mixing bowl, beat the softened butter and sugar together for approximately 3 to 5 minutes.
The mixture should become noticeably lighter, creamy, and fluffy.
This step helps incorporate air into the batter, contributing to a lighter texture.
Step 6: Add the Eggs and Flavorings
Add the eggs one at a time, beating well after each addition.
Scrape down the sides of the bowl as needed.
Add the vanilla extract and almond extract, if using.
The almond extract pairs especially well with cherries and toasted nuts and gives the loaf a classic holiday-bakery aroma.
Step 7: Add the Sour Cream
Mix in the sour cream or plain yogurt until just combined.
The sour cream adds moisture and richness while helping create a tender crumb.
Step 8: Combine Wet and Dry Ingredients
Gradually add the dry ingredients to the butter mixture.
Mix on low speed just until the flour disappears.
Do not overmix. Once the batter comes together, switch to a rubber spatula.
Step 9: Fold in the Fruit and Nuts
Gently fold the flour-coated cherries, pineapple, and toasted nuts into the batter.
Fold carefully so the fruit remains intact and is distributed evenly throughout the mixture.
The finished batter should be thick and loaded with colorful fruit and nuts.
Step 10: Fill the Loaf Pan
Transfer the batter to the prepared loaf pan.
Spread the top evenly with a spatula.
Gently tap the pan against the countertop once or twice to remove any large air pockets.
Step 11: Bake
Place the loaf in the center of the preheated oven.
Bake for approximately 70 to 85 minutes.
Because ovens vary, begin checking around the 65-minute mark.
The loaf is ready when:
- The top is deeply golden.
- A toothpick inserted into the center comes out clean or with a few moist crumbs.
- The center feels firm but slightly springy when gently pressed.
If the top becomes too dark before the center has finished baking, loosely cover the loaf with aluminum foil for the remaining baking time.
Step 12: Cool
Allow the loaf to cool in the pan for about 15 to 20 minutes.
Use the parchment overhang to carefully lift it from the pan and place it on a cooling rack.
Allow it to cool completely before slicing.
For the cleanest slices, let the loaf cool for at least 2 hours.
Optional Holiday Glaze
Whisk together the powdered sugar, milk or cream, and vanilla until smooth.
Drizzle the glaze over the completely cooled loaf.
For an especially beautiful presentation, sprinkle a few chopped candied cherries and toasted nuts over the glaze before it sets.
Allow the glaze to firm for approximately 20 to 30 minutes before slicing.
The Method Behind the Recipe
The secret to this loaf is balance.
The butter provides richness and a delicate crumb. The sour cream contributes moisture without making the loaf heavy. The cherries and pineapple provide sweetness and chewy pieces of fruit, while toasted pecans or walnuts provide a contrasting crunch.
Coating the fruit and nuts lightly in flour is another useful technique. It gives the pieces a light coating that helps them remain suspended in the thick batter as the loaf bakes.
The moderate oven temperature is equally important. A rich fruit loaf needs enough time for the center to cook without allowing the exterior to become excessively dark.
A Little History
Fruit-and-nut breads and cakes have a long tradition in holiday baking. Across Europe and North America, preserved fruits, nuts, spices, and rich batters became associated with celebrations because these ingredients could be prepared and stored well beyond the harvest season.
Candied cherries and pineapple eventually became popular additions to American holiday baking, particularly in festive fruitcakes, tea breads, cookies, and molded desserts.
The modern holiday fruit loaf carries that same tradition into a simpler format. Rather than making a large fruitcake, a loaf pan produces a smaller, sliceable cake that is easy to serve alongside coffee, tea, or a holiday breakfast.
Formation and Texture
The finished loaf should have a golden-brown exterior and a soft, buttery interior.
Each slice should reveal colorful pieces of red cherries and golden pineapple surrounded by toasted nuts and tender cake.
The texture is best described as somewhere between a rich pound cake and a traditional fruit bread: moist, dense enough to hold the fruit, but still tender enough to melt pleasantly in your mouth.
Serving Suggestions
Serve the loaf:
- Slightly warm with butter
- At room temperature with coffee
- Alongside tea
- With whipped cream
- With vanilla ice cream
- With a light dusting of powdered sugar
- As part of a holiday breakfast
- As an afternoon snack
- On a dessert platter during celebrations
For an extra-special presentation, arrange thin slices on a serving platter and garnish with a few additional candied cherries and toasted nuts.
Storage
Once completely cooled, wrap the loaf tightly in plastic wrap or place it in an airtight container.
It can be kept at room temperature for approximately 3 days.
For longer storage, refrigerate it for up to 1 week.
The loaf can also be frozen. Wrap it tightly in plastic wrap followed by aluminum foil and freeze for up to 3 months.
Thaw it overnight in the refrigerator or for several hours at room temperature before serving.
Tips for the Best Holiday Loaf
Use room-temperature butter, eggs, and sour cream so the batter combines smoothly.
Do not skip toasting the nuts. Toasting adds considerably more flavor.
Use well-drained candied pineapple. Excess moisture can make the batter unnecessarily wet.
Do not overmix after adding the flour. Overmixing can make the loaf tough.
Do not slice the loaf while it is still hot. Allowing it to cool gives the crumb time to set.
If you want a stronger holiday flavor, add 1 teaspoon of orange zest or 1/2 teaspoon of ground cinnamon to the batter.
Conclusion
This jeweled cherry, pineapple, and toasted nut loaf is more than just a cake. It is the kind of recipe that brings together buttery richness, colorful fruit, crunchy toasted nuts, and the warmth of holiday baking in every slice.
The combination of cherries, pineapple, and nuts gives the loaf its beautiful appearance, while the tender buttery crumb makes it especially satisfying with a hot cup of coffee or tea.
It is easy to imagine why a child might take one bite and declare that the jeweled cherries, pineapple, and toasted nuts taste like the holidays wrapped in butter. That is exactly the charm of this old-fashioned style of baking: simple ingredients transformed into something that tastes like a celebration.
For the Lovers of Traditional Holiday Baking
If you love classic fruitcakes, buttery pound cakes, tea loaves, candied fruit, and nut-filled holiday desserts, this is a recipe worth keeping.
It is beautiful enough for a holiday table, comforting enough for a quiet afternoon, and nostalgic enough to become one of those recipes families make year after year.