
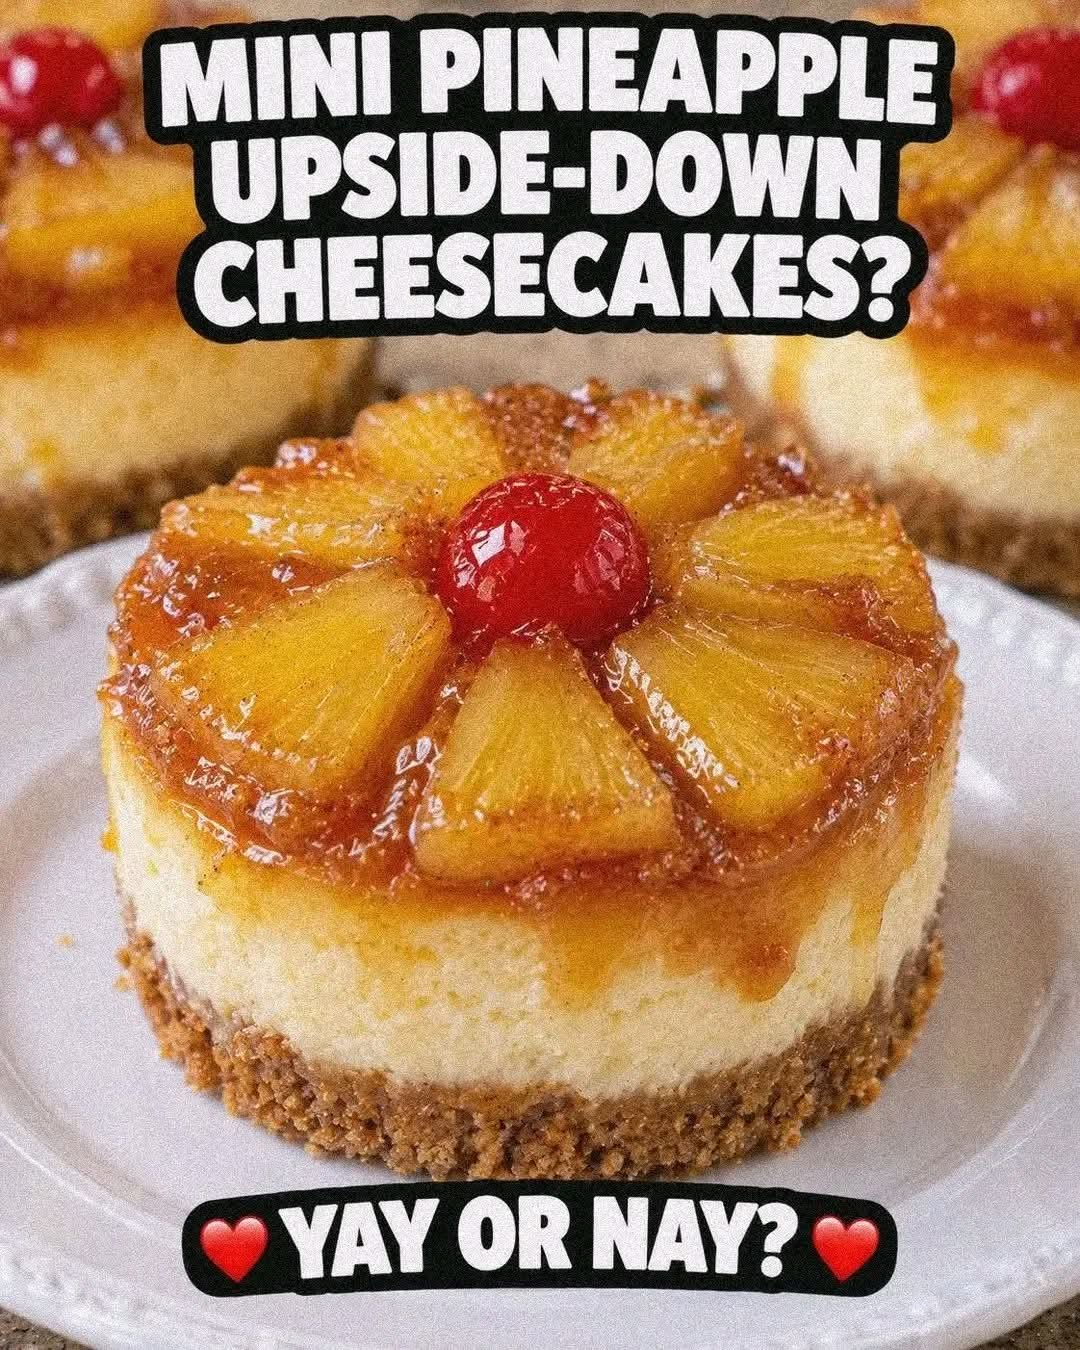
Mini Pineapple Upside-Down Cheesecakes
Introduction
Mini Pineapple Upside-Down Cheesecakes combine two classic desserts into one beautiful individual treat. Each little cheesecake has a buttery graham cracker crust, a creamy vanilla cheesecake center, and a sweet pineapple-and-cherry topping that becomes wonderfully caramelized during baking.
These individual cheesecakes are especially appealing because they are easy to portion, simple to serve, and elegant enough for birthdays, family dinners, potlucks, holiday gatherings, showers, and dessert tables. The contrast between tangy cream cheese, sweet pineapple, buttery brown sugar, and juicy cherries creates a familiar pineapple upside-down cake flavor in a rich cheesecake form.
Preparation Information
Yield: 12 mini cheesecakes
Preparation time: 25 minutes
Baking time: 20–25 minutes
Chilling time: 2–3 hours
Total time: Approximately 3 hours 50 minutes
Oven temperature: 350°F (175°C)
Ingredients
For the Pineapple Topping
- 1 can (20 ounces) pineapple slices, thoroughly drained
- 1/2 cup packed brown sugar
- 1/4 cup unsalted butter, melted
- 12 maraschino cherries
For the Graham Cracker Crust
- 1 1/2 cups graham cracker crumbs
- 5 tablespoons unsalted butter, melted
- 3 tablespoons granulated sugar
For the Cheesecake Filling
- 16 ounces cream cheese, softened to room temperature
- 1/2 cup granulated sugar
- 2 large eggs
- 1 teaspoon vanilla extract
- 1/2 cup sour cream
- 2 tablespoons all-purpose flour
Instructions
Step 1: Prepare the Pan
Preheat the oven to 350°F (175°C). Line a standard 12-cup muffin pan with cupcake liners.
For easier removal, use good-quality liners and make sure they are sitting firmly inside the muffin cups.
Step 2: Prepare the Pineapple
Drain the pineapple slices very well. Excess liquid can make the topping watery and may prevent the brown sugar mixture from becoming properly caramelized.
Cut each pineapple slice into small pieces. Set the pieces aside while preparing the topping mixture.
Step 3: Make the Caramelized Pineapple Layer
In a small bowl, combine the melted butter and packed brown sugar. Stir until the mixture is evenly combined.
Place approximately 1 teaspoon of the butter and brown sugar mixture into the bottom of each cupcake liner.
Add several small pieces of pineapple to each cup, followed by one maraschino cherry.
Arrange the pineapple around the cherry so that the fruit will create an attractive topping when the cheesecakes are inverted.
Step 4: Prepare the Graham Cracker Crust
In another bowl, combine the graham cracker crumbs, melted butter, and granulated sugar.
Mix until the crumbs are evenly coated and the mixture resembles damp sand.
Place approximately 1 1/2 tablespoons of the crust mixture into each muffin cup, directly over the pineapple layer.
Gently press the crumbs into an even layer. Do not pack them excessively hard, because a very dense crust can become difficult to cut or eat.
Step 5: Make the Cheesecake Filling
Place the softened cream cheese in a large mixing bowl.
Beat the cream cheese and granulated sugar until smooth and creamy. Scrape down the sides of the bowl as needed.
Add the eggs one at a time, mixing after each addition until just incorporated.
Add the vanilla extract, sour cream, and flour. Mix until the filling is smooth and combined.
Avoid overmixing once the eggs have been added. Mixing just until incorporated helps produce a smooth, tender cheesecake texture.
Step 6: Fill the Muffin Cups
Carefully spoon the cheesecake mixture into the 12 prepared muffin cups.
Divide the filling as evenly as possible between the cups. The cheesecake mixture should sit above the crust while leaving a little room at the top.
Gently tap the pan against the counter once or twice to release any large air bubbles.
Step 7: Bake
Place the muffin pan in the preheated oven.
Bake for approximately 20–25 minutes, or until the cheesecake centers are just set.
The centers may still have a very slight jiggle when the pan is gently moved. Do not wait until they are completely firm in the oven, because cheesecakes continue to set as they cool.
Step 8: Cool the Cheesecakes
Remove the pan from the oven and allow the cheesecakes to cool at room temperature.
Once they have cooled, transfer the pan to the refrigerator.
Chill for at least 2–3 hours. For an even firmer texture and easier removal, they can be refrigerated overnight.
Step 9: Invert the Cheesecakes
When ready to serve, carefully remove the cupcake liners.
Place a serving plate over the top of each cheesecake and gently turn it upside down.
The pineapple and cherry layer should now be on top, creating the classic upside-down appearance.
If some of the caramelized pineapple mixture remains in the liner, simply spoon it over the top of the cheesecake.
Method
The recipe uses a layered muffin-pan method. The fruit and brown sugar mixture are placed at the bottom first, followed by the graham cracker crust and creamy cheesecake filling.
During baking, the butter and brown sugar combine with the pineapple juices to create a sweet, caramel-like topping. As the cheesecakes cool and are inverted, the fruit layer becomes the decorative top while the graham cracker crust forms the bottom.
The key to a successful cheesecake is gentle mixing and careful baking. The cream cheese should be completely softened before mixing, and the eggs should be incorporated without excessive beating.
The History Behind the Dessert
Pineapple upside-down cake became particularly popular in the United States during the early twentieth century. The dessert traditionally featured pineapple rings, cherries, butter, and brown sugar arranged at the bottom of a baking pan. After baking, the cake was turned upside down so that the colorful fruit became the presentation layer.
Cheesecake has a much older history, with early forms of cheesecake dating back to ancient civilizations. Over time, cheesecake evolved into many regional and modern variations, particularly in the United States.
Mini Pineapple Upside-Down Cheesecakes bring these two dessert traditions together. Instead of preparing one large upside-down cake or cheesecake, the components are divided into individual portions, making the dessert easier to serve and especially attractive for entertaining.
Formation and Texture
The formation of these mini cheesecakes comes from three distinct layers.
The first layer is the pineapple topping. Brown sugar and butter create sweetness and richness while the pineapple contributes its characteristic tropical flavor.
The second layer is the graham cracker crust. It provides a buttery, slightly crunchy contrast to the soft cheesecake filling.
The final layer is the cheesecake itself. Cream cheese provides richness, sour cream adds a gentle tang and smoothness, eggs help the filling set, and vanilla gives it a classic dessert aroma.
After chilling, the cheesecake becomes firm and creamy. When inverted, the fruit topping provides moisture and sweetness that complements the dense cheesecake underneath.
Important Tips for the Best Results
Drain the Pineapple Well
Excess pineapple juice can make the topping too wet. Allow the pineapple to drain thoroughly before cutting it into pieces.
Use Room-Temperature Cream Cheese
Softened cream cheese blends much more easily with the sugar and produces a smoother filling.
Do Not Overbake
The cheesecakes should look set around the edges while the centers retain a slight jiggle. Overbaking can result in a dry or cracked cheesecake.
Cool Before Refrigerating
Allow the cheesecakes to cool before placing them in the refrigerator. This helps prevent excessive condensation.
Chill Thoroughly
Do not rush the chilling process. The cheesecake needs sufficient time to firm up, making it easier to remove from the liners and invert.
Invert Carefully
The pineapple topping can be sticky because of the brown sugar and butter. Gently loosen the edges before turning each cheesecake over.
Serving Suggestions
These mini cheesecakes are delicious served chilled on their own. For a more elaborate dessert plate, they can be accompanied by a small spoonful of whipped cream or a light dusting of powdered sugar.
They are particularly suitable for:
- Birthday parties
- Family dinners
- Potlucks
- Holiday gatherings
- Baby showers
- Bridal showers
- Afternoon dessert tables
- Summer celebrations
- Dinner parties
- Bake sales
Because each cheesecake is individually portioned, guests can easily take one without needing to slice a large dessert.
Storage
Store the finished cheesecakes in an airtight container in the refrigerator.
They are best enjoyed within 3–4 days for the freshest flavor and texture.
For the best presentation, keep them refrigerated until shortly before serving.
Conclusion
Mini Pineapple Upside-Down Cheesecakes are a delicious combination of creamy cheesecake and classic pineapple upside-down cake. The buttery graham cracker crust provides a satisfying base, the cheesecake filling delivers a rich and smooth center, and the caramelized pineapple and cherry topping creates the unmistakable flavor and appearance of a traditional upside-down dessert.
The individual size makes this recipe especially convenient for entertaining. Instead of cutting and serving a large cheesecake, each guest receives a perfectly portioned dessert with its own beautiful pineapple topping.
For Cheesecake Lovers
If you love cheesecake but also enjoy fruity desserts, this recipe offers the best of both worlds. The richness of cream cheese is balanced by the bright flavor of pineapple, while brown sugar and butter add a warm caramelized sweetness.
The miniature size also makes these cheesecakes feel special and elegant without requiring complicated decorating techniques. Once chilled and inverted, the pineapple and cherry topping does most of the decorating work.
These Mini Pineapple Upside-Down Cheesecakes are the kind of dessert that looks impressive on a serving platter while remaining simple enough to prepare in a home kitchen. They are creamy, fruity, buttery, and satisfying, making them a wonderful choice whenever you want to turn a familiar classic into something new.