
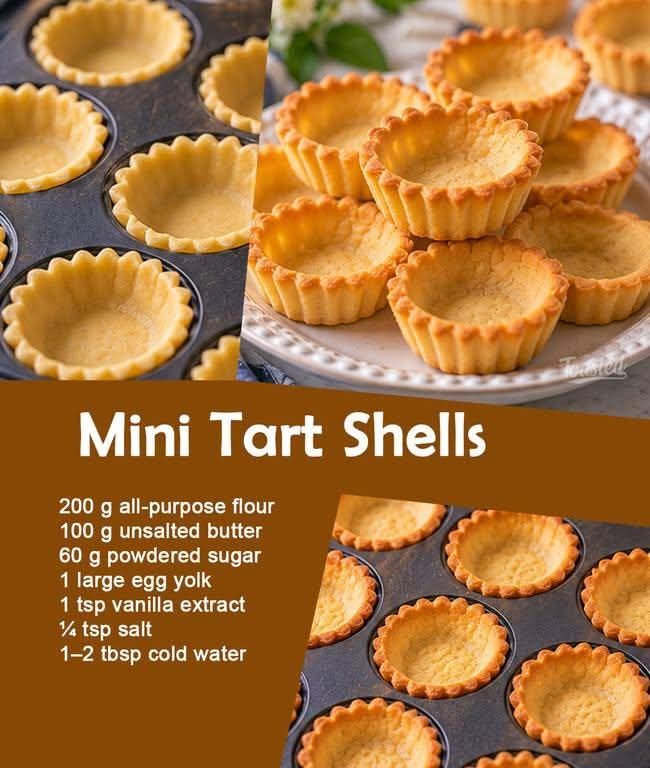
Mini Tart Shells – Buttery, Crisp, and Delicate Homemade Pastry
Introduction
There is something special about homemade mini tart shells. Their delicate, buttery texture, lightly sweet flavor, and crisp golden edges make them the perfect foundation for countless delicious desserts. Whether you fill them with silky pastry cream, rich chocolate ganache, tangy lemon curd, smooth cheesecake filling, or fresh seasonal fruit, these little pastry shells can turn simple ingredients into elegant homemade treats.
This classic mini tart shell recipe is easy to prepare with everyday baking ingredients. The dough comes together with flour, cold butter, powdered sugar, egg yolk, vanilla, and a pinch of salt. After a short rest in the refrigerator, it becomes easy to roll, shape, and bake into beautiful miniature pastry shells.
These tart shells are ideal for afternoon tea, birthday parties, holiday dessert tables, family gatherings, bake sales, or whenever you want to prepare individual desserts that look as beautiful as they taste. You can even bake them ahead of time and fill them whenever you are ready to serve.
Ingredients
Preparation: 25 minutes · Chilling: 45–65 minutes · Baking: 15–20 minutes · Makes approximately 12–18 mini shells, depending on mold size
For the pastry dough
- 200 g all-purpose flour
- 100 g unsalted butter, cold and cut into small cubes
- 60 g powdered sugar
- 1 large egg yolk
- 1 teaspoon vanilla extract
- ¼ teaspoon salt
- 1–2 tablespoons cold water, only if needed
Optional fillings
- Pastry cream for a classic French-style tart
- Chocolate ganache for rich chocolate mini tarts
- Lemon curd for a bright, tangy dessert
- Cheesecake filling for creamy individual treats
- Caramel and chopped nuts for a sweet, crunchy combination
- Fresh strawberries, blueberries, raspberries, or kiwi
- Whipped cream for a light and airy finish
Instructions
Step 1: Prepare the dry ingredients
Place the flour, powdered sugar, and salt in a large mixing bowl. Whisk them together until evenly combined.
This step distributes the sugar and salt throughout the flour, helping the pastry develop a consistent flavor. Sifting the flour and powdered sugar is optional, but it can help remove lumps and create a finer dough.
Step 2: Incorporate the cold butter
Add the cold butter cubes to the flour mixture. Using your fingertips, gently rub the butter into the dry ingredients until the mixture resembles coarse breadcrumbs.
Work quickly so the butter does not become too warm. Small pieces of butter help create a tender, crumbly pastry texture.
Avoid kneading the mixture like bread dough. Too much handling can develop excess gluten, resulting in tart shells that are tough instead of delicate.
Step 3: Add the egg yolk and vanilla
Add the egg yolk and vanilla extract to the butter-flour mixture. Stir gently with a fork or your fingertips until the dough begins to clump together.
If the mixture seems too dry and refuses to hold together, add cold water a teaspoon at a time. Stop as soon as the dough forms a cohesive ball.
The dough should feel smooth enough to shape but should not be sticky or wet.
Step 4: Chill the dough
Shape the dough into a flat disc and wrap it tightly in plastic wrap or place it in a covered container.
Refrigerate for 30–45 minutes.
Chilling allows the butter to firm up and the flour to hydrate. It also makes the dough easier to roll and helps reduce shrinkage during baking.
Do not skip this step if you want neat, well-shaped tart shells.
Step 5: Roll out the pastry
Lightly flour your work surface and rolling pin. Place the chilled dough on the surface and roll it gently to approximately 3 mm, or ⅛ inch, thick.
Turn the dough occasionally as you roll to prevent it from sticking. If the pastry becomes too soft, return it to the refrigerator for several minutes.
Cut circles slightly larger than your mini tart molds. The circles should be large enough to cover the bottom and sides of each mold.
Step 6: Shape the mini tart shells
Carefully lift each pastry circle and place it inside a mini tart mold.
Gently press the dough into the bottom and along the fluted sides. Make sure the pastry fits snugly into the corners without stretching it.
Trim away any excess dough around the edges. Prick the bottom lightly with a fork to help prevent large air bubbles from forming during baking.
Arrange the prepared molds on a baking tray and refrigerate them for another 15–20 minutes.
Step 7: Bake until golden
Preheat your oven to 175°C (350°F).
Place the chilled tart shells in the oven and bake for approximately 15–20 minutes, or until the pastry is lightly golden around the edges and the bottoms are cooked through.
For especially neat shells, line each pastry shell with a small piece of parchment paper and add baking weights or dried beans during the first 10 minutes. Carefully remove the parchment and weights, then continue baking until the bottoms are golden.
Keep an eye on the shells during the final few minutes because smaller molds may bake faster than larger ones.
Step 8: Cool completely
Remove the baking tray from the oven and allow the shells to rest in their molds for about 5 minutes.
Carefully remove them from the molds and transfer them to a wire rack. Let them cool completely before adding any filling.
Filling warm pastry shells can cause creams, chocolate, or cheesecake mixtures to soften or melt. Completely cooled shells also retain their crisp texture more effectively.
Step 9: Fill and decorate
Once the shells are cool, add your favorite filling.
For a classic fruit tart, pipe pastry cream into each shell and arrange fresh berries on top. For chocolate lovers, spoon in smooth ganache and allow it to set. For a refreshing dessert, fill the shells with lemon curd and finish with a little whipped cream.
You can also combine several fillings to create a colorful assortment of mini desserts for a party or celebration.
Methods for Perfect Mini Tart Shells
1. The traditional shortcrust method
This method uses cold butter rubbed into flour and sugar before the egg yolk is added. It creates a delicate, crumbly pastry that works beautifully for sweet mini tarts.
The most important rule is to keep the butter cool and avoid excessive mixing.
2. The food processor method
If you prefer a quicker approach, place the flour, powdered sugar, and salt in a food processor. Add the cold butter and pulse until the mixture resembles fine crumbs.
Add the egg yolk and vanilla, then pulse briefly until the dough begins to come together. Add a small amount of cold water only if necessary.
Remove the dough, shape it into a disc, wrap it, and chill as directed.
Avoid processing for too long, as overmixing can make the pastry less tender.
3. The blind-baking method
Blind baking means baking the pastry shell before adding its filling. It is especially useful for fillings that do not need to be baked, such as pastry cream, chocolate ganache, whipped cheesecake filling, or lemon curd.
For the best results, chill the shaped shells first, line them with parchment, and use baking weights during the initial baking period. Remove the weights and parchment before finishing the bake.
4. The make-ahead method
You can prepare the dough a day in advance and keep it refrigerated until you are ready to shape the shells. Alternatively, bake the shells ahead of time, cool them completely, and store them in an airtight container.
Fill them closer to serving time to help maintain their crisp texture, especially when using moist fillings.
The History of Mini Tart Shells
Tarts have a long history in European baking, particularly in French pastry traditions. Early forms of tarts and pies developed as ways to enclose or present sweet and savory fillings inside pastry.
Over time, European bakers refined shortcrust pastry techniques, using butter, flour, sugar, and eggs to create tender shells suitable for fruit, custards, creams, and other fillings.
French patisserie became especially well known for elegant fruit tarts, custard tarts, and miniature pastries. Individual tartlets offered an attractive way to serve desserts in neat portions, making them popular in cafés, bakeries, celebrations, and formal gatherings.
Today, mini tart shells are used around the world. Home bakers appreciate them because one simple pastry recipe can become the base for dozens of different desserts. From traditional fruit tartlets to modern chocolate creations, these little shells continue to be a versatile favorite.
Formation: Understanding the Perfect Tart Shell
The formation of a good tart shell depends on the balance between its ingredients and the way the dough is handled.
Flour provides structure. It forms the foundation of the pastry and helps the shells hold their shape.
Cold butter creates tenderness. When rubbed into the flour, butter coats some of the flour particles, limiting gluten development and producing a delicate, crumbly texture.
Powdered sugar adds sweetness. Its fine texture blends easily into the dough and helps create a smooth pastry with a tender bite.
Egg yolk binds the ingredients. It contributes richness, color, and a more cohesive dough.
Vanilla enhances the flavor. Its warm aroma complements the butter and sugar without overpowering the filling.
Salt balances the sweetness. Even a small amount makes the buttery flavor more noticeable.
Chilling improves stability. Cold dough is easier to shape, and firm butter helps the pastry maintain its form as it enters the oven.
During baking, the butter melts, moisture evaporates, and the pastry sets into a crisp shell. Baking until the bottom is properly golden is important because pale pastry may remain soft, especially after it is filled.
Tips for Success
- Always begin with cold butter.
- Avoid adding too much water; excess moisture can make the pastry tough.
- Handle the dough as little as possible.
- Chill both the dough and the shaped shells before baking.
- Do not stretch the pastry when fitting it into the molds.
- Prick the bases lightly to help reduce air pockets.
- Use baking weights if you want flatter, more even bottoms.
- Allow the shells to cool completely before filling.
- If the dough cracks while rolling, let it soften slightly at room temperature before continuing.
- If the edges brown too quickly, check your oven temperature and reduce the baking time slightly.
Delicious Filling Ideas

Fresh Fruit Tartlets
Fill the shells with vanilla pastry cream and top with strawberries, blueberries, raspberries, or sliced kiwi. A light apricot glaze gives them a beautiful bakery-style finish.

Chocolate Ganache Tarts
Fill the baked shells with warm chocolate ganache made from chocolate and cream. Allow the filling to set before serving, then decorate with chocolate shavings.

Lemon Tartlets
Add smooth lemon curd for a sweet, tangy dessert. Finish with a little whipped cream or a thin slice of lemon for decoration.

Caramel Pecan Tartlets
Spoon caramel filling into the shells and sprinkle with toasted pecans. The combination of crisp pastry, buttery caramel, and crunchy nuts is ideal for autumn gatherings and holiday dessert tables.
Storage Instructions
Unbaked dough: Wrap tightly and refrigerate for up to 2 days.
Baked, unfilled shells: Store in an airtight container at room temperature for approximately 3–4 days, provided they are completely cool and kept in a dry place.
Freezing: Freeze baked, unfilled shells in a freezer-safe container for up to 2 months for best quality. Thaw at room temperature before filling. If they have softened, briefly re-crisp them in a low oven and allow them to cool completely.
Filled tartlets: Storage depends on the filling. Desserts containing pastry cream, fresh dairy, or other perishable ingredients should be refrigerated promptly and handled according to the filling’s food-safety requirements.
Serving Suggestions
Mini tart shells are wonderful served with coffee, tea, or a glass of cold milk. Arrange several varieties on a dessert platter to create a colorful selection for birthdays, weddings, afternoon tea, family celebrations, or holiday parties.
For an elegant presentation, use different fillings in the same batch. A mixture of fruit, chocolate, lemon, and caramel tartlets gives everyone something to enjoy.
You can also decorate the finished shells with powdered sugar, finely grated chocolate, chopped pistachios, toasted coconut, or fresh mint leaves, depending on the filling.
Conclusion
Homemade mini tart shells are one of the most useful recipes to keep in your baking collection. They are buttery, crisp, delicately sweet, and versatile enough to suit almost any dessert idea.
With a few simple ingredients and some careful chilling, you can create beautiful pastry shells that look as though they came from a professional bakery. Once you master the basic technique, you can experiment with countless fillings, toppings, and decorations to make every batch unique.
Whether you choose fresh fruit, creamy custard, rich chocolate, tangy lemon, or sweet caramel, these little tart shells provide the perfect foundation for an unforgettable dessert.
For Tart Lovers
If you love homemade pastries, elegant desserts, and small treats that look beautiful on a serving platter, this recipe is worth making again and again. Prepare a batch for your next gathering, fill each shell with a different flavor, and enjoy the pleasure of serving homemade mini tartlets made from scratch.
Recipe reminder: The secret to the best mini tart shells is simple: cold butter, minimal handling, enough chilling time, and a fully baked golden base. Follow these steps, and you will have crisp, delicate shells ready for your favorite fillings.