
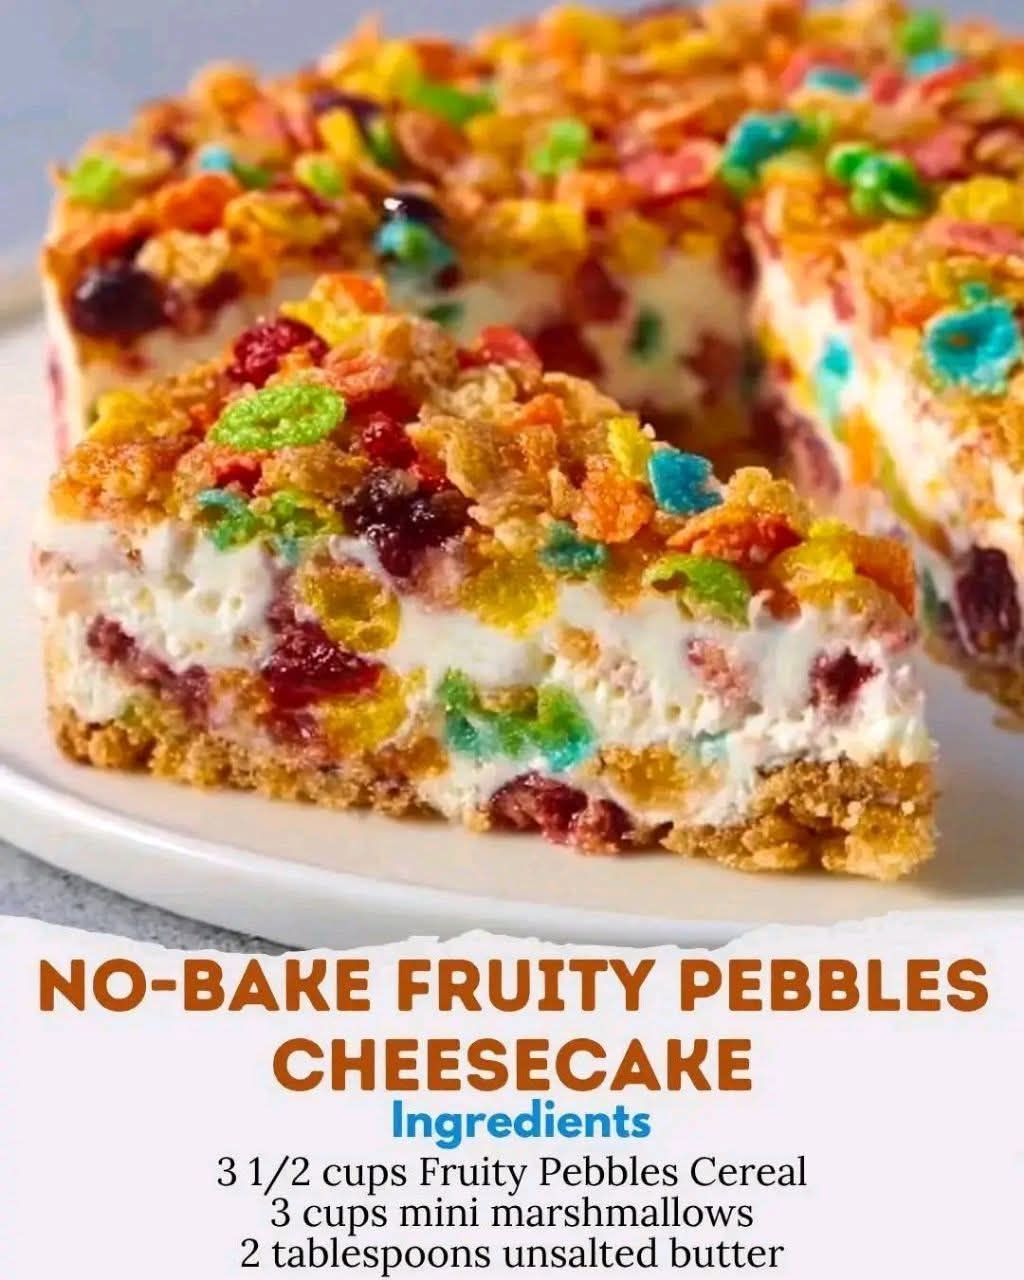
No-Bake Fruity Pebbles Cheesecake
This No-Bake Fruity Pebbles Cheesecake is a colorful, creamy, nostalgic dessert that combines the familiar crunch and fruity sweetness of Fruity Pebbles cereal with a rich cheesecake filling. The best part is that there is no oven required. A cereal-and-marshmallow crust creates a chewy, crisp foundation, while the cream cheese filling adds a smooth and tangy contrast.
It is an especially fun dessert for birthdays, family gatherings, potlucks, holidays, or whenever you want an easy cheesecake that looks as good as it tastes.
Ingredients
For the Fruity Pebbles Crust
- 3 ½ cups Fruity Pebbles cereal
- 3 cups mini marshmallows
- 2 tablespoons unsalted butter
For the Cheesecake Filling
- 16 oz cream cheese, softened
- ¼ cup powdered sugar
- 1 teaspoon vanilla extract
- 1 ½ cups cold heavy whipping cream
- ½ cup powdered sugar, preferably sifted
- 1 cup Fruity Pebbles cereal
For the Topping
- 1 cup Fruity Pebbles cereal
- 1 cup whipped cream
- ½ cup mini marshmallows, optional
- Fruity Pebbles crumbs, optional
Equipment
- 9-inch springform pan
- Large mixing bowls
- Small saucepan or microwave-safe bowl
- Electric mixer
- Rubber spatula
- Measuring cups and spoons
- Parchment paper
Introduction
No-bake cheesecakes are popular because they provide the creamy texture associated with traditional cheesecake without requiring an oven or a water bath. This Fruity Pebbles version takes that simple idea and gives it a playful cereal-inspired twist.
The crust is made by gently melting butter and marshmallows before folding in Fruity Pebbles. Once pressed into the pan, the mixture becomes a sweet, slightly chewy base with plenty of cereal crunch.
The filling is made with softened cream cheese, powdered sugar, vanilla, whipped cream, and additional Fruity Pebbles. The result is light, creamy, fruity, and rich without being as heavy as a traditional baked cheesecake.
History and Inspiration
Fruity Pebbles cereal has been a familiar part of American breakfast culture for decades and is particularly recognizable for its brightly colored, small rice-shaped pieces and fruity flavor.
Cereal treats made with marshmallows became popular because they were inexpensive, simple, and required very little cooking. The same basic technique can be adapted into dessert crusts, bars, and cheesecake bases.
This recipe combines those two ideas: a classic marshmallow cereal treat and a modern no-bake cheesecake. While this particular cheesecake is a contemporary dessert creation rather than a traditional historical recipe, it reflects the long-standing American tradition of turning breakfast cereals and pantry ingredients into fun homemade sweets.
Formation of the Cheesecake
The cheesecake is built in three main layers.
First, the Fruity Pebbles and marshmallow mixture forms the crust. The melted marshmallows act as the binder, while the butter helps create a softer texture and makes the mixture easier to press into the pan.
Second, the cream cheese filling provides the creamy center. Whipped cream is folded into the cream cheese mixture to make the filling lighter and more airy.
Finally, Fruity Pebbles and whipped cream are added to the top for decoration and additional texture.
Instructions
Step 1: Prepare the Pan
Lightly grease the bottom and sides of a 9-inch springform pan.
For easier removal, place a round piece of parchment paper on the bottom of the pan.
Set the prepared pan aside.
Step 2: Make the Fruity Pebbles Crust
Place the butter and mini marshmallows in a large microwave-safe bowl.
Microwave for approximately 20 to 30 seconds at a time, stirring between each interval, until the marshmallows become soft and mostly melted.
Be careful not to overheat the mixture.
Once melted, immediately stir until the butter and marshmallows are combined.
Add the 3 ½ cups of Fruity Pebbles cereal.
Gently fold the cereal into the marshmallow mixture until it is evenly coated.
Step 3: Form the Crust
Transfer the cereal mixture to the prepared springform pan.
Lightly grease your hands or use a piece of parchment paper to prevent sticking.
Press the mixture firmly and evenly across the bottom of the pan.
Do not press it so aggressively that the crust becomes extremely hard. You want it firm enough to hold the cheesecake while retaining some of its pleasant chewy texture.
Place the pan in the refrigerator while preparing the filling.
Step 4: Prepare the Cream Cheese
Place the softened cream cheese in a large mixing bowl.
Beat it with an electric mixer until smooth and creamy.
Add ¼ cup powdered sugar and 1 teaspoon vanilla extract.
Continue beating until the mixture is smooth and free of lumps.
Scrape down the sides of the bowl as necessary.
Step 5: Whip the Cream
Pour the cold heavy whipping cream into a separate chilled bowl.
Add ½ cup powdered sugar.
Beat on medium-high speed until stiff peaks form.
Do not overbeat the cream, as it can become grainy and eventually turn into butter.
Step 6: Combine the Filling
Add approximately one-third of the whipped cream to the cream cheese mixture.
Fold gently with a rubber spatula.
Continue adding the remaining whipped cream in batches, folding gently after each addition.
The goal is to maintain the airiness of the whipped cream while creating a smooth cheesecake filling.
Step 7: Add Fruity Pebbles
Fold 1 cup of Fruity Pebbles into the cheesecake mixture.
Mix gently so the cereal remains recognizable and does not become completely crushed.
The cereal will add color, fruity flavor, and little bursts of texture throughout the filling.
Step 8: Fill the Cheesecake
Remove the crust from the refrigerator.
Spoon the cheesecake filling over the cereal crust.
Spread the filling evenly using a spatula.
Smooth the surface as much as possible.
Step 9: Decorate
Sprinkle 1 cup of Fruity Pebbles over the top.
Add small dollops or swirls of whipped cream around the edge if desired.
For additional decoration, sprinkle a few mini marshmallows over the cheesecake.
You can also lightly crush some Fruity Pebbles and use the crumbs around the outside edge.
Step 10: Chill
Cover the cheesecake carefully with plastic wrap or foil.
Refrigerate for at least 6 hours, preferably overnight.
The long chilling time allows the filling to become firm enough to slice cleanly.
For an especially firm cheesecake, you can place it in the freezer for approximately 30 to 45 minutes before serving, but do not freeze it completely unless you intend to store it frozen.
Method
The key method in this recipe is gentle mixing.
The marshmallows should be melted only until soft and workable. Overheating them can make the crust excessively sticky and difficult to handle.
The cream cheese should be completely softened before mixing. Cold cream cheese can leave lumps in the filling.
The whipped cream should be folded into the cream cheese rather than aggressively beaten together. Gentle folding keeps air in the filling and produces a lighter cheesecake.
Finally, refrigeration is essential. Unlike baked cheesecake, a no-bake cheesecake relies on chilling and the structure of the cream cheese and whipped cream to firm up.
Important Tips for Success
Use softened cream cheese
Allow the cream cheese to sit at room temperature until softened. This produces a smoother filling.
Keep the whipping cream cold
Cold heavy cream whips more easily and produces better volume.
Do not overmix
Once the whipped cream is incorporated, fold rather than beat.
Press the crust evenly
An even crust gives the cheesecake a stable foundation and makes every slice easier to serve.
Chill overnight when possible
Overnight refrigeration gives the cheesecake the best texture and makes slicing easier.
Add cereal shortly before serving
Fruity Pebbles on the surface can gradually soften because of moisture from the cheesecake. For the brightest color and best crunch, add some fresh cereal immediately before serving.
Serving Suggestions
For clean slices, remove the cheesecake from the refrigerator and allow it to sit at room temperature for approximately 5 to 10 minutes.
Run a thin, sharp knife under warm water, wipe it dry, and carefully slice the cheesecake.
Serve each slice with a little whipped cream and additional Fruity Pebbles.
For a more decadent presentation, you can add a small drizzle of white chocolate over the top or serve each slice with a spoonful of whipped cream.
Storage
Keep the cheesecake refrigerated and covered.
It is best enjoyed within approximately 3 to 4 days.
If you want to freeze it, freeze the cheesecake without the fresh cereal topping. Wrap it tightly and freeze for up to about one month for best quality. Thaw it in the refrigerator before serving and add fresh Fruity Pebbles afterward.
Variations
Fruity Pebbles Cheesecake Cups
Instead of using a springform pan, press the cereal mixture into individual dessert cups and divide the cheesecake filling between them. Chill and decorate each cup individually.
Chocolate Fruity Pebbles Cheesecake
Add a thin layer of melted and cooled chocolate between the crust and cheesecake filling for a chocolate-fruity combination.
Extra Fruity Cheesecake
Fold another ½ cup of Fruity Pebbles into the filling for even more cereal texture.
Birthday Version
Decorate the top with whipped cream, colorful sprinkles, and additional Fruity Pebbles to create a festive birthday dessert.
Common Mistakes to Avoid
Using cold cream cheese: This can result in a lumpy filling.
Overheating the marshmallows: Very hot marshmallow mixture can become excessively sticky.
Adding warm ingredients to the filling: Warm ingredients can soften the whipped cream and make the cheesecake less stable.
Skipping the chilling period: A no-bake cheesecake needs sufficient refrigeration time to set.
Cutting immediately after assembling: The filling needs several hours to develop its proper structure.
Conclusion
This No-Bake Fruity Pebbles Cheesecake is a playful dessert that brings together creamy cheesecake, sweet marshmallows, buttery cereal, and colorful Fruity Pebbles in one easy-to-make treat.
Its greatest appeal is its simplicity. There is no complicated baking process, no water bath, and no need to worry about cracks forming in the cheesecake. With a little preparation and plenty of chilling time, you can create a dessert that is creamy, colorful, crunchy, and wonderfully nostalgic.
For cereal lovers, cheesecake lovers, and anyone who enjoys fun homemade desserts, this recipe is an excellent choice for sharing with family and friends.