
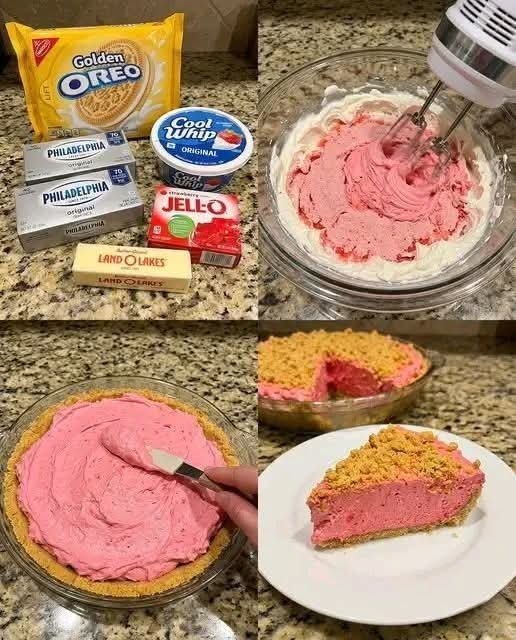
No-Bake Strawberry Crunch Cheesecake
Absolutely! Here’s a big, detailed, creamy and fruity version of your No-Bake Strawberry Crunch Cheesecake, with a full introduction, ingredients, preparation methods, a little history, presentation ideas, and a delicious conclusion.
🍓 No-Bake Strawberry Crunch Cheesecake
🌸 Introduction
There are desserts that are simply delicious, and then there are desserts that make everyone stop and ask, “Who made this?” This No-Bake Strawberry Crunch Cheesecake is definitely one of them!
It combines a buttery Golden Oreo crust with a silky strawberry cheesecake filling and a nostalgic strawberry-cookie crunch topping. Best of all, there is no oven required. That makes it perfect for summer gatherings, birthdays, potlucks, family celebrations, or whenever you want an impressive dessert without turning on the oven.
The combination of creamy Philadelphia-style cheesecake, fluffy whipped topping, sweet strawberry gelatin, and crunchy Golden Oreos creates layers of contrasting textures: smooth, creamy, fruity, crunchy and buttery all in one bite.
🍓 Ingredients
For the crust
- 1 package Golden Oreos, approximately 36 cookies
- 5 tablespoons unsalted butter, melted
For the strawberry cheesecake filling
- 2 blocks (8 oz each) cream cheese, softened
- 1 tub (8 oz) Cool Whip, thawed
- 1 package (3 oz) strawberry Jell-O gelatin mix
- ½ cup powdered sugar
- 1 teaspoon vanilla extract
- 2 tablespoons milk or heavy cream, if needed
- ½ cup finely chopped fresh strawberries, optional
For the strawberry crunch topping
- 12–15 Golden Oreos
- 1 package strawberry gelatin powder, about 2–3 tablespoons
- 3 tablespoons melted butter
- ½ cup freeze-dried strawberries, crushed, optional but highly recommended
For decoration
- Fresh strawberries
- Whipped cream
- Golden Oreo halves
- Strawberry sauce or strawberry preserves
- A few crushed Golden Oreos
🍰 Equipment
You will need:
- 9-inch springform pan
- Food processor or large plastic bag
- Mixing bowls
- Electric hand mixer or stand mixer
- Rubber spatula
- Measuring cups and spoons
- Refrigerator
👩🍳 Method 1: Prepare the Golden Oreo Crust
Begin by crushing the Golden Oreos.
Place the cookies into a food processor and pulse until they become fine crumbs.
If you don’t have a food processor, place the cookies inside a sturdy zip-top bag and crush them with a rolling pin.
You want the crumbs to resemble fine sand, with only a few tiny cookie pieces remaining.
Pour the crumbs into a bowl and add the melted butter.
Mix thoroughly until all of the crumbs are moistened.
Form the crust
Press the mixture firmly into the bottom of a 9-inch springform pan.
Use the bottom of a measuring cup or glass to compact the crust.
Make sure the edges are even and the crust is firmly packed.
Place the pan in the refrigerator while you prepare the filling.
Chill for at least 20–30 minutes.
🍓 Method 2: Prepare the Strawberry Cheesecake Filling
Make sure your cream cheese is completely softened before beginning.
Place the two blocks of cream cheese into a large mixing bowl.
Beat until smooth and creamy.
Add:
- Powdered sugar
- Vanilla extract
- Strawberry gelatin mix
Beat again until everything is completely incorporated.
The strawberry gelatin gives the cheesecake its beautiful pink color and concentrated strawberry flavor.
Now gently fold in the Cool Whip.
Don’t overmix once the whipped topping has been added. You want to keep the filling light and fluffy.
If using fresh strawberries, gently fold in the chopped strawberries at this stage.
Important tip
Taste the filling before putting it into the crust.
If you’d like a stronger strawberry flavor, you can add a little strawberry sauce or a few finely chopped strawberries.
🍰 Method 3: Form the Cheesecake
Remove the chilled crust from the refrigerator.
Spoon the strawberry cheesecake mixture over the Golden Oreo crust.
Spread it evenly using a rubber spatula or the back of a spoon.
Smooth the top carefully.
For an especially beautiful cheesecake, create a slightly rounded surface in the center.
Cover the cheesecake with plastic wrap.
Place it in the refrigerator.
Chill
Refrigerate for at least 6 hours, but overnight is even better.
This allows the cheesecake to become firm enough to slice beautifully.
🍓 Method 4: Make the Strawberry Crunch
While the cheesecake chills, prepare the famous strawberry crunch topping.
Place the Golden Oreos into a food processor and pulse several times.
Don’t pulverize them completely. You want a mixture containing both crumbs and small cookie pieces.
Transfer them to a bowl.
Add the strawberry gelatin powder.
If using freeze-dried strawberries, crush them and add them to the mixture.
Pour in the melted butter.
Stir until the crumbs are evenly coated.
The finished mixture should resemble a colorful strawberry-cookie crumble.
Place it in the refrigerator until you’re ready to decorate the cheesecake.
❤️ Method 5: Finish the Cheesecake
Once the cheesecake has completely set, carefully remove it from the springform pan.
Sprinkle the strawberry crunch mixture generously over the top.
For an extra-special presentation, press some of the crunch mixture gently around the sides of the cheesecake.
Decorate with:
- Fresh strawberries
- Whipped cream rosettes
- Golden Oreo halves
- Strawberry sauce
- Additional strawberry crunch
For a bakery-style finish, pipe small whipped-cream swirls around the edge and place a strawberry or Oreo piece on each swirl.
🍓 Formation & Layering
The beauty of this cheesecake comes from its layers.
Layer 1 — Golden Oreo Crust
A firm, buttery cookie foundation gives the dessert its satisfying crunch.
Layer 2 — Strawberry Cheesecake
The creamy center is sweet, smooth and slightly tangy from the cream cheese.
Layer 3 — Strawberry Crunch
The topping adds texture and brings together the Golden Oreo and strawberry flavors.
Layer 4 — Fresh Decoration
Fresh strawberries and whipped cream make the finished dessert look bright, festive and irresistible.
📖 A Little History
The idea of combining cheesecake with cookies and fruit has been popular for generations, but no-bake cheesecakes became especially beloved because they offer the rich character of cheesecake without the need for baking.
Strawberry-and-cookie combinations also became popular in American-style ice cream desserts, cakes and frozen treats. The familiar strawberry crunch topping is especially nostalgic for many people because it resembles the crunchy strawberry-cookie coating found on classic strawberry shortcake-style frozen desserts.
This recipe brings those flavors together in a simple refrigerator cheesecake.
Golden sandwich cookies provide the buttery vanilla-cookie flavor, while strawberry gelatin contributes both color and strawberry flavor. Cream cheese provides the characteristic cheesecake tang, and whipped topping keeps everything light and airy.
🍓 Tips for the Best Cheesecake
1. Soften the cream cheese
Cold cream cheese can leave lumps in your filling.
Let it sit at room temperature until softened.
2. Don’t rush the chilling process
The cheesecake needs time to firm up.
Six hours is a good minimum; overnight is ideal.
3. Don’t overmix the Cool Whip
Fold it gently into the cream cheese mixture to maintain a fluffy texture.
4. Make a firm crust
Press the Oreo crumbs firmly into the pan.
A loose crust can crumble when you cut the cheesecake.
5. Add the crunch shortly before serving
For maximum crispness, add the strawberry crunch topping after the cheesecake has set.
6. Use fresh strawberries for decoration
They provide a beautiful contrast against the pink cheesecake.
🍽️ How to Serve
For beautiful slices, remove the cheesecake from the refrigerator and let it sit for about 5–10 minutes.
Dip a sharp knife into warm water.
Dry the knife and cut the cheesecake.
Repeat between slices for clean cuts.
Serve each slice with:
- Fresh strawberries
- Whipped cream
- Strawberry sauce
- Extra strawberry crunch
- A Golden Oreo
💕 For Strawberry Cheesecake Lovers
If you’re a serious strawberry dessert lover, this recipe can easily become one of your favorites.
The first bite starts with the crunchy Golden Oreo crust, followed by the soft strawberry cheesecake filling. Then comes the strawberry-cookie topping, giving you that wonderful contrast between creamy and crunchy.
It’s sweet without being overly complicated, colorful enough for a celebration, and easy enough for a weekend dessert.
🎀 Variations
🍫 Strawberry Chocolate Crunch
Add a thin layer of melted chocolate between the crust and cheesecake filling.
🍋 Strawberry Lemon Cheesecake
Add 1–2 teaspoons of fresh lemon zest to the filling for a bright citrus flavor.
🍓 Fresh Strawberry Version
Blend ½ cup strawberries into a smooth purée and fold a small amount into the filling.
🧁 Individual Cheesecakes
Prepare the dessert in muffin cups or small dessert glasses for individual servings.
🍪 Extra-Crunchy Version
Add additional crushed Golden Oreos to the topping for an even more substantial crunch.
🧊 Storage
Keep the cheesecake covered and refrigerated.
It is best enjoyed within 3–4 days.
If you’re preparing it for a party, making it the day before is ideal because the overnight chilling time gives the filling plenty of time to firm up.
🌟 Conclusion
This No-Bake Strawberry Crunch Cheesecake is the perfect dessert when you want something that looks spectacular but doesn’t require complicated baking.
With its Golden Oreo crust, creamy strawberry cheesecake center, fluffy texture and irresistible strawberry crunch topping, every bite delivers something different.
It’s perfect for birthdays, summer parties, family dinners, potlucks, holidays—or simply those moments when you want a beautiful homemade dessert without turning on the oven.
And the best part?
It’s creamy. It’s crunchy. It’s strawberry-packed. And it’s completely irresistible. 🍓❤️
If you love strawberries and cheesecake, this is one dessert you’ll want to make again and again.