
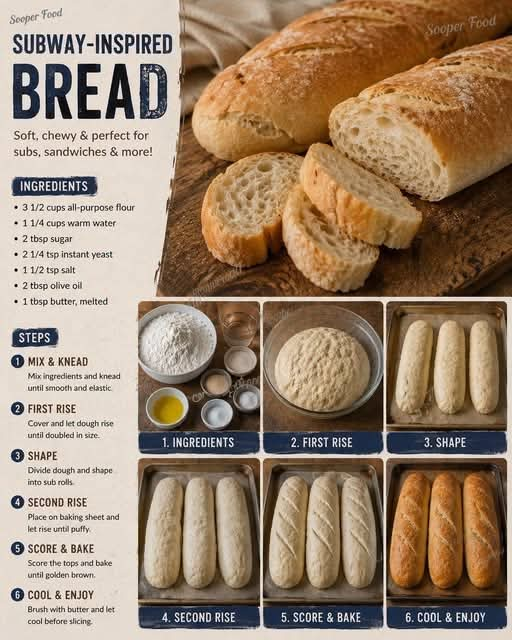
Subway-Inspired Homemade Sandwich Bread
Introduction
There is something special about a freshly baked sub roll: soft and fluffy on the inside, lightly golden on the outside, pleasantly chewy, and sturdy enough to hold generous layers of meat, cheese, vegetables, and sauces without falling apart.
This Subway-inspired homemade sandwich bread is designed to recreate that classic sandwich-shop experience in your own kitchen. The dough is enriched with olive oil for tenderness and moisture, while a little sugar helps with browning and gives the bread a subtle sweetness. After two rises and careful shaping, the rolls bake into long, fluffy loaves with a delicate crust and a soft interior.
These homemade rolls are perfect for lunch, dinner, meal preparation, picnics, parties, or whenever you want a fresh deli-style sandwich.
Recipe Overview
Yield: 4 large sub rolls
Preparation time: About 25 minutes
First rise: 60–75 minutes
Second rise: 30–45 minutes
Baking time: 18–22 minutes
Oven temperature: 375°F (190°C)
Difficulty: Moderate
Ingredients
For the Bread Dough
- 1 1/4 cups (300 ml) warm water, approximately 105–110°F (40–43°C)
- 2 tablespoons (25 g) granulated sugar
- 2 1/4 teaspoons (7 g) instant yeast
- 3 1/2 cups (440 g) all-purpose flour, plus a small amount if necessary
- 1 1/2 teaspoons (8 g) fine salt
- 3 tablespoons (45 ml) olive oil
For Finishing
- 1 tablespoon (14 g) unsalted butter, melted
Optional Toppings
For variations inspired by sandwich-shop breads, you can add:
- Sesame seeds
- Poppy seeds
- Dried oregano
- Italian seasoning
- Grated Parmesan
- Garlic powder
- Dried onion flakes
- Everything seasoning
The History and Inspiration
Long sandwich rolls have become an important part of American deli and fast-casual food culture. The sub roll, hoagie roll, hero roll, and similar breads developed as practical breads designed to hold substantial fillings while remaining soft enough to eat comfortably.
Modern sandwich chains helped popularize the long, soft white roll around the world. Subway became particularly well known for its selection of freshly assembled submarine sandwiches served on elongated bread.
This recipe is not an official Subway recipe. Instead, it is a homemade interpretation inspired by the characteristics people commonly associate with Subway-style bread: a soft crumb, mild flavor, lightly golden exterior, elongated shape, and enough structure to hold a generous amount of filling.
Understanding the Dough
The ingredients in this recipe each have an important purpose.
Warm Water
Warm water activates the yeast and helps begin fermentation. The water should be warm rather than hot. Water that is excessively hot can damage the yeast.
Sugar
Sugar provides a small amount of sweetness and contributes to browning during baking. It also gives the yeast readily available food during the early stages of fermentation.
Yeast
Yeast produces carbon dioxide during fermentation. This gas becomes trapped within the developing gluten network, causing the dough to rise and creating the light texture of the finished bread.
Flour
All-purpose flour provides the structure of the rolls. The proteins in the flour form gluten when combined with water and kneaded.
Salt
Salt improves flavor and helps regulate yeast activity. It also contributes to the strength and overall texture of the dough.
Olive Oil
Olive oil adds tenderness and moisture. It also helps create a soft, flexible crumb that works particularly well for sandwich bread.
Butter
Brushing the hot rolls with melted butter after baking softens the exterior and adds a subtle richness.
Instructions
Step 1: Prepare the Yeast Mixture
Place the warm water in a large mixing bowl.
Add the granulated sugar and instant yeast.
Stir briefly to distribute the ingredients.
Allow the mixture to stand for approximately 5 minutes.
With instant yeast, you may not see dramatic foaming, so do not worry if the surface does not become extremely bubbly. The mixture should smell pleasantly yeasty.
Step 2: Add the Oil
Add the olive oil to the water and yeast mixture.
Stir gently to combine.
The oil will help produce a tender and flexible dough.
Step 3: Add the Flour and Salt
Add most of the flour and the salt to the bowl.
Begin mixing with a wooden spoon, sturdy spatula, or your hands.
Continue mixing until the flour is incorporated and a rough, shaggy dough forms.
If the dough appears extremely wet, gradually add a small amount of the remaining flour.
Do not add large quantities of flour at once.
A slightly tacky dough is preferable to a stiff dough because excessive flour can produce heavy, dry rolls.
Step 4: Knead the Dough
Transfer the dough to a lightly floured work surface.
Knead by hand for approximately 8–10 minutes.
Alternatively, use a stand mixer fitted with a dough hook and knead for approximately 6–7 minutes on low to medium-low speed.
The dough should gradually become:
- Smooth
- Elastic
- Soft
- Slightly tacky
- Stretchy
To test the dough, take a small piece and gently stretch it between your fingers. It should stretch thinly before tearing.
This is an indication that gluten has developed.
Step 5: First Rise
Lightly oil a clean bowl.
Place the kneaded dough inside and turn it once so the surface is lightly coated with oil.
Cover the bowl with plastic wrap, a lid, or a clean kitchen towel.
Place it somewhere warm and draft-free.
Allow the dough to rise for approximately 60–75 minutes, or until it has approximately doubled in volume.
The exact time depends on the temperature of your kitchen.
A warmer environment will generally shorten the rising time, while a cooler environment will require more time.
Step 6: Gently Deflate the Dough
Once the dough has doubled, gently press it down to release excess gas.
Do not aggressively knead it at this stage.
The goal is simply to redistribute the fermentation gases and make the dough easier to divide and shape.
Step 7: Divide the Dough
Transfer the dough to a work surface.
Divide it into 4 approximately equal pieces.
Each piece should weigh around 195–200 grams.
Using a kitchen scale will give you evenly sized rolls that bake at approximately the same rate.
Step 8: Shape the Sub Rolls
Take one portion of dough and gently flatten it into a rectangle.
The rectangle should be approximately the length you want your finished roll to be.
Fold or roll the dough tightly from the long side.
Continue rolling until you have a long, even cylinder.
Pinch the seam closed.
Gently roll the dough back and forth to even out the thickness.
Slightly taper the ends if desired.
Repeat with the remaining three pieces.
Step 9: Arrange the Rolls
Place the shaped rolls seam-side down on a parchment-lined baking sheet.
Leave several centimeters of space between each roll.
The rolls will expand during the second rise and again in the oven.
Make sure they have enough room to grow without immediately touching one another.
Step 10: Second Rise
Cover the rolls loosely with a clean kitchen towel or lightly oiled plastic wrap.
Allow them to rise for approximately 30–45 minutes.
They should become visibly puffy and lighter.
Do not rely only on the clock. The appearance and feel of the dough are more important.
If you gently press the surface with a fingertip, the indentation should slowly begin to recover.
Step 11: Preheat the Oven
While the rolls are completing their second rise, preheat the oven to:
375°F (190°C)
Allow the oven to fully preheat before baking.
A properly heated oven gives the bread a stronger initial rise and more even browning.
Step 12: Score the Bread
Using a very sharp knife or bread lame, make 3–4 shallow diagonal cuts across the top of each roll.
Do not cut deeply.
The purpose of scoring is to control how the bread expands during baking.
Make the cuts confidently rather than repeatedly dragging the blade through the dough.
Step 13: Bake
Place the baking sheet in the preheated oven.
Bake for approximately 18–22 minutes.
The rolls should become lightly golden on the outside and feel firm enough to hold their shape.
Because ovens vary, begin checking them toward the lower end of the baking time.
If the tops brown too quickly, you can loosely cover them with foil during the final part of baking.
Step 14: Brush With Butter
Remove the rolls from the oven.
Immediately brush their tops lightly with melted butter.
The butter adds flavor and helps soften the crust.
For a particularly soft sandwich-shop-style exterior, loosely cover the hot rolls with a clean kitchen towel.
Allow them to cool.
Step 15: Cool Completely
Let the rolls cool completely before slicing.
Although it may be tempting to cut into them immediately, the interior continues to set as the bread cools.
Cutting too early can cause the crumb to become compressed or gummy.
Once cooled, slice each roll lengthwise, taking care not to cut completely through the bottom if you want the roll to remain connected like a traditional sub.
Important Methods and Techniques
The Soft Dough Method
The dough should remain soft and slightly tacky.
One of the biggest mistakes when making homemade sandwich bread is adding too much flour because the dough sticks to the hands or work surface.
Instead of immediately adding flour, lightly oil your hands or work surface.
A softer dough generally produces a softer finished roll.
The Gluten Development Method
Kneading develops gluten, which gives the dough the strength necessary to trap fermentation gases.
Under-kneaded dough may produce dense, flat bread.
Overly stiff dough can produce a dry and heavy roll.
Knead until the dough becomes smooth, elastic, and cohesive.
The Two-Rise Method
The first rise develops flavor and volume.
The second rise develops the final shape and lightness.
Skipping the second rise can result in rolls that are dense and tight.
The Gentle Shaping Method
When shaping the rolls, create enough tension to produce a smooth surface, but do not crush the dough.
Roll the dough tightly enough to create an even cylinder.
A consistent shape helps the bread bake evenly.
How to Get Extra-Soft Sandwich Bread
For particularly soft rolls, pay attention to several details.
First, avoid adding excessive flour.
Second, do not overbake the bread. The rolls only need to become lightly golden and fully cooked.
Third, brush the freshly baked rolls with melted butter.
Finally, cover them loosely with a clean towel while they cool. This helps retain moisture and softens the crust.
How to Make the Rolls More Like Sandwich-Shop Bread
For a classic appearance, keep the rolls approximately 9–10 inches long.
For a softer crust, avoid excessive steam during baking.
For a slightly more golden top, brush the dough very lightly with oil before baking.
For a seeded version, sprinkle sesame seeds or another preferred topping over the rolls immediately after lightly brushing the surface with water or oil.
Sandwich Filling Ideas
These homemade rolls can be used for almost any sandwich.
Classic Turkey and Cheese
Fill with:
- Sliced turkey
- Cheddar or Swiss cheese
- Lettuce
- Tomato
- Onion
- Pickles
- Mayonnaise
- Mustard
Italian-Style Sub
Use:
- Salami
- Ham
- Pepperoni
- Provolone
- Lettuce
- Tomato
- Onion
- Banana peppers
- Italian dressing
Chicken Sandwich
Fill the bread with:
- Grilled chicken
- Lettuce
- Tomato
- Cucumber
- Red onion
- Cheese
- Mayonnaise or garlic sauce
Tuna Sub
Combine tuna with mayonnaise, then add:
- Lettuce
- Tomato
- Onion
- Pickles
- Cheese
- Black pepper
Vegetable Sub
For a meat-free option, use:
- Lettuce
- Tomato
- Cucumber
- Bell peppers
- Red onion
- Olives
- Pickles
- Cheese
- Your favorite dressing
Storage
Once completely cooled, store the rolls in an airtight container or sealed bread bag.
They are best enjoyed within 1–2 days at room temperature.
For longer storage, freeze the rolls.
Wrap each roll individually in plastic wrap or another freezer-safe wrapping material, then place them in a freezer bag.
They can be frozen for approximately 2–3 months.
To serve, allow them to thaw at room temperature and refresh them briefly in a warm oven if desired.
Troubleshooting
My bread is too dense
Possible causes include:
- The yeast was inactive.
- The dough did not rise enough.
- Too much flour was added.
- The dough was not kneaded sufficiently.
- The second rise was skipped or shortened.
My rolls spread instead of rising
The dough may have been too wet, insufficiently shaped, or over-proofed.
Make sure the dough has enough gluten development and shape the rolls with moderate surface tension.
My bread is dry
The most common causes are too much flour and overbaking.
Measure flour by weight when possible.
Avoid continuing to add flour simply because the dough feels sticky.
My crust is too hard
The bread may have been baked too long or allowed to cool uncovered.
Brush the rolls with melted butter immediately after baking and loosely cover them with a clean towel while they cool.
Formation of the Perfect Sub Roll
The ideal homemade sandwich roll has several characteristics.
The outside should be lightly golden rather than dark and thick.
The inside should be soft, airy, and flexible.
The crumb should contain small, evenly distributed air pockets.
The roll should be strong enough to hold fillings without tearing.
The shape should be long enough for a substantial sandwich while remaining easy to handle.
The best result comes from balancing softness with structure. Too little gluten development produces bread that falls apart, while excessive flour or overbaking produces bread that is unnecessarily firm.
Serving and Presentation
For a beautiful homemade sandwich, slice the cooled roll lengthwise.
Do not cut completely through the bottom. Leaving the bottom connected makes it easier to fill and eat.
Layer your ingredients evenly rather than creating one large pile in the center.
Begin with meat and cheese, followed by vegetables and sauces.
If serving the sandwiches for a gathering, cut each finished sub into smaller portions and arrange them on a large platter.
These rolls also work beautifully for packed lunches because they are sturdy enough to carry substantial fillings.
Make-Ahead Method
The dough can also be prepared ahead of time.
After kneading, place the covered dough in the refrigerator and allow it to rise slowly.
The following day, allow the dough to warm slightly, divide it, shape the rolls, and complete the second rise before baking.
A slower fermentation can also add additional flavor to the bread.
Final Tips for Bakery-Style Results
- Use a kitchen scale whenever possible.
- Keep the dough soft rather than excessively floury.
- Knead until the dough becomes elastic.
- Give the dough enough time to rise.
- Shape the rolls evenly.
- Do not skip the second rise.
- Score the rolls with a sharp blade.
- Avoid overbaking.
- Brush with melted butter immediately after baking.
- Allow the bread to cool before slicing.
Conclusion
Homemade Subway-inspired sandwich bread is a simple way to transform an ordinary sandwich into something that feels freshly made from a bakery.
The key is not complicated ingredients. It is the method: a soft dough, proper kneading, patient fermentation, careful shaping, a gentle second rise, and controlled baking.
Once you become comfortable with the basic dough, you can customize these rolls with different toppings, seasonings, cheeses, herbs, or fillings. You can make them shorter for children’s sandwiches, longer for large subs, or slightly smaller for party platters.
Fresh from the oven, brushed with butter and allowed to cool until perfectly soft, these homemade rolls provide the ideal foundation for your favorite sandwiches.
For the Lovers of Homemade Bread
For bread lovers, this recipe is especially satisfying because it gives you the opportunity to experience the entire process from beginning to end.
You mix the ingredients, knead the dough, watch it rise, shape each roll with your hands, and finally see the golden loaves emerge from the oven.
The result is more than just sandwich bread. It is a versatile homemade staple that can become the foundation for countless meals.
Once you make these soft sub rolls at home, you may find yourself preparing them regularly instead of buying packaged sandwich bread.
They are soft, flavorful, economical, customizable, and perfect for anyone who loves a generous homemade sandwich.
Final Recipe at a Glance
Warm water, sugar, and yeast begin the dough.
Olive oil, flour, and salt are incorporated.
The dough is kneaded until smooth and elastic.
It rises until doubled.
The dough is divided into four portions.
Each portion is shaped into a long sub roll.
The rolls rise again until puffy.
They are scored and baked at 375°F (190°C) for approximately 18–22 minutes.
The hot rolls are brushed with melted butter.
They are covered loosely while cooling for a soft crust.
Finally, they are sliced and filled with your favorite sandwich ingredients.
The result is a soft, fluffy, homemade sandwich roll with the classic shape and texture of a bakery-style sub bread.