
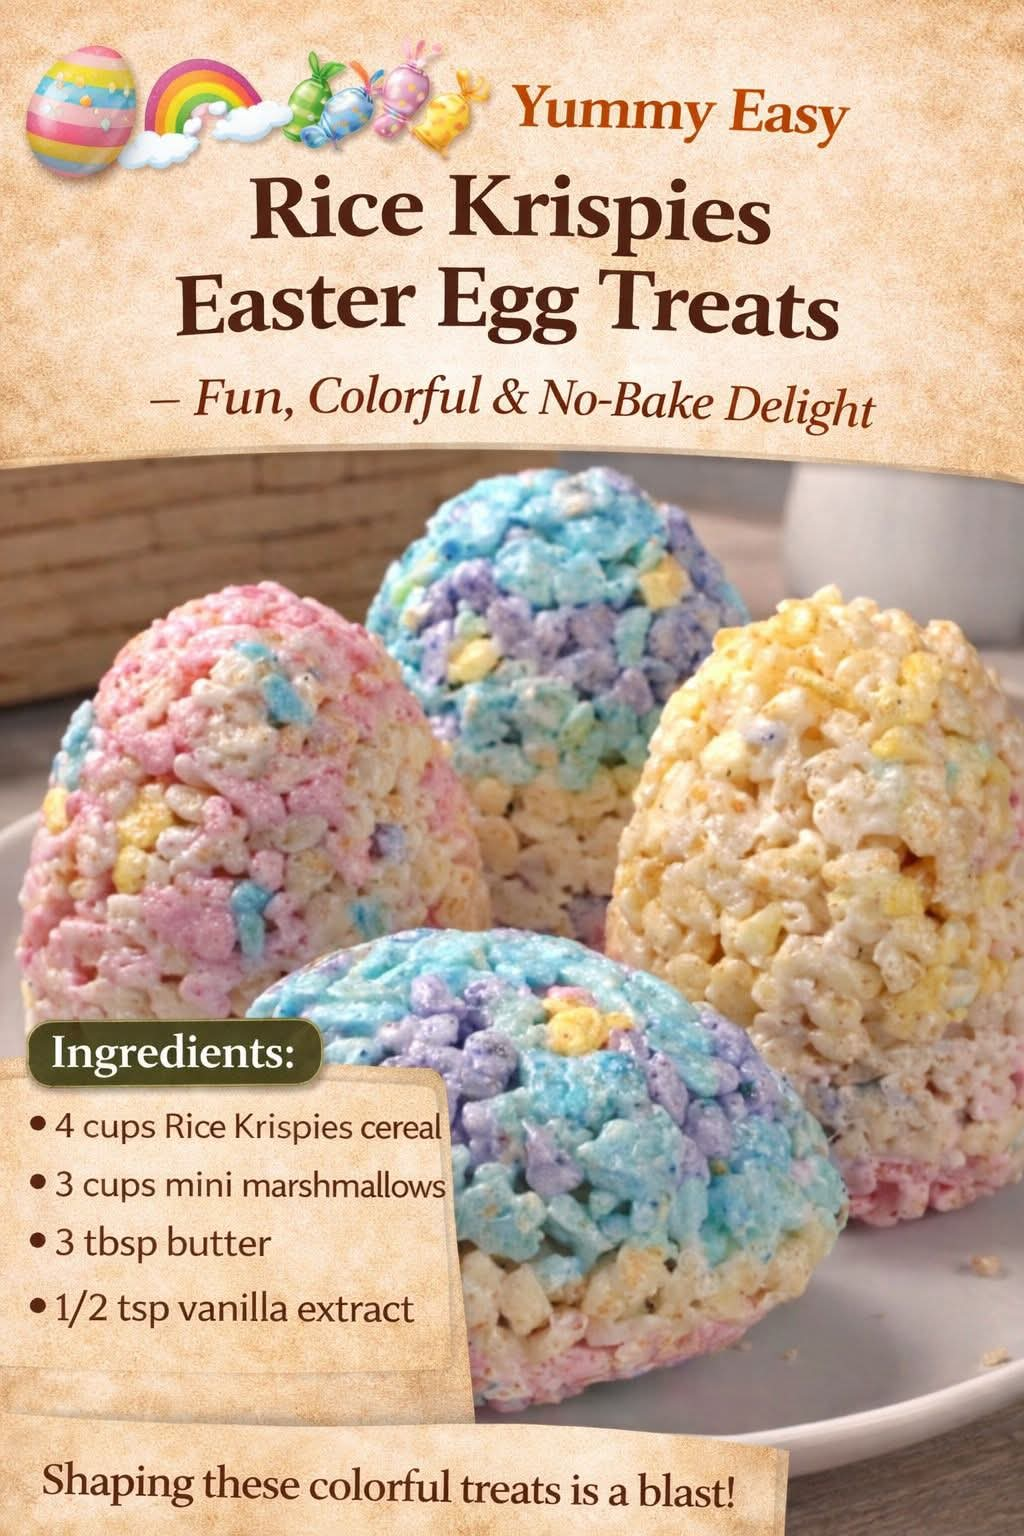
Yummy Easy Rice Krispies Easter Egg Treats
Introduction
Rice Krispies Easter Egg Treats are one of those simple homemade desserts that bring instant fun to the kitchen. They require only a few basic ingredients, no oven, and very little preparation, making them perfect for Easter celebrations, spring parties, school treats, family gatherings, or an afternoon activity with children.
These colorful Easter egg treats combine the familiar chewy sweetness of marshmallow cereal treats with a playful egg-shaped design. Once the mixture is prepared, it can be shaped into individual Easter eggs and decorated with colorful sprinkles, melted chocolate, candy pieces, icing, or other festive toppings.
The best part is how easy they are to customize. You can make small eggs for a dessert platter, larger eggs for individual treats, or even create several different colors and decorations so every family member can make a favorite version.
Ingredients
For the Rice Krispies Mixture
- 4 cups Rice Krispies cereal
- 3 cups mini marshmallows
- 3 tablespoons butter
Optional Decorations
- Colored sprinkles
- Easter-colored sanding sugar
- Mini chocolate candies
- Melted white chocolate
- Melted milk or dark chocolate
- Colored icing
- Small candy-coated chocolates
- Coconut flakes
- Pastel sugar pearls
- Edible decorations of your choice
Instructions
Step 1: Prepare the Work Area
Before making the treats, prepare a baking sheet or large tray by lining it with parchment paper or lightly greasing it. This gives you a clean surface for the finished Easter eggs.
Lightly grease your hands or wear disposable food-safe gloves if desired. The mixture becomes sticky while warm, so having everything prepared before you begin makes shaping much easier.
Step 2: Melt the Butter
Place a large saucepan over low heat and add the butter.
Allow the butter to melt slowly. Avoid using high heat because the butter and marshmallows can easily become overheated, which may make the finished treats harder instead of soft and chewy.
Step 3: Add the Marshmallows
Add the mini marshmallows to the melted butter.
Stir continuously with a wooden spoon or heat-resistant spatula until the marshmallows are almost completely melted and form a smooth, creamy mixture.
Keep the heat low throughout this step.
Step 4: Add the Cereal
Remove the saucepan from the heat and immediately add the Rice Krispies cereal.
Gently fold the cereal into the melted marshmallow mixture. Continue stirring until the cereal is evenly coated.
Do not crush or aggressively stir the cereal. Gentle folding helps preserve the light, crisp texture that makes these treats so enjoyable.
Step 5: Allow the Mixture to Cool Slightly
Let the mixture sit for a few minutes until it is cool enough to handle but still soft and flexible.
Do not allow it to cool completely in the saucepan because it will become much more difficult to shape.
Step 6: Form the Easter Eggs
Lightly grease your hands with butter or nonstick cooking spray.
Take a portion of the Rice Krispies mixture and gently press it together. Roll and shape it between your palms until it resembles an egg.
To create the traditional Easter egg appearance, make one end slightly narrower and the opposite end slightly rounded.
Place each finished egg onto the prepared parchment-lined tray.
Continue until all the mixture has been shaped.
Step 7: Decorate the Easter Eggs
Once the eggs have been formed, allow them to firm up slightly.
You can leave them plain for a simple homemade treat, or decorate them with your favorite Easter toppings.
For a colorful finish, drizzle melted white chocolate over the eggs and immediately add pastel sprinkles.
You can also pipe thin lines of colored icing across the eggs, add small candy pieces, or coat portions of the eggs with colorful sugar.
Step 8: Let the Treats Set
Allow the decorated Rice Krispies Easter eggs to sit at room temperature until completely set.
This usually takes approximately 20 to 30 minutes, depending on the size of the treats and the decorations used.
Once firm, they are ready to serve.
Method
The method behind these Easter treats is simple: butter is melted with marshmallows to create a soft, sticky binder, and crisp rice cereal is folded into that mixture. While still warm, the cereal mixture can be molded into different shapes.
For Easter, the classic rectangular cereal treat is transformed into an egg shape. This small change turns an everyday no-bake snack into a festive seasonal dessert.
The key to a successful texture is gentle heating. The marshmallows should melt just enough to coat the cereal without being overheated. Too much heat can cause the finished treats to become firm and less chewy.
History of Rice Krispies Treats
Rice Krispies Treats became a popular American homemade dessert during the twentieth century. Their appeal came from their simplicity, inexpensive ingredients, and the satisfying combination of crisp rice cereal, melted marshmallows, and butter.
Over time, the basic recipe became a foundation for countless creative variations. Home cooks began shaping the mixture into holiday decorations, animals, hearts, bars, balls, and other designs.
Easter naturally became one of the most popular occasions for shaping cereal treats into eggs. The egg shape is easy to create by hand and provides a perfect canvas for colorful seasonal decorations.
Today, Rice Krispies-style treats remain popular because they require minimal equipment and can be prepared quickly without an oven.
Formation and Shaping Tips
The formation of the Easter eggs is the most creative part of this recipe.
For evenly sized treats, divide the mixture into similar portions before shaping. This helps make sure every guest receives a treat of approximately the same size.
If the mixture sticks to your hands, lightly grease your hands again. Avoid adding too much butter or cooking spray because excessive grease can make the treats difficult to decorate.
Press the mixture firmly enough to hold its shape, but do not compress it too aggressively. A gentle touch keeps the finished eggs light and chewy.
For children, you can place several bowls of decorations on the table and let everyone create their own Easter egg.
Decoration Ideas
There are many ways to turn these simple treats into beautiful Easter desserts.
Pastel Sprinkle Eggs
Drizzle the eggs with melted white chocolate and immediately cover them with pastel sprinkles.
Chocolate Drizzle Eggs
Use melted chocolate to create thin decorative lines across the surface.
Iced Easter Eggs
Pipe colorful icing in zigzag patterns, dots, stripes, or simple floral designs.
Candy Eggs
Press small candy pieces into the surface while the treats are still slightly soft.
Coconut Easter Eggs
Add a thin layer of melted white chocolate followed by finely shredded coconut for a softer, more textured finish.
Storage
Store the finished Rice Krispies Easter Egg Treats in an airtight container at room temperature.
Place parchment or wax paper between layers if you are stacking them to prevent the decorations from sticking together.
For the best texture, enjoy them within a few days. Keeping them tightly covered helps prevent the cereal from becoming stale.
Serving Suggestions
These Easter egg treats are perfect for an Easter dessert table, children’s parties, school celebrations, family gatherings, spring picnics, or simple weekend baking projects.
Arrange them in a basket lined with parchment paper to create the appearance of a basket filled with homemade Easter eggs.
They can also be individually wrapped and given as small homemade gifts.
Why Everyone Loves These Treats
Rice Krispies Easter Egg Treats are loved because they are simple, inexpensive, colorful, and fun to make.
They do not require complicated baking techniques or special equipment. The basic mixture comes together quickly, and the shaping and decorating can become an enjoyable activity for the entire family.
Children especially love being able to use their hands to form the eggs and choose their own decorations. Adults appreciate how little time and preparation the recipe requires.
Most importantly, these treats combine a nostalgic classic with a festive Easter presentation.
Conclusion
Easy Rice Krispies Easter Egg Treats prove that a memorable holiday dessert does not need to be complicated. With just three basic ingredients, you can create soft, chewy cereal treats and transform them into charming Easter eggs.
Their simple preparation makes them ideal for busy holidays, while the endless decoration possibilities allow you to make them as colorful, elegant, playful, or traditional as you like.
Whether you are preparing them for children, bringing them to an Easter gathering, or simply making a sweet spring treat for your family, these homemade Rice Krispies Easter eggs are an easy recipe worth keeping.
For Rice Krispies Treat Lovers
If you love classic Rice Krispies treats, this Easter version is a wonderful way to give that familiar favorite a seasonal makeover. The crisp cereal, buttery marshmallow coating, and soft chewy texture remain comforting and familiar, while the egg shape and colorful decorations make every piece feel special.
These treats are especially wonderful when made together as a family. Set out the decorations, shape the eggs, and let everyone create their own version. The finished treats are not only delicious but also become part of the holiday memories.
Recipe Summary
Preparation time: About 15 minutes
Shaping time: About 10 minutes
Setting time: About 20–30 minutes
Total time: Approximately 45–55 minutes
Difficulty: Easy
Method: No-bake
Main ingredients: Rice Krispies cereal, mini marshmallows, butter
Best occasion: Easter, spring parties, family gatherings, children’s celebrations