
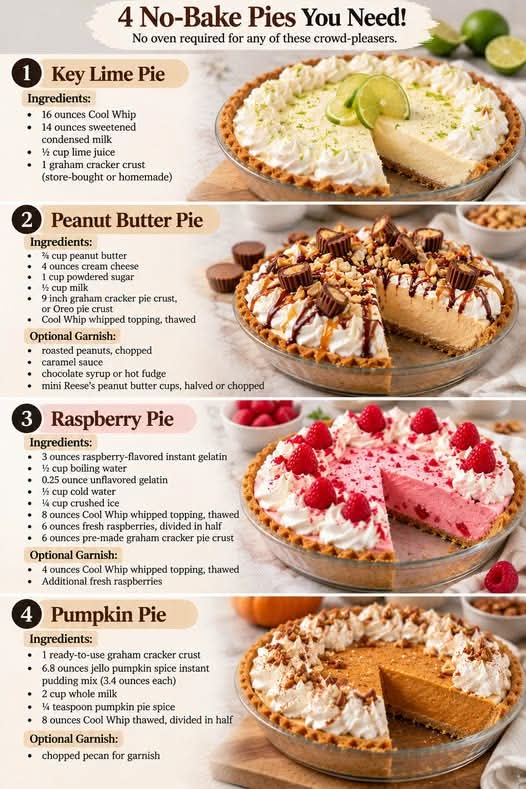
4 Types of No-Bake Pies: Four Delicious Desserts Without Turning on the Oven
Introduction
There is something truly special about a homemade pie, especially when you can prepare it without turning on the oven. No-bake pies are creamy, refreshing, easy to assemble, and perfect for busy days when you want a delicious dessert without spending hours in the kitchen. With a few simple ingredients, a prepared pie crust, and enough time in the refrigerator, you can create a dessert that looks beautiful and tastes wonderful.
Today, we are sharing four irresistible types of no-bake pies: Key Lime Pie, Peanut Butter Pie, Raspberry Pie, and Pumpkin Pie. Each recipe has its own unique flavor and texture, making this collection perfect for family gatherings, holiday celebrations, summer parties, potlucks, or an ordinary evening when you want something sweet.
The Key Lime Pie delivers a refreshing citrus flavor with a smooth, creamy filling. The Peanut Butter Pie is rich, sweet, and satisfying for anyone who loves peanut butter. The Raspberry Pie combines fruity sweetness with a light, fluffy texture, while the Pumpkin Pie brings the comforting flavors of autumn to your dessert table.
The best part is that all four recipes use convenient ingredients and require no traditional baking. Simply prepare the filling, spread it into the crust, refrigerate until set, and enjoy a delicious homemade dessert.
1. Creamy No-Bake Key Lime Pie
Introduction
Key Lime Pie is a classic dessert loved for its balance of sweet, creamy, and tangy flavors. This no-bake version makes the traditional idea even easier by combining sweetened condensed milk, fresh lime juice, and whipped topping in a prepared graham cracker crust.
As the filling chills, it develops a smooth, sliceable texture with a refreshing citrus taste. The graham cracker crust adds a pleasant crunch that perfectly complements the creamy filling.
This pie is an excellent choice for summer gatherings, family dinners, picnics, and celebrations when you want a dessert that tastes fresh and looks elegant without requiring an oven.
Ingredients
- 16 oz (450 g) Cool Whip, thawed
- 1 can (397 g) sweetened condensed milk
- ½ cup (120 ml) fresh lime juice
- 1 prepared graham cracker pie crust, approximately 230–250 g
- Lime zest or thin lime slices, optional for garnish
Instructions
- Prepare the ingredients. Remove the whipped topping from the freezer and allow it to thaw in the refrigerator. Squeeze fresh limes until you have approximately ½ cup of juice.
- Mix the condensed milk and lime juice. Pour the sweetened condensed milk into a large mixing bowl. Add the fresh lime juice and whisk until the mixture becomes smooth and begins to thicken.
- Fold in the whipped topping. Add the thawed Cool Whip in several portions. Gently fold it into the lime mixture with a spatula until the filling is evenly combined. Avoid vigorous mixing because you want to preserve its light texture.
- Fill the crust. Spoon the filling into the prepared graham cracker crust. Spread it evenly, smoothing the surface with a spatula.
- Refrigerate. Cover the pie and refrigerate for at least 4–6 hours, or preferably overnight, until the filling is firm enough to slice.
- Garnish and serve. Add a little lime zest or a few thin lime slices just before serving.
Method
The secret to this easy Key Lime Pie is the combination of sweetened condensed milk and acidic lime juice. The acidity helps thicken the mixture, while the whipped topping gives it a light, airy consistency.
For the best results, use freshly squeezed lime juice and allow sufficient chilling time. Keep the pie refrigerated until serving, and use a sharp knife to cut clean slices.
If you prefer a stronger citrus flavor, add a little finely grated lime zest to the filling. For a more attractive presentation, pipe small swirls of whipped topping around the edges.
History
Key Lime Pie is associated with the Florida Keys in the United States. Traditional versions use Key lime juice, egg yolks, and sweetened condensed milk in a pie crust. The dessert became famous for its distinctive tart-and-sweet flavor.
Modern no-bake adaptations often use whipped topping or whipped cream instead of eggs, creating a convenient chilled dessert inspired by the classic pie.
Formation and Texture
The finished pie should have a pale, creamy filling with a smooth surface and a buttery graham cracker crust. Once properly chilled, it should hold its shape when sliced while remaining soft and creamy on the tongue.
The flavor should be sweet at first, followed by a refreshing lime tang. A little lime zest provides an attractive finishing touch and an extra burst of citrus aroma.
Conclusion
No-Bake Key Lime Pie is a wonderful dessert for anyone who loves refreshing flavors and simple preparation. Its creamy filling, tangy lime taste, and crunchy crust make it a reliable favorite for warm-weather celebrations and family meals.
Pie Lovers’ Tips
- Use fresh lime juice for the brightest flavor.
- Chill overnight if you want especially neat slices.
- Add lime zest for a stronger citrus aroma.
- Store covered in the refrigerator.
- For a firmer texture, briefly freeze the pie before slicing, then allow it to soften slightly before serving.
2. Rich and Creamy No-Bake Peanut Butter Pie
Introduction
If you love peanut butter, this No-Bake Peanut Butter Pie deserves a place in your dessert collection. It combines creamy peanut butter, softened cream cheese, powdered sugar, milk, and whipped topping to create a rich, fluffy filling inside a delicious prepared pie crust.
Every slice offers a wonderful balance of nutty flavor and creamy sweetness. You can use a graham cracker crust for a traditional flavor or an Oreo crust for a chocolate-and-peanut-butter combination.
This pie is ideal for birthdays, potlucks, family celebrations, holiday desserts, and any occasion when you want something impressive without the effort of baking.
Ingredients
- ⅔ cup (170 g) creamy peanut butter
- 4 oz (113 g) cream cheese, softened
- 1 cup (120 g) powdered sugar
- ½ cup (120 ml) milk
- 1 tub (8 oz / 225 g) Cool Whip, thawed
- 1 prepared 9-inch graham cracker or Oreo pie crust
- Chopped roasted peanuts, optional
- Caramel sauce, optional
- Chocolate syrup, optional
- Chopped peanut butter cups, optional
Instructions
- Prepare the cream cheese. Allow the cream cheese to soften at room temperature so it blends smoothly without lumps.
- Combine the peanut butter and cream cheese. Place both ingredients in a large mixing bowl. Beat with an electric mixer until the mixture is smooth and creamy.
- Add the powdered sugar. Gradually mix in the powdered sugar. Scrape the sides of the bowl to ensure everything is incorporated evenly.
- Pour in the milk. Add the milk gradually while mixing on low speed. Continue until the filling becomes smooth and creamy.
- Fold in the whipped topping. Add the thawed Cool Whip and gently fold it into the peanut butter mixture. Stop when the filling is light, fluffy, and evenly combined.
- Fill the crust. Transfer the mixture into the prepared pie crust. Spread it evenly with a spatula, creating a smooth top.
- Chill until firm. Cover the pie and refrigerate for at least 4 hours. For the cleanest slices, chill it overnight.
- Add toppings. Before serving, drizzle with chocolate or caramel sauce, then sprinkle with chopped peanuts or peanut butter cups if desired.
- Slice and serve. Cut into portions using a sharp knife. Wipe the knife between cuts for a neat presentation.
Method
The method depends on creating a smooth peanut butter and cream cheese base before incorporating the whipped topping. Mixing the first ingredients thoroughly prevents lumps, while folding in the whipped topping keeps the filling airy.
Do not add all the milk at once if your mixture appears very soft. Add it gradually and allow the pie enough time to chill. The exact firmness depends on the brands of peanut butter and whipped topping used.
For a chocolate version, use an Oreo crust and finish the pie with chocolate shavings. For a classic peanut butter flavor, choose a graham cracker crust and garnish with roasted peanuts.
History
Peanut butter pies became popular in American home cooking as peanut butter grew into a common pantry staple. Creamy chilled pies became especially appealing because they were easy to prepare for gatherings and could be made ahead of time.
Today’s no-bake versions often combine peanut butter with cream cheese and whipped topping, producing a rich but airy dessert that is easy to customize.
Formation and Texture
The finished pie should have a thick, fluffy filling that holds its shape when sliced. The peanut butter provides a rich nutty taste, the cream cheese adds a slight tang, and the powdered sugar contributes sweetness.
A graham cracker crust gives a buttery crunch, while an Oreo crust adds a deeper chocolate flavor. Toppings such as caramel, chopped peanuts, and peanut butter cups make the dessert even more indulgent.
Conclusion
No-Bake Peanut Butter Pie is a satisfying treat that brings together simple ingredients in a delicious way. It is easy to prepare in advance, requires no oven, and can be customized with your favorite toppings.
Whether served at a birthday party or as a weekend family dessert, this pie is a wonderful choice for peanut butter lovers.
Pie Lovers’ Tips
- Use creamy peanut butter for the smoothest filling.
- Let the cream cheese soften before mixing.
- Choose an Oreo crust for a chocolate-peanut butter combination.
- Refrigerate overnight for cleaner slices.
- Keep leftovers covered in the refrigerator.
- Remember that peanut butter contains peanuts, an important allergen.
3. Light and Fruity No-Bake Raspberry Pie
Introduction
No-Bake Raspberry Pie is a beautiful dessert for anyone who enjoys fruity flavors and a light, creamy filling. This version combines raspberry-flavored gelatin, unflavored gelatin, whipped topping, and fresh raspberries to create a refreshing pie with a delicate pink color.
The raspberry filling is sweet and fruity, while the whipped topping softens the flavor and creates a smooth consistency. Fresh raspberries add little bursts of tartness, and the graham cracker crust provides a buttery foundation.
This pie is particularly lovely for spring celebrations, summer gatherings, afternoon tea, birthdays, and holiday dessert tables.
Ingredients
- 1 package (3 oz / 85 g) raspberry-flavored instant gelatin
- ½ cup (120 ml) boiling water
- ¼ oz (7 g) unflavored gelatin
- ½ cup (120 ml) cold water
- ¼ cup (approximately 35 g) crushed ice
- 8 oz (225 g) Cool Whip, thawed
- 6 oz (170 g) fresh raspberries, divided
- 1 prepared graham cracker pie crust, approximately 170 g
- 4 oz (113 g) extra Cool Whip, optional for topping
Instructions
- Dissolve the raspberry gelatin. Place the raspberry-flavored gelatin in a heatproof bowl. Pour in the boiling water and stir until all the gelatin granules have dissolved.
- Prepare the unflavored gelatin. Sprinkle the unflavored gelatin evenly over the cold water in a small bowl. Allow it to stand for approximately 5 minutes so the granules can absorb the water.
- Dissolve the unflavored gelatin. Gently warm the bloomed gelatin until it becomes liquid. Do not boil it. Stir it into the prepared raspberry gelatin until fully combined.
- Cool the mixture. Add the crushed ice and stir until the mixture cools and begins to thicken slightly. Remove any remaining pieces of ice. Allow the gelatin mixture to cool until it is no longer warm but has not fully set.
- Add the whipped topping. Gently fold the thawed Cool Whip into the cooled raspberry mixture. Continue folding until the color is even and the filling is smooth.
- Add the raspberries. Reserve some raspberries for decoration. Gently fold approximately half of the remaining fruit into the filling, taking care not to crush all the berries.
- Fill the crust. Spoon the raspberry mixture into the prepared graham cracker crust. Spread it evenly without pressing down too firmly.
- Refrigerate. Cover the pie and chill for at least 4 hours, or until the filling is completely firm.
- Decorate the pie. Add the reserved raspberries and pipe or spoon extra whipped topping around the edges if desired.
- Serve chilled. Slice gently and serve straight from the refrigerator.
Method
The key to this raspberry pie is allowing the gelatin mixture to cool before folding in the whipped topping. If the gelatin is too warm, the whipped topping may lose its volume and produce a less fluffy filling.
The unflavored gelatin helps the pie set firmly, while the raspberry gelatin provides its fruity taste and pink color. Fresh raspberries contribute natural fruit flavor and a pleasant contrast to the creamy filling.
For the best results, use a light folding motion rather than vigorous stirring. This helps maintain a soft, airy consistency.
History
Fruit-flavored gelatin desserts became especially popular in American home kitchens during the twentieth century, when packaged gelatin made colorful desserts easier to prepare.
Refrigerated fruit pies and chiffon-style desserts developed many variations using whipped cream, whipped topping, and fresh fruit. This raspberry pie follows that tradition, combining the convenience of gelatin with the freshness of berries.
Formation and Texture
A successful raspberry pie has a delicate pink filling that is creamy yet firm enough to hold its shape. The texture should be light and smooth, with small pieces of raspberry distributed throughout.
The graham cracker crust provides a slightly crunchy contrast, while the fresh raspberries offer a bright, mildly tart flavor. A decorative layer of whipped topping and whole berries makes the pie suitable for special occasions.
Conclusion
No-Bake Raspberry Pie is a refreshing dessert that combines fruit, creaminess, and convenience. Its attractive color and sweet raspberry flavor make it a wonderful addition to any dessert table.
Because it can be prepared several hours ahead, it is especially useful when you want to serve guests without spending the entire day in the kitchen.
Pie Lovers’ Tips
- Let the gelatin cool before adding the whipped topping.
- Use fresh, dry raspberries to help prevent excess moisture.
- Fold gently to preserve the airy texture.
- Refrigerate until the center is completely set.
- Decorate just before serving for the freshest appearance.
- Keep the finished pie refrigerated.
4. Easy No-Bake Pumpkin Pie
Introduction
Pumpkin pie is one of the most recognizable desserts of autumn, often associated with family gatherings, Thanksgiving celebrations, and cozy holiday meals. This no-bake version offers a convenient alternative to traditional baked pumpkin pie.
Instead of preparing an egg-based custard and baking it in the oven, this recipe uses pumpkin-spice instant pudding mix, cold milk, whipped topping, and a prepared graham cracker crust. The result is a creamy, lightly spiced dessert that can be assembled quickly and chilled until ready to serve.
The filling combines the familiar warm flavors of pumpkin spice with a light texture, while the graham cracker crust adds sweetness and crunch. A topping of whipped cream and chopped pecans gives the finished pie a lovely presentation.
Important ingredient note: This recipe uses pumpkin-spice instant pudding mix, not canned pumpkin puree. It is a pumpkin-spice-flavored pudding pie rather than a traditional pumpkin custard pie.
Ingredients
- 1 prepared graham cracker pie crust, approximately 230–250 g
- 2 packages (3.4 oz / 96 g each) pumpkin-spice instant pudding mix
- 2 cups (480 ml) cold whole milk
- ¼ teaspoon (approximately 0.5 g) pumpkin pie spice
- 8 oz (225 g) Cool Whip, thawed and divided into two portions
- Chopped pecans, optional for garnish
Instructions
- Prepare the mixing bowl. Choose a large bowl that provides enough space for whisking the pudding and folding in the whipped topping.
- Combine the pudding ingredients. Add both packages of pumpkin-spice instant pudding mix to the bowl. Pour in the cold milk and add the pumpkin pie spice.
- Whisk until thickened. Whisk according to the pudding package instructions, usually for approximately 2 minutes. The mixture should become noticeably thicker.
- Fold in half the whipped topping. Add approximately 4 oz (113 g) of the thawed Cool Whip. Gently fold it into the pudding until the filling becomes lighter and creamier.
- Fill the crust. Spoon the pumpkin-spice filling into the prepared graham cracker crust. Smooth the surface with a spatula.
- Chill the pie. Cover and refrigerate for at least 4 hours, or until the filling is fully set.
- Add the topping. Spread the remaining Cool Whip over the chilled pie or pipe it around the edges for a decorative finish.
- Garnish. Sprinkle chopped pecans over the top if desired. A light dusting of pumpkin pie spice can also add a finishing touch.
- Serve chilled. Cut the pie into slices and serve immediately after removing it from the refrigerator.
Method
This pie relies on instant pudding to create a thick filling without cooking or baking. Cold milk activates the pudding mix, allowing it to thicken before the whipped topping is added.
Folding in half the Cool Whip creates a lighter filling, while the remaining portion forms a creamy topping. The prepared crust eliminates the need to make pastry from scratch.
Follow the milk quantity and preparation directions on the pudding packaging if the particular brand differs from the measurements listed here. Some pudding mixes have different setting requirements, so checking the label helps ensure a firm pie.
History
Pumpkin pie has a long association with North American cooking, where pumpkin and other winter squashes became important ingredients in seasonal meals. Traditional pumpkin pie generally contains pumpkin puree, eggs, milk or cream, sugar, and warm spices, baked in a pastry crust.
As packaged pudding mixes and whipped toppings became popular, home cooks developed chilled versions that were quicker to prepare. These recipes capture the familiar flavors of pumpkin spice while offering a lighter, more convenient alternative to traditional baked pies.
Formation and Texture
The finished pie should have a smooth, creamy filling with a warm pumpkin-spice flavor and a soft but stable texture. It should slice cleanly after sufficient refrigeration.
The graham cracker crust provides a sweet, buttery base, while the whipped topping adds a light finish. Chopped pecans contribute a gentle crunch and a nutty flavor that complements the spices.
Conclusion
No-Bake Pumpkin Pie is a convenient dessert for anyone who enjoys the warm flavors of autumn but wants to avoid the extra work of traditional baking. It is easy to prepare ahead, requires only a handful of ingredients, and fits beautifully into a holiday dessert spread.
Serve it after a family dinner, bring it to a potluck, or keep it ready in the refrigerator for a simple seasonal treat.
Pie Lovers’ Tips
- Use cold milk for proper pudding thickening.
- Follow the specific pudding package directions.
- Allow the pie to chill completely before slicing.
- Add the whipped topping after the filling has set if you want a particularly neat finish.
- Sprinkle pecans on top immediately before serving for a fresher crunch.
- Keep the pie refrigerated until ready to eat.
General Methods for All Four No-Bake Pies
Although each pie has a different flavor and filling, the overall preparation process is simple. Following these general guidelines will help you achieve better results.
1. Prepare the Ingredients
Measure everything before you begin. Thaw frozen whipped topping in the refrigerator rather than leaving it at room temperature for an extended period. Soften cream cheese when preparing the peanut butter pie, and wash and dry fresh fruit thoroughly for the raspberry pie.
2. Choose the Right Crust
Prepared graham cracker crusts work well with all four recipes because they are convenient and provide a sweet, slightly crunchy base. An Oreo crust is particularly delicious with peanut butter pie.
If using a homemade crust, make sure it has cooled and firmed up completely before adding the filling.
3. Mix Carefully
Use a whisk or electric mixer for ingredients that need to become smooth, such as cream cheese and peanut butter or pudding and milk.
When adding whipped topping, switch to a spatula and fold gently. Overmixing can reduce the lightness of the filling.
4. Allow Enough Chilling Time
Refrigeration is essential for no-bake pies. The chilled filling needs time to firm up so that the pie can be sliced neatly.
Most of these recipes require at least 4 hours, while the Key Lime Pie generally benefits from 4–6 hours or overnight. If the center is still soft, continue chilling rather than cutting the pie too soon.
5. Decorate Just Before Serving
Fresh fruit, lime slices, chopped nuts, chocolate drizzle, and extra whipped topping can make these pies look special. Adding delicate decorations shortly before serving helps preserve their appearance.
6. Store Safely
Because these pies contain dairy-based ingredients and moist fillings, keep them covered in the refrigerator at 40°F (4°C) or below. Avoid leaving them at room temperature for more than 2 hours, or more than 1 hour when temperatures exceed 90°F (32°C).
For longer storage, freezing may be possible, especially for the Key Lime and Peanut Butter pies, although the texture may change after thawing. Thaw frozen pies in the refrigerator.
Which No-Bake Pie Should You Choose?
Choose Key Lime Pie if you love a refreshing dessert with a sweet-and-tangy citrus flavor.
Choose Peanut Butter Pie if you prefer a rich, creamy dessert with a nutty flavor and optional chocolate toppings.
Choose Raspberry Pie if you enjoy fruity desserts with a light texture and a beautiful pink filling.
Choose Pumpkin Pie if you want a simple, chilled dessert with the familiar warm spices of autumn.
Conclusion: Four Easy Pies, Four Wonderful Flavors
These four no-bake pies prove that a delicious homemade dessert does not always require an oven. With prepared crusts, convenient ingredients, and a little patience while everything chills, you can create four different desserts for almost any occasion.
From the bright citrus flavor of Key Lime Pie to the rich sweetness of Peanut Butter Pie, the fruity freshness of Raspberry Pie, and the comforting spices of Pumpkin Pie, there is an option for almost every dessert lover.
Another advantage is that each pie can be prepared ahead of time, leaving you with more time to enjoy your family, entertain guests, or relax after a busy day.
Make one for your next gathering, or prepare two different flavors so everyone can choose their favorite. Once you discover how easy chilled pies can be, you may find yourself returning to these recipes whenever you need a simple, crowd-pleasing dessert.
A Final Note for Pie Lovers
The best desserts are often the ones that bring people together. Whether you serve these pies at a holiday dinner, a summer picnic, a birthday celebration, or a quiet family evening, each one offers a simple way to make an ordinary moment feel special.
Keep these four recipes in your collection and enjoy experimenting with crusts, toppings, and garnishes. A little creativity can turn each simple no-bake pie into a dessert that your family and friends will look forward to enjoying again and again.