
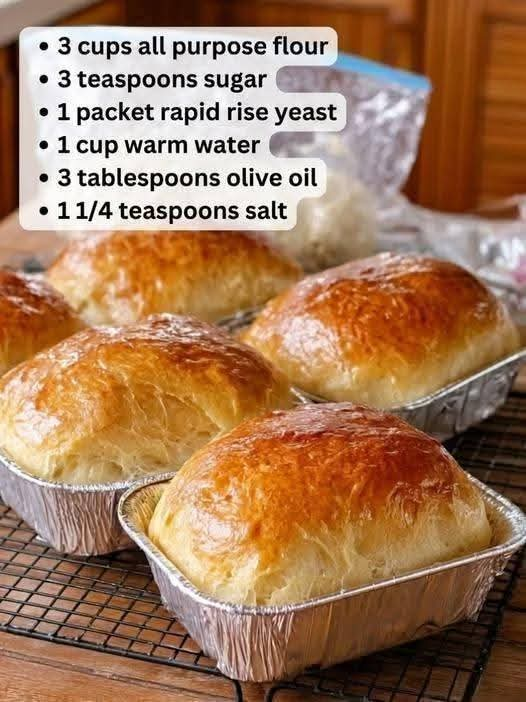
Bread in a Bag: Easy Homemade Bread with Simple Ingredients
Introduction
There is something truly special about homemade bread. The wonderful aroma of freshly baked bread filling the kitchen, the golden crust coming out of the oven, and the soft, warm center make every slice feel comforting and delicious. The best part is that you do not need an expensive bread machine or complicated baking equipment to make a beautiful loaf at home.
This Bread in a Bag recipe is a fun, simple, and convenient way to introduce homemade bread-making to beginners. Instead of mixing everything in a bowl, you begin by combining some of the ingredients inside a large resealable plastic bag. Shaking the bag helps mix the dry ingredients together, while kneading the dough inside the bag can make the process less messy.
Made with flour, yeast, sugar, warm water, olive oil, and salt, this homemade bread has a soft interior and a lightly golden crust. It is perfect for breakfast, sandwiches, toast, or serving alongside your favorite soups and family meals.
Whether you are baking bread for the first time or looking for an enjoyable kitchen activity with your family, this easy Bread in a Bag recipe is a wonderful place to begin.
Ingredients
This recipe uses simple pantry staples that are easy to find in most kitchens.
- 3 cups all-purpose flour: The main ingredient that gives the bread its structure. Keep a little extra flour available for dusting your work surface if needed.
- 3 teaspoons granulated sugar: Helps feed the yeast and contributes to a balanced flavor and golden crust.
- 1 packet rapid-rise yeast: Usually about 2¼ teaspoons or 7 grams. This helps the dough rise and become light and airy.
- 1 cup warm water: Approximately 110°F (43°C). The water should feel comfortably warm, not hot, because excessive heat can damage the yeast.
- 3 tablespoons olive oil: Adds moisture, tenderness, and a subtle richness to the bread.
- 1¼ teaspoons salt: Enhances the flavor and helps regulate yeast activity.
Equipment Needed
- One large, sturdy resealable food-storage bag
- Measuring cups and spoons
- A large baking sheet or loaf pan
- A clean work surface
- A kitchen towel
- An oven
- A cooling rack
Instructions
Step 1: Prepare the Flour, Sugar, and Yeast
Place 1 cup of all-purpose flour into a large resealable plastic bag. Add the sugar and rapid-rise yeast.
Seal the bag securely, making sure there is some air inside, and shake gently until the ingredients are evenly combined.
This first step distributes the yeast throughout the flour and sugar, helping prepare the mixture for the remaining ingredients.
Step 2: Add the Warm Water
Open the bag carefully and pour in the warm water.
Seal the bag again and gently squeeze or knead it with your hands until the mixture becomes thick and sticky.
Allow the mixture to rest for approximately 5 minutes. This gives the yeast a little time to begin working and helps the ingredients combine.
Step 3: Add the Olive Oil and Salt
Open the bag and add the olive oil and salt.
Add another cup of flour and seal the bag. Gently squeeze and mix the ingredients until the flour is incorporated.
Add the remaining cup of flour gradually, mixing after each addition. The dough should begin to come together into a soft, slightly sticky ball.
Depending on the flour and humidity, you may need a small amount of additional flour, but avoid adding too much because that can make the finished bread dense.
Step 4: Knead the Dough Inside the Bag
With the bag securely closed, gently press, fold, and squeeze the dough through the plastic for about 5–8 minutes.
The goal is to develop the gluten, which gives bread its structure and chewy texture.
If the dough becomes difficult to knead inside the bag, transfer it to a lightly floured surface and knead by hand until it becomes smooth and elastic.
If the bag stretches, leaks, or appears damaged, stop using it and transfer the dough to a clean work surface.
Step 5: Let the Dough Rise
Remove the dough from the bag and place it in a lightly oiled bowl.
Cover the bowl with a clean kitchen towel or suitable cover and leave it in a warm, draft-free place for approximately 30–60 minutes, or until the dough has noticeably increased in size.
The rising time depends on room temperature and yeast activity. A warm kitchen will generally encourage faster rising.
Step 6: Shape the Bread
Once the dough has risen, gently press it to release some of the excess gas.
Shape it into a round loaf or an oval loaf, depending on your preference.
Place the shaped dough on a lightly greased baking sheet or in a greased loaf pan. Cover it loosely and let it rest for another 15–25 minutes.
During this second rise, the dough should become slightly puffier.
Step 7: Preheat the Oven
Preheat your oven to 375°F (190°C).
Make sure the oven is fully heated before baking. A properly preheated oven helps the bread develop a golden crust while allowing the inside to bake evenly.
Step 8: Bake the Bread
Place the dough in the preheated oven and bake for approximately 25–35 minutes.
The bread is ready when the crust is golden brown and the loaf sounds hollow when tapped on the bottom. If using a thermometer, the center should generally reach about 190–200°F (88–93°C).
If the top browns too quickly, loosely cover it with aluminum foil for the remainder of the baking time.
Step 9: Cool Before Slicing
Remove the bread from the oven and transfer it to a cooling rack.
Allow it to cool for at least 20–30 minutes before slicing. Cutting into very hot bread can cause the interior to become gummy because the crumb is still setting.
Once cooled, slice the loaf and serve it with butter, jam, honey, cheese, or your favorite sandwich fillings.
Methods of Preparation
The Bread-in-a-Bag Method
The defining feature of this recipe is its simple mixing technique. Some of the ingredients are combined in a resealable bag, allowing you to mix and knead the dough with less direct contact and less mess on the counter.
This method is especially useful for beginners and family baking activities. However, the bag is primarily a mixing aid; the dough still needs sufficient kneading, rising, shaping, and baking to produce a good loaf.
The Traditional Kneading Method
If you prefer a more traditional approach, mix the ingredients in a large bowl and knead the dough on a lightly floured surface.
Knead for approximately 8–10 minutes, until the dough feels smooth and elastic. This method allows you to judge the dough’s texture directly and adjust the flour or water gradually.
The One-Loaf Baking Method
For a classic homemade loaf, shape the dough into an oval and bake it on a baking sheet. This creates a rustic loaf with a golden crust.
Alternatively, place the dough in a greased loaf pan to produce slices that are more uniform and convenient for sandwiches and toast.
The Flavor-Variation Method
You can customize the dough by adding dried herbs, a little garlic powder, or a small amount of grated cheese. Add these ingredients during the final stage of mixing so they are distributed evenly.
For a sweeter breakfast bread, you can add a little cinnamon, but remember that substantial changes to the ingredient quantities may affect the dough’s texture and rising time.
The History of Homemade Bread
Bread has been a staple food for thousands of years. Early communities discovered that crushed grains mixed with water could be cooked into simple flatbreads, providing an important source of nourishment.
Over time, people learned to make fermented dough, creating bread that was lighter and more flavorful. Yeast-based bread-making developed across many cultures, with different regions producing their own distinctive loaves, shapes, and baking traditions.
As baking became more accessible, home cooks developed practical ways to prepare bread with ordinary household ingredients. Modern recipes such as Bread in a Bag reflect this tradition of making baking easier and more approachable.
Although the resealable-bag technique is a modern convenience rather than an ancient bread-making tradition, it follows the same fundamental process: combining flour and liquid, developing the dough, allowing it to rise, and baking it until delicious.
Today, homemade bread remains popular because it brings families together and allows cooks to control the ingredients, texture, flavor, and freshness of every loaf.
Formation and Texture of the Bread
The quality of Bread in a Bag depends on several important stages.
Gluten development: When flour combines with water and is kneaded, proteins in the flour form a network called gluten. This network gives the dough elasticity and helps it retain the gases produced during fermentation.
Yeast fermentation: The yeast consumes available sugars and produces carbon dioxide. The gas becomes trapped in the gluten network, causing the dough to rise.
Moisture and tenderness: Olive oil coats some of the flour particles and contributes to a softer crumb. It also helps keep the bread tender after baking.
Crust formation: During baking, the surface loses moisture and browns, creating a flavorful crust. The interior sets into a soft structure as the dough heats through.
Final cooling: As the bread cools, its internal structure stabilizes. This is why allowing the loaf to rest before slicing is an important part of the process.
When all these stages are handled properly, the result is a loaf with a lightly crisp crust, a tender interior, and a pleasant homemade flavor.
Tips for Perfect Bread in a Bag
- Check the water temperature. Aim for approximately 110°F (43°C). Water that is too hot can weaken or kill the yeast.
- Measure the flour carefully. Spoon flour into the measuring cup and level it rather than packing it tightly.
- Add flour gradually. Different brands and conditions affect how much water the flour absorbs. The dough should be soft and manageable, not dry and stiff.
- Give the dough enough time to rise. Follow the dough’s appearance rather than relying entirely on the clock.
- Avoid overloading the dough. Too many additional ingredients can make the loaf heavy or interfere with its structure.
- Use a sturdy, food-safe bag. Keep the bag away from sharp objects and excessive heat. Never put a plastic bag in the oven.
- Allow the bread to cool. Cooling helps maintain a better texture and makes slicing easier.
- Store it properly. Once completely cool, keep the bread in an airtight bag or container at room temperature for about 2–3 days. Freeze extra slices for longer storage.
Serving Suggestions
Bread in a Bag is wonderfully versatile and can be served in many different ways.
- For breakfast: Serve warm slices with butter, honey, jam, or peanut butter.
- For sandwiches: Use the bread for cheese sandwiches, egg sandwiches, chicken sandwiches, or your favorite fillings.
- For lunch: Pair it with vegetable soup, tomato soup, or a fresh salad.
- For dinner: Serve slices alongside roasted vegetables, pasta, stews, or grilled meat.
- For a simple snack: Toast a slice and top it with olive oil, cheese, or mashed avocado.
- For family gatherings: Place the sliced loaf in a bread basket and serve it with a selection of spreads.
Common Mistakes and How to Avoid Them
The dough is too sticky: Add flour a tablespoon at a time while kneading. Avoid adding large amounts at once, as too much flour can produce dry bread.
The dough does not rise: Check that the yeast is fresh, the water was not too hot, and the dough was kept in a reasonably warm place.
The bread is dense: Possible causes include insufficient kneading, too much flour, inactive yeast, or inadequate rising time.
The crust becomes too dark: Lower the oven rack if necessary or cover the loaf loosely with foil once it reaches the desired color.
The center is underbaked: Extend the baking time and check the internal temperature. A golden crust alone does not always mean the middle is fully baked.
The bread crumbles when sliced: Allow it to cool fully and make sure the dough was properly hydrated and kneaded.
Conclusion
Bread in a Bag proves that making homemade bread does not have to be complicated. With a handful of everyday ingredients, a resealable bag, and a little patience, you can create a delicious loaf with a golden crust and a soft, satisfying center.
This recipe is perfect for beginners, busy families, and anyone who enjoys the comfort of freshly baked bread without needing special equipment. It also offers an enjoyable way to introduce children to baking under adult supervision.
Serve it warm with butter, turn it into delicious sandwiches, or enjoy a slice alongside your favorite meal. Once you experience the flavor and satisfaction of homemade bread, you may find yourself making this easy recipe again and again.
For the Love of Homemade Bread
Homemade bread is more than a recipe. It is a simple pleasure that brings warmth to the kitchen and creates moments worth sharing. The process of mixing, kneading, watching the dough rise, and enjoying the finished loaf can turn an ordinary day into something special.
Whether you bake it for your family, share it with friends, or enjoy it fresh from the oven with a little butter, this Bread in a Bag recipe is a lovely reminder that delicious food can begin with the simplest ingredients.
If you love easy homemade recipes, keep this bread recipe in your collection and share it with someone who enjoys baking. A warm loaf of homemade bread is always a welcome addition to the table.