
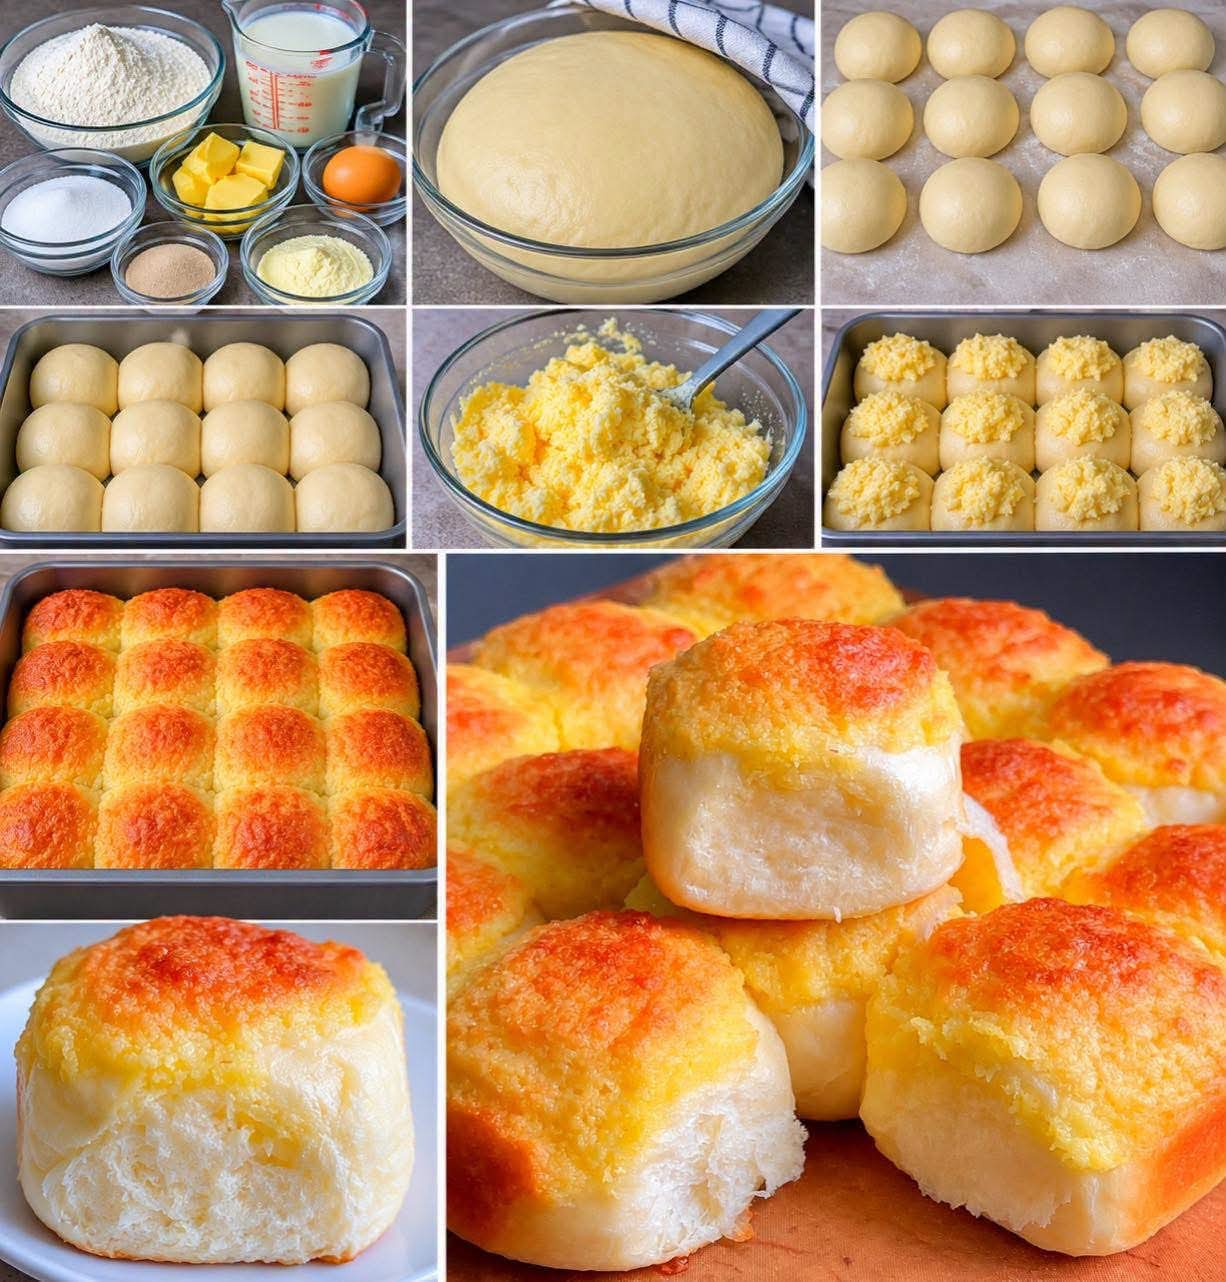
Soft Cheese-Topped Milk Bread Rolls
Introduction
Soft Cheese-Topped Milk Bread Rolls are tender, fluffy homemade rolls enriched with milk, egg, and butter, then finished with a creamy, lightly sweet cheese topping. The result is a beautiful combination of soft, pillowy bread and a golden, slightly savory cheese crust.
These rolls are wonderful for breakfast, afternoon tea, brunch, family gatherings, or as a comforting homemade snack. They are especially delicious when served warm from the oven, when the bread is soft and fragrant and the cheese topping is still wonderfully tender.
The dough is simple to prepare, but proper kneading and rising are important. Once the dough has developed enough gluten, the finished rolls become light, elastic, and fluffy rather than dense. The cheese topping adds another layer of flavor, combining grated cheese with butter, milk, sugar, and a small amount of flour to create a creamy topping that bakes beautifully.
Ingredients
For the Milk Bread Dough
- 2 cups all-purpose flour, approximately 250 g
- 1/4 cup granulated sugar, approximately 50 g
- 1 teaspoon instant yeast, approximately 4 g
- 1/2 teaspoon salt, approximately 3 g
- 1/2 cup warm milk, approximately 120 ml
- 1 large egg, preferably at room temperature
- 3 tablespoons softened butter, approximately 45 g
For the Cheese Topping
- 1/2 cup grated cheese, approximately 50 g
- 2 tablespoons softened butter, approximately 30 g
- 2 tablespoons granulated sugar, approximately 25 g
- 2 tablespoons milk, approximately 30 ml
- 1 tablespoon all-purpose flour, approximately 8 g
For Preparing the Pan
- A little butter or neutral oil for greasing the baking pan
Instructions
Step 1: Prepare the Dough
Begin by preparing a large mixing bowl. Add the all-purpose flour, granulated sugar, instant yeast, and salt. Mix the dry ingredients thoroughly so that the yeast and salt are distributed throughout the flour.
Add the warm milk and the egg. Mix everything together using a wooden spoon, spatula, or your hands until a rough and soft dough begins to form.
The milk should be warm rather than hot. Extremely hot milk can damage the yeast and interfere with the rise of the dough.
Step 2: Add the Butter
Add the softened butter to the dough.
At first, the dough may become sticky and appear difficult to work with. Continue kneading rather than immediately adding large amounts of flour. The butter needs time to become incorporated into the dough.
Knead for approximately 10 to 15 minutes by hand, or use a stand mixer with a dough hook until the dough becomes smooth, soft, elastic, and stretchy.
A properly kneaded dough should feel soft and supple. It may remain slightly tacky, but it should not be excessively wet.
Step 3: First Rise
Shape the dough into a smooth ball and place it in a lightly greased bowl.
Cover the bowl with plastic wrap, a clean kitchen towel, or a reusable cover. Place it somewhere warm and allow the dough to rise until approximately doubled in size.
Depending on the temperature of your kitchen, this may take around 1 to 1 1/2 hours.
Do not rely only on the clock. The dough is ready when it has visibly expanded and feels light and airy.
Step 4: Divide and Shape
Once the dough has doubled, gently press it down to release some of the accumulated air.
Transfer it to a lightly floured work surface and divide it into equal portions. The exact number of rolls depends on how large you want them to be. For medium-sized rolls, approximately 8 to 10 portions work well.
Take each portion and gently shape it into a smooth ball. Pull the edges toward the bottom and pinch them together underneath to create a neat, rounded surface.
Step 5: Arrange the Rolls
Grease a suitable baking pan with a little butter or oil.
Arrange the shaped dough balls in the pan, leaving a small amount of space between them. As they rise, the rolls will expand and eventually become close together.
Cover the pan and let the rolls rise for a second time until they become noticeably puffy and soft.
This second rise is important because it helps create the light, fluffy texture associated with soft milk bread.
Step 6: Prepare the Cheese Topping
While the rolls are undergoing their second rise, prepare the topping.
Place the grated cheese, softened butter, sugar, milk, and flour in a small bowl.
Mix thoroughly until everything is combined into a thick, creamy mixture.
The topping should be spreadable but not extremely runny. If it seems too thick, add a very small amount of milk. If it becomes too loose, a little additional flour can help thicken it.
For the best flavor, use a cheese that melts well. Mild cheddar, mozzarella, Gouda, or another good melting cheese can work beautifully depending on the flavor you prefer.
Step 7: Add the Cheese Topping
Preheat the oven to 180°C (350°F).
Once the dough balls have finished their second rise, gently spoon or spread a portion of the cheese mixture over the top of each roll.
Try to distribute the topping evenly so every roll develops a delicious golden cheese layer during baking.
Do not press heavily on the risen dough, as this can cause it to lose some of its air.
Step 8: Bake
Place the pan in the preheated oven.
Bake for approximately 18 to 25 minutes, or until the rolls are golden brown on top and the bread is completely baked.
Because ovens vary, begin checking the rolls toward the lower end of the baking time.
The tops should be beautifully golden, while the rolls should feel light and cooked through.
If the cheese topping begins browning too quickly before the bread has finished baking, loosely cover the pan with aluminum foil for the remaining baking time.
Step 9: Cool and Serve
Remove the rolls from the oven and allow them to cool in the pan for several minutes.
They are especially delicious served warm while the bread is still soft and the cheese topping is tender.
For an extra bakery-style finish, lightly brush the exposed bread with a little melted butter immediately after baking.
Method
The key to these rolls is developing a soft, enriched yeast dough. Milk contributes tenderness and a gentle richness, while the egg gives the dough structure, color, and a delicate texture. Butter adds richness and helps produce a soft crumb.
Kneading is essential because it develops the gluten network needed to trap the gases produced by the yeast. This gives the rolls their characteristic airy structure.
The first rise allows the yeast to ferment the dough and increase its volume. After shaping, the second rise gives the individual rolls another opportunity to become light and airy.
The cheese topping is prepared separately and added after the second rise. During baking, the butter melts into the topping while the cheese develops a golden surface, creating a flavorful contrast with the soft milk bread underneath.
The Formation of the Rolls
The formation process has several important stages.
First, the ingredients are brought together to create a soft dough. The butter is then incorporated during kneading, producing an enriched dough with a smooth and elastic consistency.
After the first fermentation, the dough is divided into equal pieces. Each piece is rounded carefully into a smooth ball. This creates tension on the surface of the dough, helping the rolls maintain their shape while rising.
The shaped rolls are placed close enough together that they can expand and support one another during baking. After the second rise, they become noticeably larger and softer.
Finally, the cheese topping is applied to the surface. As the rolls bake, the dough expands further while the topping melts and browns, producing the characteristic appearance of these cheese-topped milk bread rolls.
History and Inspiration
Milk bread has become popular in many parts of the world because enriched dough produces a softer and more tender loaf than basic flour-and-water bread. Different cultures have developed their own versions using ingredients such as milk, eggs, butter, sugar, or condensed milk.
Soft milk breads are particularly associated with Asian-style bakery traditions, where tender, lightly sweet breads are often served as breakfast foods, snacks, or bakery treats. Cheese-topped breads have also become popular because the combination of sweet, fluffy bread and savory cheese creates a satisfying balance.
This recipe brings together those ideas in a simple homemade format. Instead of forming one large loaf, the dough is divided into individual rolls and finished with a creamy cheese topping, making the bread easy to serve to family and guests.
Helpful Baking Tips
Use Properly Warm Milk
The milk should feel comfortably warm. Very hot milk can negatively affect the yeast, while milk that is too cold may slow the rising process.
Do Not Add Too Much Flour
A common mistake when making soft bread is adding too much flour because the dough feels sticky. This can result in heavy, dry rolls.
The dough should remain soft and slightly tacky while being kneaded.
Knead Thoroughly
Proper kneading helps create the stretchy gluten structure needed for fluffy rolls. If kneading by hand, work the dough patiently for approximately 10 to 15 minutes.
Give the Dough Enough Time to Rise
Rising time depends on room temperature, humidity, and yeast activity. Use the appearance and texture of the dough as your guide rather than following the time exactly.
Choose a Good Melting Cheese
A mild cheddar, mozzarella, Gouda, or similar cheese can produce an excellent topping. You can also combine two cheeses for a more complex flavor.
Watch the Topping
The sugar and cheese in the topping can brown quickly. Keep an eye on the rolls during the final part of baking.
Serving Suggestions
These rolls can be served warm on their own, but they also pair beautifully with many meals.
Serve them for breakfast with eggs, vegetables, or fresh fruit. They can also be placed in a bread basket alongside soups, stews, roasted meats, pasta dishes, or salads.
For an afternoon snack, serve them with tea, coffee, or warm milk.
Because they are individually portioned, they are also excellent for brunches, family gatherings, picnics, potlucks, and holiday tables.
Storage
Allow leftover rolls to cool completely before storing them.
Place them in an airtight container or tightly sealed food bag and keep them at room temperature for up to 2 days.
For longer storage, the rolls can be frozen. Wrap them individually or place them in a freezer-safe container. Thaw at room temperature and gently reheat before serving.
A short warming period in the oven can help restore some of the softness of the bread.
Variations
For a more savory version, reduce or omit the sugar in the cheese topping and add a pinch of garlic powder or dried herbs.
For a richer cheese topping, combine mozzarella with cheddar.
For a slightly sweet bakery-style variation, use a mild cheese and keep the sugar in the topping.
You can also add finely chopped herbs such as parsley, chives, or green onion for a fresh savory flavor.
Conclusion
Soft Cheese-Topped Milk Bread Rolls are a wonderful homemade baking project for anyone who enjoys tender bread with a golden, flavorful topping. The enriched milk bread creates a soft and fluffy interior, while the cheese mixture provides a creamy, buttery finish with just enough sweetness to make every bite interesting.
The recipe takes a little patience because the dough needs time to rise, but the reward is a pan of beautiful homemade rolls that smell wonderful and taste even better.
Fresh from the oven, these rolls are soft, warm, fragrant, and satisfying. They are simple enough for an ordinary breakfast but special enough to serve at a family gathering.
For Bread Lovers
If you love soft homemade bread, these rolls are especially worth adding to your baking collection. The combination of fluffy milk bread and creamy cheese topping gives them the comforting quality of a homemade bakery favorite.
Bread lovers can experiment with different cheeses, herbs, and toppings to create their own version. Whether served alongside a savory meal or enjoyed warm as a snack, these rolls are the kind of homemade treat that can quickly become a family favorite.
The best way to enjoy them is warm, fresh from the oven, when the bread is at its softest and the cheese topping is still tender and fragrant.
Walking Taco Casserole
Introduction
Walking Taco Casserole is a hearty, comforting dinner that brings all the best parts of a classic walking taco into an easy baked casserole. Crunchy corn chips are layered with seasoned ground beef, creamy cheese, green chiles, and melted Mexican-style cheese, then finished with fresh iceberg lettuce and juicy tomato.
It is an especially good choice for busy weeknights because the beef mixture can be prepared in one skillet, and the casserole comes together quickly. Every serving combines creamy, savory, cheesy, crunchy, and fresh textures in one dish.
Ingredients
For the Casserole
- 2–3 cups corn chips
- 1 1/2 pounds ground beef
- 1 yellow onion, finely diced
- 1 packet taco seasoning
- 1 can green chiles, drained
- 3 ounces cream cheese, softened
- 1 cup Mexican blend shredded cheese
For the Toppings
- 1–2 cups iceberg lettuce, finely shredded
- 1 Roma tomato, diced
- Sour cream, for serving
- Salsa, for serving
- Additional corn chips, optional
- Extra shredded cheese, optional
- Diced avocado, optional
- Sliced jalapeños, optional
- Chopped green onions, optional
Instructions
1. Prepare the Oven and Baking Dish
Preheat the oven to 375°F (190°C). Lightly grease a medium-sized baking dish so the casserole will be easier to serve and clean up afterward.
2. Cook the Ground Beef
Place a large skillet over medium-high heat. Add the ground beef and diced yellow onion. Cook for approximately 7–10 minutes, breaking the beef apart with a spoon or spatula as it cooks.
Continue cooking until the beef is completely browned and the onion has softened.
Drain any excess grease from the skillet.
3. Season the Beef
Return the skillet to the heat and sprinkle in the taco seasoning. Add the drained green chiles and softened cream cheese.
Stir everything together until the seasoning is evenly distributed and the cream cheese has melted into the beef mixture. The filling should become creamy, flavorful, and well combined.
If the mixture seems especially thick, a small splash of water can be added to loosen it.
4. Build the First Layer
Spread approximately half of the corn chips across the bottom of the prepared baking dish.
Try to distribute them fairly evenly so every portion gets some crunchy chips.
5. Add the Beef Filling
Spoon the creamy taco-seasoned beef mixture over the corn chips. Spread it gently into an even layer.
6. Add the Cheese
Sprinkle the Mexican blend cheese evenly over the beef mixture. The cheese will melt into the filling during baking and create a delicious golden, bubbly topping.
7. Bake
Place the casserole in the preheated oven and bake for approximately 20 minutes, or until the casserole is heated through and the cheese is completely melted and bubbling.
Keep an eye on the corn chips toward the end of baking. You want them warm and slightly crisp rather than overly browned.
8. Add the Fresh Toppings
Remove the casserole from the oven and allow it to rest for a few minutes.
Top with shredded iceberg lettuce and diced Roma tomato. Add additional toppings such as sour cream, salsa, jalapeños, avocado, or green onions according to your preference.
For extra crunch, sprinkle a few additional corn chips over the top just before serving.
Methods
Skillet Method
The skillet is the foundation of this recipe. Browning the ground beef with onion develops a rich savory flavor, while draining the excess grease keeps the casserole from becoming overly heavy.
Creamy Taco Filling Method
Adding cream cheese after the beef has been browned creates a smooth and creamy filling. The taco seasoning and green chiles give the mixture its signature Tex-Mex character.
Layering Method
Layering the corn chips underneath the beef allows them to absorb some of the savory flavors while maintaining some of their crunch. The melted Mexican blend cheese then brings the layers together.
Baking Method
A short bake at 375°F is enough to heat the casserole thoroughly and melt the cheese without requiring a long cooking time.
Fresh-Topping Method
The lettuce and tomato are added after baking rather than before. This keeps the vegetables crisp, cool, and refreshing against the hot, creamy beef and melted cheese.
History and Inspiration
The idea behind a walking taco comes from the popular American tradition of serving taco toppings with seasoned meat and crunchy corn chips, often directly inside an individual bag of chips. It became particularly popular at fairs, school events, sporting events, festivals, and casual gatherings because it is easy to assemble and eat.
Walking Taco Casserole takes that fun concept and transforms it into a family-style baked dish. Instead of preparing individual portions, the ingredients are layered in one baking dish, making it convenient for dinner parties, potlucks, and busy family meals.
While there are many variations of taco casseroles, the combination of seasoned beef, corn chips, cheese, and fresh taco toppings gives this version the recognizable walking-taco flavor.
Formation of the Casserole
The beauty of this casserole comes from the contrast between its layers.
The corn chips provide crunch and a salty corn flavor. The seasoned ground beef supplies the hearty savory center. Cream cheese makes the filling rich and smooth, while green chiles add mild heat and extra flavor. The Mexican blend cheese melts over everything, creating a creamy, cheesy finish.
Finally, iceberg lettuce and Roma tomato add freshness and texture. Sour cream and salsa provide the finishing touches and allow everyone to customize their serving.
Serving Suggestions
Serve the casserole hot shortly after baking. For a complete meal, pair it with:
- Mexican-style rice
- Refried beans
- Black beans
- Corn salad
- Guacamole
- Fresh salsa
- Avocado
- A simple green salad
For a party, place bowls of toppings on the table and let everyone customize their own serving.
Make-Ahead Method
The beef mixture can be prepared ahead of time and refrigerated in an airtight container. When ready to assemble, reheat the beef gently before layering the casserole.
For the best texture, add the corn chips close to baking time rather than letting them sit underneath the filling for an extended period. The lettuce and tomato should always be added after baking.
Storage and Reheating
Store leftover casserole in an airtight container in the refrigerator and use within a few days.
Because the corn chips become softer as they absorb moisture, leftovers will not have exactly the same crunch as freshly baked casserole. For the best result, reheat individual portions and add fresh lettuce, tomato, salsa, sour cream, and extra corn chips afterward.
Why Lovers of Taco Casseroles Will Enjoy It
This recipe is perfect for people who love tacos but want something easier to prepare for a group. There is no need to assemble individual tacos or keep numerous ingredients separate.
It is creamy, cheesy, savory, crunchy, and customizable. You can make it mild for the whole family or add jalapeños and spicy salsa for extra heat.
It is also flexible enough to accommodate different preferences. Ground turkey or chicken can be substituted for beef, while black beans or pinto beans can be added to make the filling even heartier.
Conclusion
Walking Taco Casserole turns the fun flavors of a classic walking taco into a warm, satisfying family meal. The combination of crunchy corn chips, seasoned ground beef, creamy cheese, green chiles, melted Mexican cheese, crisp lettuce, and fresh tomato makes every bite full of contrasting textures and flavors.
It is simple enough for a weeknight dinner but flavorful enough for a potluck or casual gathering. Serve it with plenty of salsa and sour cream, add your favorite taco toppings, and let everyone build their perfect portion.
Mince Pie Banana Bread
Introduction
Mince Pie Banana Bread is a wonderfully festive twist on classic homemade banana bread. It combines the soft, naturally moist texture of ripe banana cake with the warm flavors traditionally associated with mince pies: cinnamon, mixed spice, brown sugar, and rich fruity mincemeat.
This loaf is perfect when you have a few overripe bananas waiting in the fruit bowl and want to turn them into something special. The bananas provide moisture and sweetness, while the mincemeat creates little pockets of rich, spiced fruit throughout the loaf. The result is tender, fragrant, comforting, and full of Christmas character without being as heavy as a traditional fruit cake.
You can enjoy it plain with a cup of tea or coffee, or finish it with a creamy cinnamon cream-cheese frosting and an extra spoonful of mincemeat for a beautiful festive presentation.
Ingredients
For the Banana Bread
- 75 g unsalted butter, melted and slightly cooled
- 125 g light brown soft sugar
- 50 ml milk
- 1 teaspoon vanilla extract
- 2 large eggs
- 3 very ripe bananas, mashed
- 250 g plain wholemeal flour or regular plain flour
- 2 teaspoons baking powder
- 1 teaspoon ground cinnamon
- 1 teaspoon mixed spice
- 100 g mincemeat
For the Optional Cinnamon Cream Cheese Topping
- 75 g unsalted butter, softened
- 75 g icing sugar
- ½ teaspoon ground cinnamon
- 150 g full-fat cream cheese
- ½ teaspoon vanilla extract
- 75 g mincemeat, for finishing
Equipment
- 2 lb loaf tin
- Baking paper
- Large mixing bowl
- Medium mixing bowl
- Electric mixer or whisk
- Spatula
- Fork or potato masher
- Wooden skewer or cake tester
Instructions
Step 1: Prepare the Oven and Loaf Tin
Preheat the oven to 180°C conventional or 160°C fan.
Grease a 2 lb loaf tin thoroughly and line it with baking paper, leaving some paper hanging over the sides. This makes it much easier to lift the finished loaf from the tin.
Step 2: Prepare the Bananas
Peel the bananas and place them in a bowl. Mash them thoroughly with a fork until mostly smooth.
A few small pieces of banana are perfectly fine and can actually add extra moisture and texture to the finished loaf.
Very ripe bananas are best because they contain more natural sweetness and have a softer texture.
Step 3: Combine the Wet Ingredients
In a large mixing bowl, combine the melted butter and light brown soft sugar.
Add the milk and vanilla extract and mix until combined.
Beat in the eggs one at a time, making sure each egg is incorporated before adding the next.
Add the mashed bananas and stir until the mixture is evenly combined.
Step 4: Prepare the Dry Ingredients
In a separate bowl, combine the flour, baking powder, cinnamon, and mixed spice.
Stir the dry ingredients together so that the baking powder and spices are distributed evenly throughout the flour.
Step 5: Make the Batter
Gradually add the dry ingredients to the banana mixture.
Fold gently with a spatula until just combined.
Do not overmix the batter. Once you can no longer see large amounts of dry flour, stop mixing. Overmixing can make banana bread heavier and less tender.
Step 6: Add the Mincemeat
Gently fold 100 g of mincemeat through the batter.
Try not to mix it too aggressively. Keeping some small pockets of mincemeat throughout the mixture gives the finished loaf wonderful bursts of rich, fruity spice.
Step 7: Fill the Tin
Transfer the batter into the prepared loaf tin.
Use a spatula to spread the mixture evenly and gently level the top.
If desired, you can place a few small pieces of banana or a little extra mincemeat on top before baking, but this is optional.
Step 8: Bake
Place the loaf in the center of the preheated oven.
Bake for approximately 55–65 minutes.
The exact baking time will depend on your oven and the moisture content of your bananas.
The loaf should be golden brown and risen in the center. Insert a wooden skewer into the middle. It should come out clean or with only a few moist crumbs attached.
If the top begins to brown too quickly while the center still needs time, loosely cover the loaf with aluminum foil and continue baking.
Step 9: Cool
Remove the loaf from the oven and allow it to rest in the tin for approximately 10–15 minutes.
Carefully lift it out using the baking-paper overhang and place it on a wire rack.
Allow the loaf to cool completely before adding the cream-cheese topping.
Cooling completely is particularly important because cream cheese frosting can soften or melt if spread onto a warm cake.
Method for the Cinnamon Cream Cheese Topping
Step 1: Beat the Butter
Place the softened butter into a mixing bowl.
Beat for several minutes until smooth and creamy.
Step 2: Add the Icing Sugar
Gradually add the icing sugar and continue beating until the mixture becomes light and fluffy.
Add the cinnamon and vanilla extract.
Mix until evenly incorporated.
Step 3: Add the Cream Cheese
Add the cream cheese and beat briefly until smooth.
Avoid overbeating once the cream cheese has been added, as excessive mixing can make the frosting become loose.
Step 4: Decorate the Loaf
Make sure the banana bread is completely cool.
Spread the cinnamon cream-cheese topping over the surface using a spatula or the back of a spoon.
Finish with approximately 75 g of mincemeat, spooned gently over the top.
For a more decorative appearance, you can create small swirls in the frosting and distribute the mincemeat in little sections rather than spreading it completely evenly.
The History Behind the Recipe
Banana bread and mince pies come from very different culinary traditions, but they work surprisingly well together.
Banana bread became particularly popular as a way of using overripe bananas that might otherwise have been discarded. Its soft texture, simple ingredients, and adaptable nature have made it a favorite homemade loaf in many households.
Mince pies, meanwhile, have a much longer history in Britain. Early versions were savory-sweet pies containing meat along with dried fruits and spices. Over time, the meat gradually disappeared from many modern versions, leaving the familiar mixture of dried fruits, spices, sugar, and other flavorful ingredients commonly known as mincemeat.
This recipe brings those two traditions together. Instead of making individual mince pies, the festive mincemeat is folded directly into a banana loaf. The banana gives the cake softness and moisture, while the mincemeat supplies the rich Christmas flavor.
Formation and Texture
The formation of this loaf is simple but each ingredient contributes something important.
The mashed bananas provide moisture, natural sweetness, and body. Melted butter gives the loaf richness without requiring the traditional creaming method used for many cakes.
Brown sugar contributes sweetness as well as a deeper caramel-like flavor that complements the spices and dried fruit.
The eggs help bind the ingredients together and contribute to the structure of the loaf.
Flour provides the framework, while baking powder gives the bread enough lift to become light and tender.
Cinnamon and mixed spice create the warm aromatic flavor that makes the loaf taste distinctly festive.
Finally, the mincemeat adds concentrated fruitiness, spice, and texture. Because it is folded through the batter rather than completely blended in, every slice can contain little pockets of rich mincemeat.
The optional cream-cheese topping adds another layer of contrast. Its creamy, slightly tangy flavor balances the sweetness of the banana bread and mincemeat.
Important Baking Tips
Use very ripe bananas whenever possible. Bananas with plenty of brown spots are ideal because they are softer, sweeter, and more flavorful.
Do not overmix the batter. Gentle folding keeps the loaf tender.
Measure the flour accurately. Adding too much flour can make banana bread dry or dense.
Make sure the butter has cooled slightly before combining it with the eggs.
Do not frost the loaf while it is warm. The cream cheese topping needs a completely cooled loaf to remain thick and attractive.
If your mincemeat is particularly wet, avoid adding excessive amounts because too much moisture can affect the structure of the bread.
Allow the loaf to cool fully before slicing. This gives the crumb time to set and makes the slices cleaner.
Serving Suggestions
This loaf is delicious served at room temperature with a hot cup of tea or coffee.
For a more indulgent dessert, warm an individual slice very gently and serve it with vanilla ice cream or lightly whipped cream.
It also makes a beautiful addition to a Christmas afternoon tea, holiday brunch, family gathering, or festive dessert table.
If serving guests, slice the loaf into moderately thick pieces so that each person gets a good balance of banana crumb, spices, and mincemeat.
Storage
Because the unfrosted banana bread keeps particularly well, it can be prepared in advance.
Store the unfrosted loaf in an airtight container at room temperature for a few days.
Once covered with cream-cheese frosting, refrigerate the loaf in an airtight container because of the cream cheese.
Allow refrigerated slices to sit at room temperature for a short time before serving for the best texture and flavor.
The loaf can also be frozen without the frosting. Wrap it securely and freeze in individual slices or as a whole loaf. Thaw completely before serving.
Why Lovers of Banana Bread Will Love This Recipe
Banana bread lovers will appreciate how soft and moist this loaf remains, while mince-pie lovers will enjoy the familiar combination of dried fruit and warming spices.
It is festive without being complicated.
It is also an excellent recipe for using bananas that have become too ripe for eating on their own. Instead of throwing them away, they become the foundation for a beautiful homemade Christmas loaf.
The optional cinnamon cream-cheese topping makes it feel even more special, transforming an everyday banana bread into something suitable for a holiday celebration.
Variations
For an extra nutty loaf, add a small handful of chopped walnuts or pecans.
For additional citrus flavor, add finely grated orange zest to the batter.
If you enjoy a stronger spice flavor, slightly increase the cinnamon or mixed spice.
A little chopped dried cranberry can also complement the mincemeat beautifully.
For a simpler version, leave off the frosting entirely and serve the loaf plain. The banana, brown sugar, cinnamon, mixed spice, and mincemeat already provide plenty of flavor.
Conclusion
Mince Pie Banana Bread is a wonderful way to combine the comforting simplicity of homemade banana bread with the traditional flavors of the festive season.
Every slice is soft, moist, warmly spiced, and filled with little pockets of fruity mincemeat. The optional cinnamon cream-cheese topping adds a smooth, creamy finish that makes the loaf especially attractive for Christmas gatherings.
Whether served as part of a festive breakfast, afternoon tea, family dessert, or simply enjoyed with a warm drink on a cold day, this loaf brings together the best qualities of banana bread and mince pies in one easy homemade bake.
It is comforting, nostalgic, festive, and wonderfully satisfying from the first slice to the last.
Dolly Parton’s Cuppa Cuppa Cuppa Cake
Introduction
Dolly Parton’s Cuppa Cuppa Cuppa Cake is a wonderfully simple, old-fashioned dessert that celebrates the idea that delicious baking does not always require a long list of ingredients. Traditionally associated with Dolly Parton and her Southern-inspired cooking, this cake is known for its uncomplicated “a cup of this, a cup of that” style.
This version brings together ripe bananas, flour, butter, pecans, eggs, and brown sugar to create a tender, golden cake with a rich buttery flavor, natural sweetness, and plenty of comforting texture. The bananas keep the crumb soft, while toasted pecans add a pleasant crunch and brown sugar gives the cake a warm caramel-like depth.
Ingredients
For the Cake
- 3 ripe bananas, mashed
- 1 cup all-purpose flour
- 1 cup packed brown sugar
- 1/2 cup unsalted butter, melted and slightly cooled
- 2 large eggs
- 1 cup chopped pecans
- 1 teaspoon vanilla extract
- 1 teaspoon baking powder
- 1/2 teaspoon baking soda
- 1/2 teaspoon salt
- 1 teaspoon ground cinnamon, optional
For the Top
- 1/4 cup chopped pecans
- 2 tablespoons brown sugar
- 1 tablespoon melted butter
Instructions
Step 1: Prepare the Oven and Pan
Preheat the oven to 350°F (175°C).
Grease a 9-inch square baking pan or a similar-sized baking dish. For easier removal, you can also line the bottom with parchment paper.
Step 2: Prepare the Bananas
Place the ripe bananas in a large mixing bowl and mash them thoroughly with a fork.
For the best flavor, use bananas that are very ripe and have plenty of brown spots on their skins. These bananas are naturally sweeter and produce a softer, more flavorful cake.
Step 3: Add the Wet Ingredients
Add the melted butter, brown sugar, eggs, and vanilla extract to the mashed bananas.
Whisk until the mixture is smooth and well combined. Do not worry if a few small pieces of banana remain; they will create delicious pockets of fruit throughout the cake.
Step 4: Combine the Dry Ingredients
In a separate bowl, whisk together the flour, baking powder, baking soda, salt, and cinnamon if using.
Gradually add the dry mixture to the banana mixture.
Fold everything together gently until just combined. Avoid overmixing because excessive mixing can make the finished cake dense instead of tender.
Step 5: Add the Pecans
Fold in the chopped pecans, reserving a small amount for the topping.
The pecans can be lightly toasted before adding them to the batter. Toasting intensifies their flavor and gives the cake an especially rich, nutty character.
Step 6: Prepare the Topping
Combine the remaining chopped pecans with the brown sugar and melted butter.
Sprinkle this mixture evenly over the top of the cake batter.
This creates a lightly caramelized, crunchy layer as the cake bakes.
Step 7: Bake
Pour the batter into the prepared pan and spread it evenly.
Bake for approximately 30 to 40 minutes, or until the top is golden brown and a toothpick inserted into the center comes out clean or with a few moist crumbs attached.
Because ovens and baking pans vary, begin checking the cake around the 30-minute mark.
Step 8: Cool
Remove the cake from the oven and allow it to cool in the pan for approximately 15 to 20 minutes.
For a warm, comforting dessert, serve it while it is still slightly warm. For cleaner slices, allow it to cool completely before cutting.
Traditional Baking Method
The charm of this cake lies in its straightforward preparation. There is no complicated decorating, elaborate layering, or special equipment required.
The basic method is:
- Mash the bananas.
- Combine the butter, sugar, eggs, and vanilla.
- Mix the wet and dry ingredients.
- Fold in the pecans.
- Transfer the batter to a prepared pan.
- Add the pecan-brown-sugar topping.
- Bake until golden and tender.
- Cool slightly and serve.
The simplicity is part of what makes this style of dessert so appealing.
History and Inspiration
Dolly Parton is strongly associated with Southern Appalachian food traditions, where home cooking often emphasizes simple ingredients, practical preparation, and comforting flavors. The name “Cuppa Cuppa Cuppa” comes from the memorable concept of using a cup of several basic ingredients rather than relying on a complicated recipe.
Recipes connected with Dolly Parton have become especially popular because they reflect the warmth and nostalgia of Southern home cooking. They are the kind of desserts that feel approachable: ordinary pantry ingredients are transformed into something worthy of sharing around the family table.
This banana-and-pecan variation captures that same spirit while adding the familiar flavors of banana bread and a traditional Southern-style nut topping.
Formation and Texture
The bananas are the heart of this cake. As they bake, their natural sugars become concentrated, giving the cake a fragrant fruity sweetness.
Butter contributes richness and tenderness, while eggs help provide structure and create a soft crumb. Brown sugar adds moisture and a deeper caramel flavor than ordinary granulated sugar.
The pecans provide contrast. Instead of having every bite soft and tender, the cake has little pieces of crisp, buttery nuts throughout.
The finished texture should be moist and tender without being wet or gummy.
Serving Suggestions
This cake is excellent served warm on its own, but several additions can make it even more special.
Try serving it with:
- A scoop of vanilla ice cream
- Freshly whipped cream
- A light drizzle of caramel sauce
- A spoonful of vanilla custard
- A dusting of powdered sugar
- Sliced bananas and toasted pecans
- A small drizzle of warm butter sauce
For breakfast or an afternoon treat, simply serve a slice with coffee or tea.
Tips for the Best Results
Use very ripe bananas: The darker and more fragrant the bananas, the sweeter and more flavorful the cake will be.
Do not overmix: Mix only until the flour disappears. This helps maintain a soft crumb.
Measure the flour carefully: Too much flour can make the cake dry. Spoon the flour into the measuring cup and level it rather than packing it down.
Toast the pecans: Five to eight minutes in a moderate oven can dramatically improve their flavor. Allow them to cool before adding them to the batter.
Do not overbake: The cake is ready when a toothpick comes out with a few moist crumbs. Waiting until the toothpick is completely dry can result in a less tender cake.
Storage
Store the cooled cake in an airtight container at room temperature for up to two days.
For longer storage, refrigerate it for up to five days. Allow refrigerated slices to come closer to room temperature before serving, or warm them gently.
The cake can also be frozen. Wrap individual portions securely and freeze for up to three months. Thaw overnight in the refrigerator or allow the cake to thaw at room temperature.
Conclusion
Dolly Parton’s Cuppa Cuppa Cuppa Cake is a beautiful example of how simple ingredients can create an unforgettable homemade dessert. Ripe bananas provide sweetness and moisture, brown sugar brings a warm caramel note, butter creates richness, and pecans add a satisfying crunch.
It is uncomplicated, comforting, and wonderfully nostalgic—the kind of cake that does not need elaborate decoration to make an impression.
For the Lovers of Old-Fashioned Homemade Desserts
If you love desserts that taste homemade rather than overly complicated, this cake is a wonderful choice. It belongs alongside banana bread, Southern pecan cake, coffee cake, and other classic family-style bakes.
Serve it warm from the oven with vanilla ice cream, gather everyone around the table, and let the aroma of bananas, butter, brown sugar, and toasted pecans do the rest.
Classic Texas Sheet Cake
Rich Chocolate Fudge Cake with Warm Chocolate Icing
Introduction
Classic Texas Sheet Cake is one of those timeless desserts that proves a simple cake can be incredibly special. It is a thin, tender chocolate cake baked in a large sheet pan and covered with a warm, glossy chocolate icing while the cake is still fresh from the oven. The result is a wonderfully moist interior, a rich chocolate flavor, and a smooth frosting that sets into a delicate fudge-like layer.
This cake is especially beloved because it is easy to prepare, serves a crowd, and does not require elaborate decorating. The combination of butter, cocoa, buttermilk, and chocolate icing creates the classic flavor and texture that generations of home bakers have enjoyed.
Preparation Information
Prep time: 20 minutes
Bake time: 18–25 minutes
Cooling time: 10–15 minutes
Servings: 20–24 pieces
Pan: 10 x 15-inch jelly-roll pan or similar shallow sheet pan
Ingredients
For the Chocolate Cake
- 2 cups all-purpose flour
- 2 cups granulated sugar
- 1 teaspoon baking soda
- 1/2 teaspoon salt
- 1/2 cup unsweetened cocoa powder
- 1 cup unsalted butter
- 1 cup water
- 1/2 cup buttermilk
- 2 large eggs
- 1 teaspoon vanilla extract
For the Chocolate Fudge Icing
- 1/2 cup unsalted butter
- 1/4 cup unsweetened cocoa powder
- 1/4 cup whole milk
- 1 teaspoon vanilla extract
- 3 1/2 to 4 cups powdered sugar
- 1 cup chopped pecans or walnuts, optional
Instructions
Step 1: Prepare the Pan
Preheat the oven to 350°F (175°C).
Grease a 10 x 15-inch jelly-roll pan thoroughly with butter or nonstick cooking spray. For easier removal, you can also line the bottom with parchment paper.
Because this is a thin cake, using a shallow sheet pan is important. A deeper baking pan will change the thickness and baking time.
Step 2: Combine the Dry Ingredients
In a large mixing bowl, whisk together the flour, granulated sugar, baking soda, salt, and cocoa powder.
Make sure the cocoa powder is evenly distributed throughout the flour mixture. This helps produce a consistent chocolate flavor in every piece.
Step 3: Make the Chocolate Butter Mixture
Place the butter, water, and cocoa powder in a medium saucepan over medium heat.
Heat gently until the butter has melted and the mixture is hot and smooth. Whisk occasionally to dissolve the cocoa powder.
Do not allow the mixture to boil vigorously.
Remove the saucepan from the heat.
Step 4: Combine the Wet and Dry Mixtures
Slowly pour the warm chocolate mixture into the dry ingredients while stirring.
Add the buttermilk, eggs, and vanilla extract.
Whisk or stir just until everything is combined and the batter is smooth.
Avoid excessive mixing once the flour has been incorporated. Overmixing can make the cake less tender.
Step 5: Bake the Cake
Pour the batter evenly into the prepared sheet pan.
Spread it gently toward the corners so the cake has an even thickness.
Bake for approximately 18–25 minutes, or until the center springs back lightly when touched and a toothpick inserted into the middle comes out with a few moist crumbs.
Because sheet cakes are relatively thin, they can go from perfectly baked to dry very quickly. Begin checking toward the lower end of the baking time.
Step 6: Prepare the Icing
While the cake is baking, prepare the frosting.
Place the butter, cocoa powder, and milk in a saucepan over medium heat.
Heat until the butter melts and the mixture becomes smooth.
Remove from the heat and add the vanilla extract.
Gradually whisk in the powdered sugar until the icing becomes smooth, thick, and glossy.
If using nuts, stir in the chopped pecans or walnuts.
The icing should remain warm and spreadable.
Step 7: Frost the Warm Cake
Remove the cake from the oven and allow it to stand for approximately 5–10 minutes.
Pour the warm chocolate icing over the cake.
Using a spatula, gently spread the icing across the entire surface, reaching all the way to the edges.
Allow the icing to cool and set before cutting.
Method
The defining method of a Texas Sheet Cake is the combination of a thin chocolate cake and warm poured icing.
Unlike a traditional layer cake, there is no need to wait for the cake to cool completely before frosting it. The warm icing is poured directly over the freshly baked cake, allowing the chocolate topping to settle into a smooth layer.
The use of melted butter and warm cocoa in the batter also contributes to the cake’s characteristic rich chocolate flavor. Buttermilk adds tenderness and a slight tang that balances the sweetness.
History
Texas Sheet Cake is associated with Southern and Texan home baking and became especially popular as an easy dessert for family gatherings, church suppers, potlucks, holidays, and community celebrations.
Its exact origin is debated, and several similar chocolate sheet-cake recipes appeared in American newspapers, community cookbooks, and home kitchens during the twentieth century. Some versions are closely related to the German chocolate cake tradition, while others resemble Southern chocolate buttermilk cakes.
What made the sheet cake particularly successful was its practicality. Instead of baking and assembling several individual cake layers, home cooks could prepare one large, thin cake and cover it with frosting while it was still warm.
The name “Texas Sheet Cake” reflects its large format and its strong association with Texas-style hospitality, although the cake is enjoyed far beyond Texas.
Formation of the Cake
The cake has three important components.
First is the thin chocolate sponge, which provides a soft and tender foundation.
Second is the warm chocolate icing. Because it is poured over the warm cake, it spreads easily and forms a smooth, fudgy coating.
Third are the optional chopped pecans or walnuts, which provide a pleasant contrast to the soft cake and creamy icing.
Once cooled, the frosting develops a slightly firm surface while remaining rich underneath. This combination of textures is one of the reasons the cake has remained so popular.
Tips for the Best Texas Sheet Cake
Use Good Cocoa Powder
Since chocolate is the main flavor, use a good-quality unsweetened cocoa powder. Natural cocoa powder works particularly well in traditional versions.
Do Not Overbake
A Texas Sheet Cake should be moist and tender. Because it is thin, it does not require a long baking time.
Remove it from the oven as soon as it is properly set.
Frost While Warm
The icing should be poured over the cake while both the cake and frosting are warm. This is essential to achieving the traditional finish.
Sift the Powdered Sugar
Sifting the powdered sugar before adding it to the icing can help prevent lumps and produce a smoother frosting.
Add Pecans for a Traditional Southern Touch
Chopped pecans are a classic addition. They add crunch and a mild buttery flavor that works beautifully with the chocolate.
Let the Cake Set
Although it can be served slightly warm, allowing the frosting to set for about 20–30 minutes makes the cake much easier to cut neatly.
Variations
Chocolate Pecan Texas Sheet Cake
Add 1 cup of finely chopped toasted pecans to the icing. The nuts become lightly coated in chocolate and add wonderful texture.
Extra-Rich Chocolate Version
Add 1/2 cup semisweet chocolate chips to the warm icing and stir until completely melted before adding the powdered sugar.
Mocha Texas Sheet Cake
Add 1–2 teaspoons of instant espresso powder to the cocoa mixture. Coffee intensifies the chocolate flavor without making the cake taste strongly of coffee.
Cinnamon Chocolate Sheet Cake
Add 1/2 teaspoon of ground cinnamon to the cake batter for a subtle warm flavor.
Vanilla Chocolate Sheet Cake
Increase the vanilla extract in the cake and icing slightly for a softer, more aromatic flavor.
Serving Suggestions
Texas Sheet Cake is delicious served at room temperature, but it is especially comforting when served slightly warm.
A scoop of vanilla ice cream makes an excellent accompaniment because the cold, creamy ice cream contrasts beautifully with the rich chocolate cake.
It can also be served with lightly sweetened whipped cream, fresh berries, or simply enjoyed on its own with coffee or tea.
Storage
Store the cake covered at room temperature for up to 2 days.
For longer storage, refrigerate it in an airtight container for approximately 4–5 days. Allow refrigerated slices to sit at room temperature for a short time before serving for the best texture.
The cake can also be frozen. Wrap individual portions tightly and place them in a freezer-safe container. Thaw in the refrigerator or at room temperature before serving.
Why Lovers of This Cake Keep Making It
People love Texas Sheet Cake because it combines everything desirable in a homemade chocolate dessert: a tender cake, intense cocoa flavor, rich buttery icing, and an easy preparation method.
It is large enough to feed a crowd but simple enough for an ordinary weekday dessert. There is no complicated decoration, no stacking of layers, and no special equipment required.
It is also wonderfully adaptable. Some families prefer pecans, others prefer walnuts, while some enjoy the cake with nothing more than its smooth chocolate frosting.
Final Conclusion
Classic Texas Sheet Cake is a true example of comforting American home baking. Its beauty is not in complicated decoration or elaborate ingredients, but in the balance of a soft chocolate cake and warm, rich fudge icing.
The most important secrets are simple: use quality cocoa, avoid overmixing, do not overbake, and pour the icing over the cake while it is still warm.
Whether served at a family gathering, holiday celebration, potluck, birthday, or casual afternoon coffee, this chocolate sheet cake has a way of disappearing quickly.
For chocolate lovers, it is the kind of dessert that feels familiar from the very first bite: soft, buttery, deeply chocolatey, and generously covered with smooth fudge frosting.