
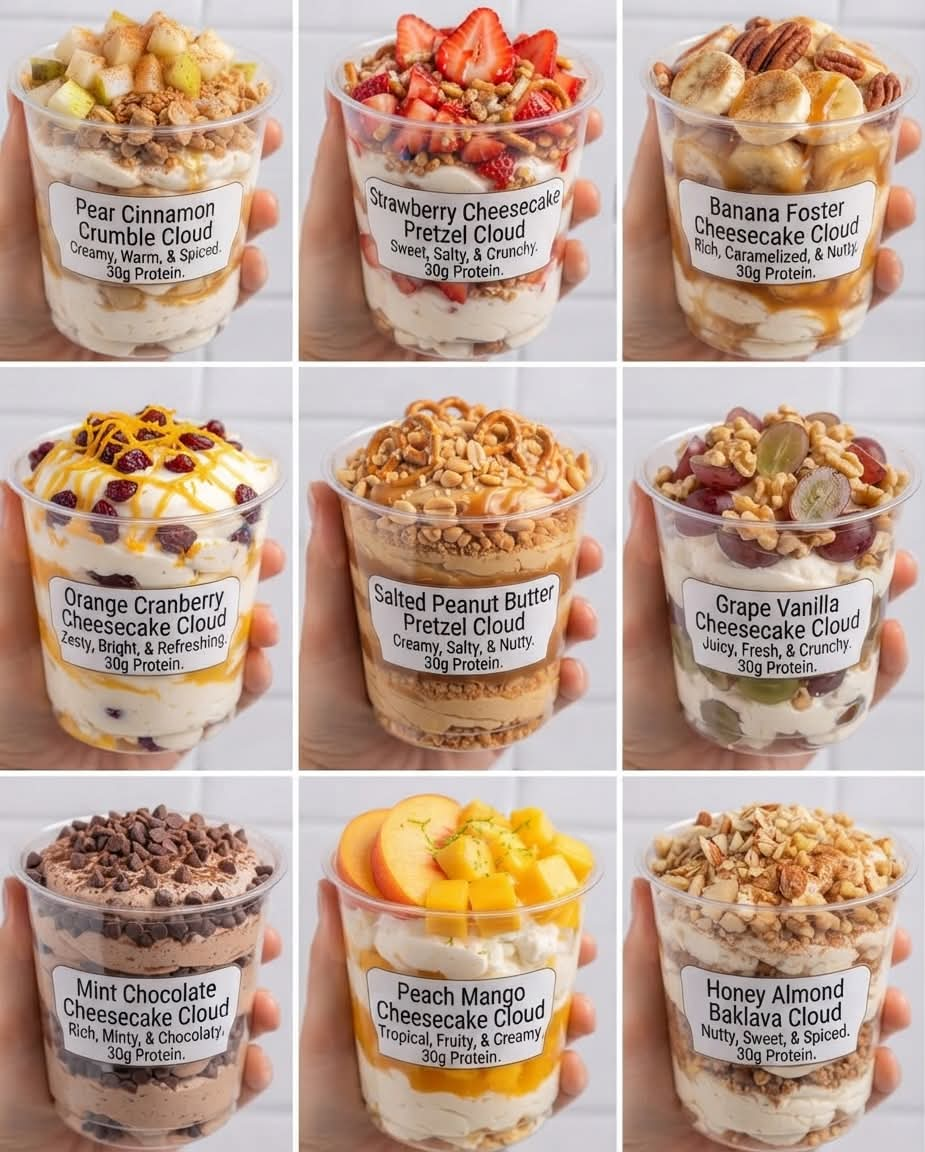
Creamy Dreamy No-Bake Cloud Dessert
Introduction
Creamy, light, dreamy, and wonderfully easy to prepare, this No-Bake Cloud Dessert is the kind of treat that feels indulgent without requiring hours in the kitchen. It has a soft, fluffy texture, a smooth creamy filling, and just enough sweetness to make every spoonful satisfying.
The best part is that there is no oven involved. Everything comes together with a simple preparation method, making this dessert especially convenient for busy days, meal preparation, family gatherings, potlucks, celebrations, or whenever you want something sweet waiting in the refrigerator.
Prepare it in individual containers for an easy grab-and-go dessert, or make it in one large dish for everyone to share. After several hours of chilling, the layers become beautifully soft and creamy, creating the cloud-like texture that gives this dessert its name.
Ingredients
For the Crust
- 2 cups finely crushed graham crackers or digestive biscuits
- 5 tablespoons unsalted butter, melted
- 2 tablespoons granulated sugar
- 1 teaspoon vanilla extract
- Pinch of salt
For the Creamy Filling
- 8 ounces cream cheese, softened
- 1/2 cup powdered sugar
- 1 teaspoon vanilla extract
- 1 cup heavy whipping cream, cold
- 1/2 cup sour cream or plain Greek yogurt
- 1 tablespoon fresh lemon juice
- 1/2 teaspoon finely grated lemon zest
For the Cloud Layer
- 1 cup heavy whipping cream, cold
- 2 tablespoons powdered sugar
- 1 teaspoon vanilla extract
Optional Toppings
- Fresh strawberries
- Fresh blueberries
- Raspberries
- Sliced bananas
- Shaved chocolate
- Crushed graham crackers
- Toasted coconut
- Chopped nuts
- A light dusting of powdered sugar
Instructions
Step 1: Prepare the Crust
Place the graham crackers or digestive biscuits in a food processor and pulse until they become fine crumbs. If you do not have a food processor, place the biscuits in a sealed bag and crush them with a rolling pin.
Transfer the crumbs to a mixing bowl. Add the melted butter, sugar, vanilla extract, and salt. Mix thoroughly until the crumbs are evenly coated and resemble wet sand.
Press the mixture firmly into the bottom of an 8-inch or 9-inch square baking dish. You can also divide it between individual dessert cups.
Place the crust in the refrigerator while preparing the filling.
Step 2: Make the Cream Cheese Filling
In a large bowl, beat the softened cream cheese until smooth and creamy. Make sure there are no large lumps.
Add the powdered sugar, vanilla extract, sour cream or Greek yogurt, lemon juice, and lemon zest. Continue mixing until everything is completely incorporated and the mixture is smooth.
Do not overmix once the ingredients are combined.
Step 3: Whip the Cream
Pour the cold heavy whipping cream into a separate chilled bowl.
Beat with an electric mixer until soft peaks begin to form. The cream should become thick and fluffy but should not be beaten until grainy.
Gently fold the whipped cream into the cream cheese mixture in several additions. Use a spatula and fold slowly to preserve as much air as possible.
This folding process is important because it helps create the light, cloud-like texture.
Step 4: Prepare the Cloud Layer
In another bowl, combine the cold heavy whipping cream, powdered sugar, and vanilla extract.
Beat until firm peaks form. The whipped cream should hold its shape when the beaters are lifted.
Be careful not to overwhip.
Step 5: Assemble the Dessert
Remove the chilled crust from the refrigerator.
Spoon the creamy filling evenly over the crust and smooth the surface with a spatula.
Add the whipped cloud layer on top. Spread it gently across the entire surface.
If you are making individual portions, alternate the crust and cream layers inside small jars or dessert cups.
Step 6: Add Toppings
Decorate the top with your favorite toppings.
Fresh berries are particularly good because their slight acidity balances the sweetness of the creamy filling. Crushed biscuits provide additional texture, while shaved chocolate or toasted coconut can give the dessert a more indulgent finish.
Step 7: Chill
Cover the dessert and refrigerate for at least 4 hours.
For the best texture, allow it to chill overnight. This gives the crust time to soften slightly and allows the creamy layers to become firm enough to slice or spoon.
Method
The preparation method is based on three simple components: a buttery crumb crust, a smooth cream cheese filling, and an airy whipped-cream topping.
The key technique is folding rather than aggressively mixing. Folding the whipped cream into the cream cheese mixture gently incorporates air without collapsing the cream. This produces the soft, fluffy consistency that makes the dessert feel light and delicate.
Chilling is equally important. Because this is a no-bake dessert, refrigeration takes the place of oven baking. The cold temperature allows the filling to firm while giving all the flavors time to blend.
History and Inspiration
No-bake desserts have become popular in home kitchens because they offer a simple alternative to traditional baked sweets. Many classic refrigerator desserts use ingredients such as cream cheese, whipped cream, biscuits, condensed milk, pudding, or fruit.
The idea behind a cloud-style dessert comes from creating an exceptionally light and airy cream layer. Similar techniques can be found in mousse desserts, icebox cakes, chilled cheesecakes, and whipped-cream-based puddings.
This recipe brings those ideas together into an easy modern dessert that can be prepared without an oven.
Formation and Texture
The dessert develops its texture through several stages.
The crumb crust creates a firm but tender foundation. The butter binds the crumbs together while refrigeration allows the crust to set.
The cream cheese layer provides richness and structure. Sour cream or Greek yogurt adds a subtle tang that prevents the filling from tasting overly sweet.
The whipped cream introduces air into the mixture. When folded carefully into the cream cheese base, it creates a smooth and fluffy consistency.
Finally, the separate whipped topping gives the dessert its soft, cloud-like appearance.
Meal-Prep Method
This dessert is excellent for meal preparation.
Prepare the entire recipe and divide it into 6 to 8 small airtight containers. Add the toppings just before serving if you want the fruit or crunchy ingredients to remain fresh.
Keep the containers refrigerated.
For the best quality, enjoy the dessert within several days. If using fresh fruit, check the fruit before serving and remove any fruit that has become overly soft.
Variations
Strawberry Cloud Dessert
Add finely chopped strawberries to the cream cheese filling and decorate the top with additional fresh strawberries.
Chocolate Cloud Dessert
Replace part of the graham cracker crumbs with chocolate cookie crumbs. Add 2 tablespoons of unsweetened cocoa powder to the cream cheese mixture and finish with chocolate shavings.
Lemon Cloud Dessert
Increase the lemon zest and lemon juice slightly for a brighter citrus flavor. Add thin slices of lemon or a little grated zest for decoration.
Coconut Cloud Dessert
Add 1/2 cup shredded coconut to the filling and sprinkle toasted coconut over the whipped topping.
Berry Cloud Dessert
Layer strawberries, blueberries, and raspberries between the creamy layers for a colorful fruit-filled version.
Tips for Success
Use room-temperature cream cheese so that the filling becomes completely smooth.
Use cold heavy cream when making whipped cream because it will whip more efficiently.
Do not overbeat the whipped cream. Stop when it reaches the desired consistency.
Fold whipped cream gently rather than stirring vigorously.
Allow enough refrigeration time. Four hours is the minimum recommended chilling time, while overnight chilling produces an even better texture.
For clean slices, use a sharp knife and wipe the blade between cuts.
For individual servings, use small jars, cups, or airtight containers.
Serving Suggestions
Serve the dessert directly from the refrigerator.
For an elegant presentation, add fresh berries, a small amount of grated chocolate, or a few biscuit crumbs immediately before serving.
For gatherings, prepare the dessert in a large glass dish so the creamy layers are visible.
For meal prep, individual portions are convenient because they can be refrigerated and served without additional preparation.
Conclusion
This Creamy Dreamy No-Bake Cloud Dessert proves that an impressive dessert does not have to require complicated techniques or an oven. With a buttery crumb crust, smooth cream cheese filling, and airy whipped topping, every layer contributes to a delicious combination of textures.
It is simple enough for an ordinary weekday but special enough for birthdays, holidays, family dinners, potlucks, and celebrations.
The dessert can also be customized with different fruits, chocolate, coconut, nuts, or citrus flavors, making it easy to create your own favorite version.
For Dessert Lovers
This recipe is especially appealing to dessert lovers who enjoy creamy, chilled sweets with a soft texture and plenty of flavor. It is also a wonderful choice for anyone who wants a make-ahead dessert that can be prepared several hours before guests arrive.
The most enjoyable part is opening the refrigerator after several hours of chilling and finding a beautifully set dessert ready to serve.
A simple recipe, a creamy texture, and endless possibilities make this a dessert worth keeping in your recipe collection.