
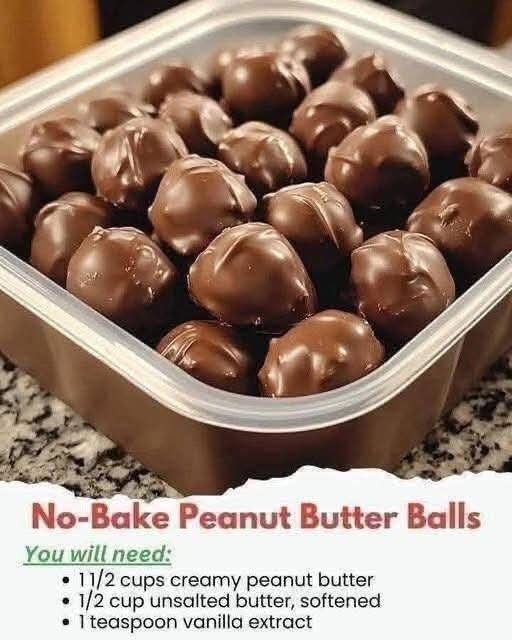
No-Bake Peanut Butter Balls
Introduction
No-Bake Peanut Butter Balls are a simple, rich, and wonderfully satisfying homemade treat made without turning on the oven. They combine creamy peanut butter, buttery sweetness, vanilla, and a smooth chocolate coating to create a bite-sized dessert with a soft, creamy center and a crisp chocolate shell.
They are ideal for holidays, cookie trays, parties, bake sales, family gatherings, or whenever you want something sweet without spending hours in the kitchen. The mixture can be prepared ahead of time, shaped into balls, chilled, and coated in chocolate when convenient.
Ingredients
For the Peanut Butter Mixture
- 1 1/2 cups creamy peanut butter
- 1/2 cup unsalted butter, softened
- 1 teaspoon vanilla extract
- 3 cups powdered sugar
- 1/4 teaspoon salt, optional
For the Chocolate Coating
- 2 cups semi-sweet chocolate chips
- 1 tablespoon shortening or coconut oil, optional
- 1/2 cup milk chocolate chips, optional, for a sweeter coating
Optional Toppings
- Finely chopped peanuts
- Crushed pretzels
- Shredded coconut
- Chocolate sprinkles
- A light drizzle of melted white chocolate
- A small pinch of flaky sea salt
Preparation Time
Preparation: 25 minutes
Chilling: 30 to 60 minutes
Chocolate coating: 15 minutes
Total time: approximately 1 hour 15 minutes
Yield: approximately 30 to 36 peanut butter balls
Instructions
Step 1: Prepare the Peanut Butter Mixture
Place the softened butter and creamy peanut butter in a large mixing bowl. Beat them together until the mixture becomes smooth, creamy, and completely incorporated.
Add the vanilla extract and optional salt. Mix again until evenly distributed.
Gradually add the powdered sugar, about 1/2 cup at a time. Mix well after each addition. As more powdered sugar is incorporated, the mixture will become thicker and easier to shape.
Continue mixing until a soft but firm dough forms. The mixture should hold together when pressed between your fingers without being excessively sticky.
Step 2: Adjust the Texture
If the peanut butter mixture feels too soft or sticky, add a little more powdered sugar, one tablespoon at a time.
If it seems unusually dry or crumbly, add a small spoonful of peanut butter and mix again.
The finished mixture should be soft enough to roll but firm enough to maintain its shape.
Step 3: Form the Peanut Butter Balls
Line a baking sheet or large tray with parchment paper or wax paper.
Using a small cookie scoop or tablespoon, portion out the mixture. Roll each portion between your palms until it forms a smooth ball.
Try to keep the balls approximately the same size so they chill and coat evenly.
Place each ball onto the prepared baking sheet.
Step 4: Chill the Balls
Place the tray in the refrigerator for at least 30 minutes.
Chilling is important because it firms the peanut butter centers and makes them much easier to dip into melted chocolate without losing their shape.
For an even firmer texture, you can chill them for up to an hour.
Step 5: Melt the Chocolate
Place the semi-sweet chocolate chips in a microwave-safe bowl.
Heat in 20- to 30-second intervals, stirring thoroughly between each interval. Continue until the chocolate is almost completely melted, then stir until smooth.
If desired, add the shortening or coconut oil. This can make the chocolate thinner and easier to work with while giving the finished coating a smoother appearance.
Avoid overheating the chocolate, as excessive heat can cause it to become thick or grainy.
Step 6: Coat the Peanut Butter Balls
Remove the chilled peanut butter balls from the refrigerator.
Using a fork, dipping tool, or toothpick, place one ball into the melted chocolate. Turn it gently until completely coated.
Lift it from the chocolate and allow the excess coating to drip back into the bowl.
Place the chocolate-covered ball back onto the parchment-lined tray.
Repeat with the remaining peanut butter balls.
Step 7: Add Toppings
If you want to decorate the peanut butter balls, add your toppings while the chocolate is still wet.
You can sprinkle them with chopped peanuts, crushed pretzels, shredded coconut, chocolate sprinkles, or a tiny amount of flaky sea salt.
For a decorative finish, allow the chocolate coating to set and then drizzle the balls with melted white or milk chocolate.
Step 8: Allow the Chocolate to Set
Place the completed peanut butter balls in the refrigerator for approximately 20 to 30 minutes, or until the chocolate coating has completely hardened.
Once set, transfer them to an airtight container.
Method
The basic method consists of four stages: mixing, shaping, chilling, and coating.
First, the peanut butter and softened butter are blended until creamy. Powdered sugar is then incorporated gradually to create a firm, moldable filling. The mixture is divided into portions and rolled into balls before being chilled.
The chilled centers are dipped into melted chocolate and returned to the refrigerator so the coating can set.
This method requires no baking and very little specialized equipment, making it an excellent beginner-friendly dessert.
Formation and Texture
The formation of these peanut butter balls depends on the balance between peanut butter, butter, and powdered sugar.
Peanut butter provides the main flavor and creamy structure. Butter contributes richness and helps create a smooth, tender center. Powdered sugar absorbs some of the moisture while providing sweetness and structure, allowing the mixture to be shaped by hand.
Chilling strengthens the structure of the peanut butter center. Once coated with chocolate and chilled again, the dessert develops a pleasing contrast between the creamy interior and firm chocolate exterior.
History
Peanut butter balls belong to a long tradition of homemade American confectionery in which peanut butter is combined with sugar and chocolate. Peanut butter and chocolate became a particularly popular pairing during the twentieth century, appearing in candies, cookies, bars, cups, and holiday treats.
No-bake versions became especially popular because they require simple pantry ingredients and can be prepared without an oven. Families often make variations during Christmas, Thanksgiving, school events, parties, and community bake sales.
The recipe has also inspired many adaptations, including versions made with graham cracker crumbs, powdered milk, crispy cereal, coconut, dark chocolate, white chocolate, and different nut butters.
Helpful Tips
Use creamy peanut butter for the smoothest filling. If using natural peanut butter, stir it extremely well before measuring because the oil can separate.
Make sure the butter is softened rather than melted. Melted butter can make the mixture too loose.
Add powdered sugar gradually instead of adding it all at once. This makes it easier to control the consistency.
Do not skip the chilling step. Cold peanut butter balls are much easier to dip and are less likely to fall apart in the chocolate.
For a thinner chocolate coating, add a small amount of shortening or coconut oil.
If the chocolate begins to thicken while you are dipping, warm it gently again in very short intervals and stir thoroughly.
Storage
Store the finished peanut butter balls in an airtight container in the refrigerator for up to one week.
For the best texture, allow them to sit at room temperature for approximately 10 minutes before serving.
They can also be frozen. Place them in a freezer-safe airtight container, separating layers with parchment paper. Freeze for up to two months. Thaw them in the refrigerator before serving.
Serving Suggestions
These peanut butter balls are delicious served chilled or slightly softened at room temperature.
Arrange them on a dessert platter alongside cookies, brownies, fudge, or other homemade candies. They also make attractive additions to holiday treat boxes and homemade gift baskets.
For special occasions, place each ball in a small paper candy cup and decorate the chocolate coating with a drizzle or finely chopped nuts.
Variations
Dark Chocolate Peanut Butter Balls
Replace the semi-sweet chocolate with dark chocolate for a deeper, less sweet flavor.
Milk Chocolate Version
Use milk chocolate for a sweeter and creamier coating.
Crunchy Peanut Butter Balls
Replace some or all of the creamy peanut butter with crunchy peanut butter for additional texture.
Coconut Peanut Butter Balls
Mix a small amount of finely shredded coconut into the peanut butter filling before shaping.
Pretzel Peanut Butter Balls
Add finely crushed pretzels to the filling for a salty, crunchy contrast.
White Chocolate Drizzle
Coat the balls in semi-sweet chocolate, allow the coating to set, and finish with thin lines of melted white chocolate.
Conclusion
No-Bake Peanut Butter Balls are one of those dependable homemade desserts that require very little effort while delivering an impressive result. The creamy peanut butter center, rich chocolate coating, and optional crunchy toppings create a delicious combination of textures and flavors.
Because the recipe requires no oven, it is especially convenient for busy days, holiday preparation, parties, and make-ahead desserts. Once you learn the basic method, you can easily customize the recipe with different chocolates, toppings, and fillings.
For Peanut Butter Lovers
If you love the classic combination of peanut butter and chocolate, these little treats are an excellent choice. They are rich enough to satisfy a sweet craving, small enough for individual servings, and simple enough to prepare whenever the craving strikes.
The best part is that you can make a large batch ahead of time and keep them refrigerated or frozen, giving you a ready-to-serve homemade dessert whenever family or guests arrive.
Final Method at a Glance
- Beat softened butter and peanut butter until smooth.
- Add vanilla and optional salt.
- Gradually mix in powdered sugar.
- Shape the mixture into small balls.
- Refrigerate for 30 to 60 minutes.
- Melt the chocolate gently.
- Dip each chilled ball into the chocolate.
- Add optional toppings.
- Refrigerate until the chocolate is completely set.
- Store in an airtight container and enjoy.