
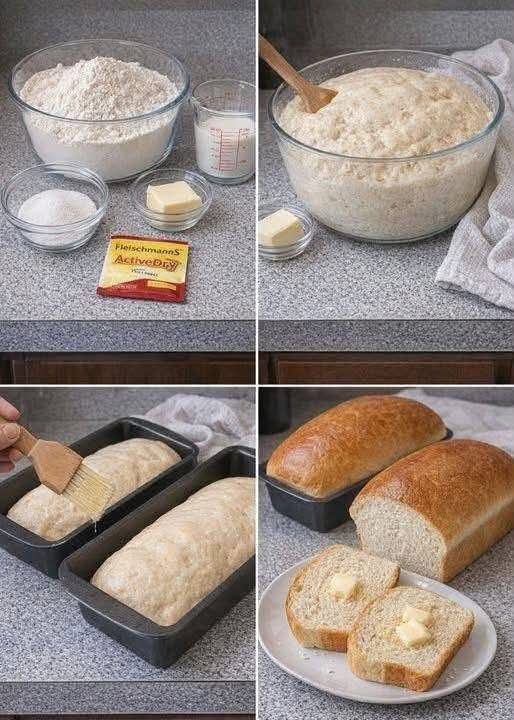
Foolproof Homemade Bread
Introduction
There is something special about homemade bread that is difficult to reproduce with store-bought loaves. The moment a freshly baked loaf comes out of the oven, the kitchen fills with the warm aroma of yeast, butter, and freshly baked dough. The crust is lightly golden, the inside is soft and tender, and a slice served warm with butter can turn a simple meal into something memorable.
This homemade bread recipe is designed to be simple enough for beginners while still producing a delicious, bakery-style loaf. The dough is made with everyday ingredients, allowed to rise until light and fluffy, shaped carefully, and baked until beautifully golden.
The best part is enjoying the bread while it is still slightly warm. Spread it with butter, serve it alongside soup, use it for sandwiches, or simply enjoy a thick slice on its own.
Ingredients
For the Bread
- 1 cup warm milk
- 1/2 cup warm water
- 2 1/4 teaspoons active dry yeast
- 1/4 cup granulated sugar
- 2 tablespoons butter, melted
- 1 teaspoon salt
- 4 to 4 1/2 cups all-purpose flour
- Additional butter for brushing the finished loaf, optional
Instructions
Step 1: Activate the Yeast
Pour the warm milk and warm water into a large mixing bowl. The liquid should feel comfortably warm rather than hot.
Add the sugar and active dry yeast. Stir gently and allow the mixture to stand for approximately 5 to 10 minutes.
The yeast should become foamy on the surface. This is a good indication that the yeast is active.
If there is little or no activity, check the temperature of the liquid and the freshness of the yeast before continuing.
Step 2: Add the Butter and Salt
Once the yeast mixture is foamy, stir in the melted butter and salt.
Mix gently until everything is combined.
Step 3: Add the Flour
Begin adding the flour gradually, starting with about 4 cups.
Stir with a wooden spoon or sturdy spatula until a soft dough begins to form.
If the dough is extremely sticky, add more flour a tablespoon or two at a time. You may need up to another half cup, depending on the humidity, flour, and size of your measuring cups.
Be careful not to add too much flour. The finished dough should be soft and slightly tacky but should not be excessively sticky.
Step 4: Knead the Dough
Transfer the dough to a lightly floured work surface.
Knead the dough for approximately 8 to 10 minutes by hand. Push the dough forward with the heel of your hand, fold it back toward you, turn it slightly, and repeat.
Continue kneading until the dough becomes smoother, softer, and more elastic.
You can also use a stand mixer fitted with a dough hook. Knead on low to medium-low speed until the dough is smooth and elastic.
Step 5: First Rise
Place the kneaded dough in a lightly greased bowl.
Turn the dough once so the surface is lightly coated with oil or butter.
Cover the bowl with a clean kitchen towel or plastic wrap.
Place it somewhere warm and allow the dough to rise for approximately 1 to 1 1/2 hours, or until it has roughly doubled in size.
The exact rising time will depend on the temperature of your kitchen.
Step 6: Shape the Loaf
Once the dough has doubled, gently press it down to release excess air.
Transfer it to a lightly floured surface.
Shape the dough into a loaf by gently flattening it into a rectangle, then rolling it tightly from one end to the other. Pinch the seam closed and place the loaf seam-side down in a greased loaf pan.
If you prefer, the dough can also be divided into two smaller portions and shaped into two loaves.
Step 7: Second Rise
Cover the shaped dough and allow it to rise again for approximately 30 to 45 minutes.
The dough should become noticeably puffy.
Avoid allowing it to rise excessively, because an over-proofed loaf may collapse during baking.
Step 8: Prepare the Oven
Preheat the oven to 350°F (175°C).
Make sure the oven is fully preheated before placing the bread inside.
Step 9: Bake
Place the risen loaf in the center of the oven.
Bake for approximately 25 to 35 minutes, depending on the size and shape of your loaf.
The bread should develop a beautiful golden-brown crust.
If the top begins browning too quickly, loosely cover it with aluminum foil during the final portion of baking.
Step 10: Finish With Butter
Remove the bread from the oven and allow it to rest for several minutes.
While it is still warm, brush the top generously with melted butter if desired.
This gives the crust a softer texture and adds an extra layer of buttery flavor.
Allow the loaf to cool sufficiently before slicing. Cutting extremely hot bread can cause the interior to become compressed or gummy.
The Best Method for Soft Homemade Bread
The secret to good homemade bread is not complicated equipment. It is paying attention to the dough.
The liquid should be warm but not hot. Excessive heat can damage the yeast and prevent the dough from rising properly.
Flour should be added gradually because different kitchens require slightly different amounts. Weather, humidity, flour brands, and measuring methods can all affect the final dough.
Kneading develops gluten, which gives the bread structure and helps create that soft, elastic texture.
The first rise gives the yeast time to ferment and expand the dough. The second rise allows the shaped loaf to become light and airy before baking.
Finally, baking at the correct temperature allows the loaf to develop its golden crust while the interior cooks through.
How to Tell When the Bread Is Done
A properly baked loaf should be golden brown on top and sound somewhat hollow when gently tapped.
For the most reliable result, the center of the loaf should reach approximately 190°F (88°C).
If you do not have a kitchen thermometer, check the color and texture of the loaf and make sure the center is no longer doughy.
Formation and Texture
This bread has a soft, tender interior with a lightly chewy structure and a delicate golden crust.
The milk contributes richness and tenderness, while the butter adds flavor and helps create a softer crumb. Sugar provides a touch of sweetness and also helps support browning during baking.
The yeast is responsible for creating the air pockets that make the loaf light rather than dense.
Proper kneading and rising are especially important because they determine how the final loaf develops its shape and texture.
A Brief History of Homemade Bread
Bread is one of the oldest prepared foods in human history. Different forms of bread have been made by civilizations around the world for thousands of years.
Early breads were often simple mixtures of ground grains and water. Over time, people discovered that naturally occurring fermentation could make dough lighter and more flavorful.
The development of commercial yeast eventually made bread baking more predictable and convenient for home cooks.
Recipes using milk, butter, sugar, and refined wheat flour became particularly popular in many Western kitchens, producing the soft sandwich-style loaves familiar today.
Homemade bread has remained popular because it combines inexpensive ingredients with a cooking process that fills the home with an unmistakable aroma.
Tips for Perfect Results
- Use fresh yeast for the best rise.
- Make sure your milk and water are warm, not hot.
- Add flour gradually instead of adding the entire amount at once.
- Do not make the dough excessively stiff with too much flour.
- Knead until the dough becomes smooth and elastic.
- Give the dough enough time to double during the first rise.
- Do not skip the second rise after shaping.
- Preheat the oven completely before baking.
- Brush the warm loaf with butter for a softer, richer crust.
- Allow the bread to cool slightly before slicing.
Serving Ideas
This homemade bread is delicious served warm with butter.
It can also be used for:
- Breakfast toast
- French toast
- Grilled cheese sandwiches
- Turkey or chicken sandwiches
- Toasted garlic bread
- Bread and butter alongside soup
- Breakfast sandwiches
- Homemade croutons
- Bread pudding
- Dinner rolls
- Simple buttered toast with jam
Storage
Once completely cooled, store the bread in an airtight container or bread bag at room temperature for up to several days.
For longer storage, slice the loaf and freeze the slices in a well-sealed freezer bag. Individual slices can be removed as needed and warmed in a toaster or oven.
Avoid refrigerating homemade bread unless necessary, as refrigeration can cause bread to lose its soft texture more quickly.
Variations
For a slightly richer loaf, increase the butter by another tablespoon.
For a sweeter breakfast bread, add a little extra sugar and serve slices with butter and jam.
For a savory version, reduce the sugar slightly and add herbs such as rosemary, thyme, or dried Italian seasoning.
For garlic bread, slice the baked loaf and spread each slice with softened butter mixed with minced garlic and herbs before warming it in the oven.
Conclusion
Making bread at home may seem intimidating at first, but this recipe keeps the process straightforward. With warm milk, water, yeast, butter, sugar, salt, and flour, you can create a soft and flavorful loaf from scratch.
The most important things are to activate the yeast properly, avoid adding too much flour, knead the dough well, and give it enough time to rise.
Once the loaf comes out of the oven, brush it with butter and let the aroma fill the kitchen. Slice it while it is warm enough to enjoy but cool enough to hold its shape, then serve it with your favorite meal or simply enjoy it with butter.
For Bread Lovers
For anyone who loves the taste and smell of freshly baked bread, this is the kind of recipe worth keeping close. It is simple enough for an ordinary weekday but special enough to serve to family and guests.
There is also something deeply satisfying about making a loaf with your own hands. Watching the dough transform from a simple mixture of flour and liquid into a soft, risen loaf makes the finished bread taste even better.
Serve it warm, add a generous spread of butter, and enjoy the comforting flavor of homemade bread straight from your own kitchen.