
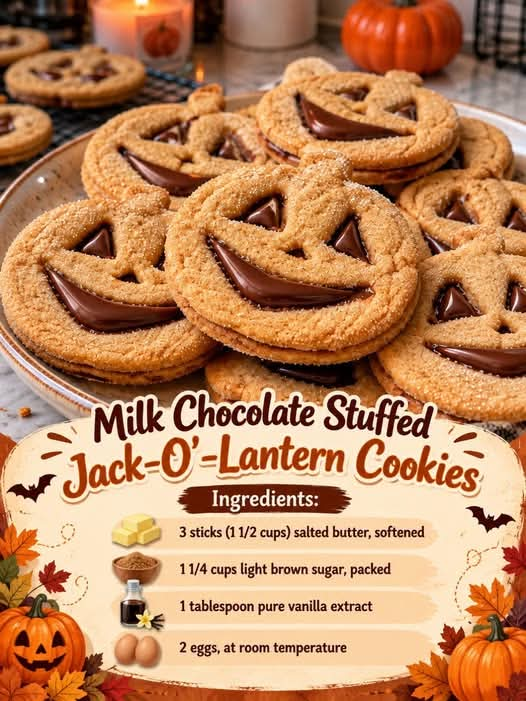
Milk Chocolate Stuffed Jack-O’-Lantern Cookies
Introduction
Milk Chocolate Stuffed Jack-O’-Lantern Cookies are a delightful Halloween treat that combines buttery homemade cookie dough, a cheerful pumpkin-orange color, and a delicious milk chocolate center. Shaped like little jack-o’-lanterns, these cookies are perfect for Halloween parties, autumn gatherings, school celebrations, bake sales, and cozy evenings at home.
The magic of this recipe lies in the contrast between the soft, tender cookie exterior and the smooth, sweet milk chocolate hidden inside. Each cookie looks like a festive little pumpkin, making it a wonderful treat for children and adults alike. The brown sugar adds a rich caramel-like flavor, the butter gives the cookies their satisfying texture, and vanilla brings everything together.
Unlike ordinary chocolate chip cookies, these Halloween cookies feature a surprise filling. Instead of mixing chocolate chips throughout the dough, you enclose a piece of milk chocolate inside each cookie, creating a delicious chocolate-filled center. With a little shaping and decorating, you can transform simple homemade cookies into adorable jack-o’-lantern faces.
These cookies are also an excellent baking project for families. Children can help cut out pumpkin shapes, arrange the chocolate filling with supervision, and decorate the finished cookies with spooky or silly expressions.
Whether you prefer friendly smiling pumpkins, funny Halloween faces, or classic jack-o’-lantern designs, this recipe gives you plenty of room to be creative. Serve them on a Halloween dessert table, pack them into treat bags, or share them with friends and neighbors for a homemade seasonal surprise.
Ingredients

For the Cookie Dough
- 3 sticks (1½ cups / 340 g) salted butter, softened
- 1¼ cups (250 g) light brown sugar, packed
- 1 tablespoon pure vanilla extract
- 2 large eggs, at room temperature
- 4½ cups (560–570 g) all-purpose flour
- 1 teaspoon baking powder
- 1 tablespoon milk, only if needed
- Orange gel food coloring, optional, for a brighter pumpkin color
For the Milk Chocolate Filling
- 12–16 oz (340–450 g) milk chocolate bars or thick milk chocolate pieces, broken into small portions
- 1 teaspoon vanilla extract, optional, for additional flavor
Choose chocolate pieces that are small enough to fit inside the dough without reaching the edges. Chocolate bars broken into squares work especially well.
For Decorating the Jack-O’-Lantern Faces
- ½ cup (85 g) melted dark or milk chocolate
- ¼ cup (45 g) melted white chocolate, optional
- Black or dark brown decorating icing, optional
- Green decorating icing or small green fondant pieces, optional, for pumpkin stems
You can also use a small amount of melted chocolate in a piping bag to draw the eyes, noses, and mouths.
Instructions
Step 1: Prepare the Baking Equipment
Preheat your oven to 350°F (175°C).
Line two large baking sheets with parchment paper. This prevents the cookies from sticking and makes it easier to transfer them without damaging their pumpkin shapes.
Gather a rolling pin, mixing bowls, an electric mixer, a spatula, and pumpkin-shaped cookie cutters. If you do not have a pumpkin cutter, you can use a small knife to cut simple pumpkin outlines from rolled dough.
For the most consistent results, keep the cookie cutters and baking sheets ready before you begin.
Step 2: Cream the Butter and Brown Sugar
Place the softened salted butter in a large mixing bowl.
Add the packed light brown sugar and beat with an electric mixer on medium speed for approximately 2–3 minutes, until the mixture looks creamy and well combined.
Scrape down the sides of the bowl as needed.
Creaming the butter and sugar helps create an even texture throughout the dough. The brown sugar also contributes moisture and a warm, caramel-like flavor that complements the milk chocolate filling.
The butter should be soft enough to press with a finger but should not be melted or greasy.
Step 3: Add the Eggs and Vanilla
Add the eggs one at a time, beating after each addition until incorporated.
Pour in the vanilla extract and mix again until the ingredients are evenly combined.
If the mixture looks slightly separated, do not worry. Once the flour is added, the dough should come together.
Using room-temperature eggs helps them blend more smoothly into the butter mixture.
Step 4: Add the Orange Coloring
If you want brightly colored pumpkin cookies, add a small amount of orange gel food coloring to the wet mixture.
Mix until the color is evenly distributed.
Gel coloring is preferable to liquid food coloring because it provides a more vivid orange shade without adding much extra moisture.
Start with a small amount and increase gradually until you reach your preferred pumpkin color. Remember that the final shade may become slightly less vivid after baking.
For a more natural-looking pumpkin color, you can leave out the coloring entirely and rely on the golden-brown color of the baked dough.
Step 5: Combine the Dry Ingredients
In a separate bowl, whisk together the all-purpose flour and baking powder.
Gradually add the dry mixture to the butter mixture, mixing on low speed after each addition.
Continue until a soft dough forms. Stop mixing as soon as the flour is incorporated.
If the dough is too dry or crumbly to hold together when pressed, add the tablespoon of milk a little at a time. You may not need any milk at all.
The finished dough should be soft, smooth, and easy to roll without sticking excessively to your hands.
Step 6: Chill the Cookie Dough
Divide the dough into two portions and flatten each portion into a thick disk.
Wrap the disks in plastic wrap and refrigerate for 30–45 minutes.
Chilling is especially important for shaped cookies because it firms the butter and makes the dough easier to roll and cut. It also helps the cookies maintain their pumpkin outlines during baking.
If the dough becomes too firm after refrigeration, let it rest at room temperature for several minutes until it is workable again.
Step 7: Roll Out the Dough
Lightly flour a clean work surface or place the dough between two sheets of parchment paper.
Roll the dough to approximately ¼ inch (6 mm) thick.
Try to maintain an even thickness throughout the dough so the cookies bake at the same rate.
Dip the pumpkin-shaped cookie cutter lightly in flour if the dough begins to stick.
Cut out an even number of pumpkin shapes. Half will serve as the bottoms, and the remaining half will become the tops.
Transfer the shapes carefully to the prepared baking sheets, leaving about 2 inches (5 cm) between cookies.
Gather the scraps, press them together gently, and reroll as needed. If the dough becomes warm and difficult to handle, refrigerate it briefly before continuing.
Step 8: Add the Milk Chocolate Filling
Place a small piece of milk chocolate in the center of each bottom cookie.
Keep the chocolate away from the outer edges so the dough can seal properly. A piece that is too large may cause the chocolate to leak out during baking.
Take a matching pumpkin-shaped piece of dough and place it over the chocolate.
Gently press around the edges to seal the two pieces together. Use your fingertips or the back of a small fork to make sure there are no obvious gaps.
Be careful not to flatten the entire cookie. The goal is to create a sealed pocket that holds the chocolate in the middle.
If you prefer a simpler method, you can place a small piece of chocolate on a dough disk, fold the dough around it, and gently reshape it into a pumpkin.
Step 9: Create the Jack-O’-Lantern Shape
Once the filled cookies are assembled, gently refine the pumpkin outlines with your fingers or a small knife.
Use a toothpick or the tip of a small knife to make shallow vertical lines resembling pumpkin ridges. Avoid cutting deeply into the dough, as this could expose the chocolate filling.
For the most recognizable jack-o’-lantern appearance, leave the surface smooth enough for decorating after baking.
If the assembled cookies have become warm or soft, refrigerate the baking sheet for 10–15 minutes before baking.
Step 10: Bake the Cookies
Place the baking sheets in the preheated oven.
Bake for approximately 10–14 minutes, depending on the size and thickness of your cookies.
The edges should look set, while the centers remain relatively pale and soft. Avoid waiting for the entire cookie to become deeply golden, especially if you want the orange color to remain bright.
If you are baking different-sized cookies, check the smaller ones first.
Remove the baking sheets from the oven and allow the cookies to rest for 5–10 minutes. They will be delicate when hot, so avoid moving them immediately.
Transfer them carefully to a wire rack to cool completely.
Step 11: Melt the Decorating Chocolate
Place the dark or milk chocolate in a microwave-safe bowl.
Microwave in short intervals of 15–20 seconds, stirring after each interval until smooth. Alternatively, melt the chocolate gently in a heatproof bowl over a pan of barely simmering water.
If using white chocolate, melt it separately.
Allow the melted chocolate to cool slightly so it is easier to control when decorating.
Transfer the chocolate to a piping bag or a small plastic bag with a tiny corner snipped off.
Step 12: Decorate the Jack-O’-Lantern Faces
Once the cookies have cooled completely, use the melted chocolate or decorating icing to create pumpkin faces.
Try different expressions, such as:
- Triangle eyes and a crooked smile for a traditional jack-o’-lantern.
- Round eyes and a small mouth for friendly pumpkin cookies.
- Narrow eyes and sharp teeth for spooky Halloween designs.
- Winking faces for playful, cartoon-style pumpkins.
Add small green stems using green icing or fondant if desired.
Allow the decorations to set before moving the cookies into a storage container.
Step 13: Serve and Enjoy
Arrange the finished cookies on a large platter, alternating different jack-o’-lantern expressions for a fun Halloween display.
Serve them with milk, hot chocolate, coffee, or a warm autumn drink.
When the cookies are freshly baked and slightly warm, the chocolate center may be soft and creamy. After cooling, the filling will become firmer, but the cookies will still offer a delicious chocolate surprise.
For the best experience, warm an individual cookie briefly before serving, checking carefully to avoid overheating the chocolate.
Methods of Preparation
1. The Creaming Method
The creaming method combines softened butter and sugar before the eggs and dry ingredients are added.
This helps create a smooth, evenly mixed dough and contributes to the cookie’s texture. Because this recipe contains a substantial amount of butter, keeping the butter at the correct temperature is particularly important.
Butter that is too warm can make the dough greasy and difficult to shape, while butter that is too cold may not blend properly with the sugar.
2. The Chilling Method
Refrigerating the dough firms the butter and makes the dough less sticky.
Chilled dough is easier to roll, cut, and assemble around the chocolate filling. It also helps the cookies maintain their pumpkin shapes as they bake.
For particularly detailed cookie cutters, a brief chill after shaping can make an additional difference.
3. The Stuffing Method
The stuffing method involves placing a small piece of chocolate between two pieces of dough and sealing the edges.
This creates a hidden center that remains inside the cookie during baking.
The most important part is making sure the dough is completely sealed around the chocolate. If there are gaps or the filling is too close to the edge, the chocolate may escape.
Use a moderate amount of chocolate rather than filling the cookie too generously.
4. The Cut-and-Decorate Method
After rolling the dough, use a pumpkin cutter to produce uniform shapes.
The cookie tops can be decorated after baking, once they have cooled completely. This approach is easier than trying to cut detailed facial features into the raw dough, especially when the cookies contain a chocolate filling.
Decorating after baking also allows you to create a variety of expressions without changing the baking time.
5. The Make-Ahead Method
The dough can be prepared in advance and refrigerated, tightly wrapped, for up to 2 days.
You can also cut and assemble the filled cookies ahead of time, then refrigerate them on a covered baking sheet until ready to bake.
For longer storage, freeze the unbaked assembled cookies in a single layer until firm, then transfer them to a freezer-safe container. Bake from frozen, adding a few extra minutes as needed and checking for doneness.
History of Jack-O’-Lantern Cookies
Jack-o’-lanterns are closely associated with Halloween, but the tradition of carving lanterns has roots that predate modern Halloween celebrations.
In Ireland and Scotland, people historically carved lanterns from turnips and other root vegetables as part of seasonal folk traditions. When Irish immigrants brought Halloween customs to North America, pumpkins became a popular alternative because they were plentiful, larger, and easier to carve.
Over time, the carved pumpkin became one of the most recognizable symbols of Halloween.
As Halloween celebrations expanded, home bakers began incorporating pumpkin shapes, spooky faces, and autumn colors into cookies, cakes, cupcakes, and other seasonal desserts.
Decorated sugar cookies became particularly popular for holidays because their dough can be rolled and cut into almost any shape. Food coloring and icing allow bakers to create festive designs, from smiling pumpkins to haunted houses and bats.
Chocolate-filled cookies are a more modern variation on traditional decorated cookies. They combine the visual appeal of Halloween baking with the familiar pleasure of a sweet chocolate center.
This particular milk chocolate stuffed jack-o’-lantern cookie is a contemporary festive creation rather than a traditional historical recipe. It brings together classic shaped-cookie techniques, the modern popularity of stuffed desserts, and the familiar Halloween pumpkin design.
Formation and Texture: What Makes These Cookies Special?
The success of these cookies depends on the balance between the outer dough, the hidden chocolate center, and the decorative finish.
The buttery foundation: Salted butter gives the cookies richness and helps create a tender bite. Softened butter also blends easily with the brown sugar.
The brown sugar flavor: Light brown sugar contributes sweetness, moisture, and subtle caramel notes that pair especially well with milk chocolate.
The flour structure: All-purpose flour gives the dough enough body to hold its shape. Correct measurement helps prevent the cookies from becoming too dry or spreading excessively.
The baking powder: A small amount of baking powder provides lift, helping the cookies develop a softer texture without becoming too puffy.
The hidden chocolate center: Milk chocolate melts as the cookies bake, creating a sweet, creamy filling. The chocolate may firm up as the cookies cool, but it can soften again when gently warmed.
The pumpkin shape: Rolling the dough evenly and chilling it before baking helps preserve the distinctive outline. Shallow lines pressed into the dough can create the appearance of pumpkin ridges.
The decorative faces: Melted chocolate or icing gives each cookie its personality. Because the decorations are added after cooling, the faces remain clear and attractive.
The finished cookies should be tender, lightly golden around the edges, and filled with milk chocolate. Their pumpkin shapes and expressive faces make them as entertaining to display as they are to eat.
Tips for Perfect Milk Chocolate Stuffed Jack-O’-Lantern Cookies
1. Measure the flour carefully. Too much flour can make the dough dry and difficult to seal around the chocolate.
2. Use softened, not melted, butter. Melted butter can change the texture and make the dough difficult to shape.
3. Chill the dough. This helps prevent excessive spreading and makes the pumpkin shapes easier to cut.
4. Choose suitable chocolate pieces. Use small, thick pieces that fit comfortably inside the dough.
5. Seal every cookie completely. Press the edges together gently but firmly to prevent the filling from leaking.
6. Avoid overfilling. Too much chocolate can push through the seams during baking.
7. Keep the dough evenly thick. Uneven thickness can cause the edges to bake before the centers are ready.
8. Do not overbake. Remove the cookies when the edges are set. They will continue to firm up as they cool.
9. Cool before decorating. Warm cookies can melt the chocolate used to create the faces.
10. Use gel coloring sparingly. A little gel color goes a long way, and excessive coloring may affect the dough’s appearance.
11. Work in batches. Keep unused dough chilled while rolling and assembling the cookies.
12. Allow decorations to set. This prevents the jack-o’-lantern faces from smudging during storage.
Delicious Variations

1. Dark Chocolate Jack-O’-Lantern Cookies
Replace the milk chocolate filling with dark chocolate for a deeper cocoa flavor. The slightly bitter notes balance the sweetness of the brown sugar dough.

2. Chocolate Hazelnut Stuffed Pumpkin Cookies
Use a small chilled portion of chocolate-hazelnut spread instead of a chocolate square. Freeze small dollops until firm before enclosing them in the dough to make filling easier.

3. White Chocolate Pumpkin Cookies
Use small pieces of white chocolate for a sweeter, creamier center. Decorate the cooled cookies with dark chocolate for a striking contrast.

4. Chocolate Peanut Butter Pumpkin Cookies
Place a small piece of peanut butter cup inside each cookie before sealing. This creates a rich combination of chocolate and peanut butter. Clearly label these cookies for anyone with peanut allergies.

5. Mini Jack-O’-Lantern Cookies
Use a smaller pumpkin cutter and reduce the chocolate filling accordingly. Watch the baking time closely because smaller cookies bake more quickly.
Serving Ideas for Halloween Parties
These cookies are versatile enough for almost any autumn celebration.
- Halloween dessert table: Arrange the cookies on a black, orange, or white platter to highlight their pumpkin shapes.
- Children’s parties: Let children choose their favorite jack-o’-lantern expressions and serve the cookies with milk.
- School bake sales: Package cooled cookies individually, following any school rules regarding homemade treats and allergen labeling.
- Autumn movie nights: Serve the cookies with hot chocolate, warm apple cider, or another seasonal drink.
- Halloween gift bags: Place each completely cooled cookie in a food-safe bag and tie it with a festive ribbon.
- Neighborhood treats: Make a large batch with different faces so each cookie looks unique.
For an eye-catching presentation, mix smiling pumpkins with spooky pumpkins and arrange them in rows or circles on a serving tray.
Storage and Freezing Instructions
At room temperature: Store completely cooled cookies in an airtight container for up to 3–4 days. Keep them in a cool, dry place away from direct sunlight.
In the refrigerator: If your kitchen is very warm, refrigerate the cookies in an airtight container. Allow them to sit briefly at room temperature before serving for a softer texture.
In the freezer: Freeze baked and cooled cookies in a freezer-safe container, separating layers with parchment paper. They are best enjoyed within 2 months for optimal texture and flavor.
Freezing the dough: You can freeze cut, unbaked, chocolate-filled cookies before decorating. Freeze them in a single layer first, then store them in a sealed freezer-safe container. Bake from frozen, adding a few minutes to the baking time as necessary.
Reheating: Warm one cookie in the microwave for approximately 5–10 seconds, then check the center before eating. The chocolate filling can become much hotter than the outer cookie, so allow it to cool slightly.
Frequently Asked Questions
Can I make these cookies without orange food coloring?
Yes. The cookies will still taste delicious without coloring. Their natural color will be more golden brown than bright orange, but the jack-o’-lantern faces will still make them recognizable.
Why is my cookie dough too crumbly?
The dough may contain too much flour, or the butter may have been too cold. Add the optional milk gradually, only as needed, until the dough holds together when pressed.
Why did the chocolate leak out?
The chocolate may have been too close to the edges, the filling may have been too large, or the dough may not have been sealed completely. Use smaller chocolate pieces and press the seams firmly together.
Can I use chocolate chips instead of chocolate bars?
Yes, but chocolate chips can be harder to contain neatly and may not produce the same continuous filling. A small piece of a milk chocolate bar generally creates a more satisfying center.
Do I need a pumpkin-shaped cookie cutter?
No. You can cut simple pumpkin shapes by hand using a small knife and a paper template. Just make sure the pieces are similar in size so the top and bottom fit together.
Can I make the cookies ahead of Halloween?
Absolutely. You can prepare the dough in advance, shape and fill the cookies, or bake them ahead and freeze them. For the neatest appearance, add the decorative faces after baking and cooling.
How can I keep the pumpkin shapes from spreading?
Chill the dough before rolling, avoid adding too much milk, and refrigerate the assembled cookies briefly before baking if the dough becomes soft. Make sure your oven is fully preheated.
Conclusion
Milk Chocolate Stuffed Jack-O’-Lantern Cookies bring together everything that makes Halloween baking enjoyable: buttery homemade dough, a sweet chocolate center, bright pumpkin shapes, and creative decorations.
The brown sugar and vanilla create a rich cookie base, while the milk chocolate filling adds a delicious surprise to every bite. Their festive appearance makes them ideal for Halloween parties, family baking days, autumn gatherings, and homemade gifts.
Although they look impressive, the process is straightforward. Prepare the dough, chill it, cut out pumpkin shapes, add the chocolate filling, seal the cookies, bake until set, and decorate with fun jack-o’-lantern faces.
You can personalize them with dark chocolate, white chocolate, chocolate-hazelnut spread, or peanut butter cups. You can also make every face different, turning a simple batch of cookies into a playful Halloween centerpiece.
Bake a batch, share them with friends and family, and enjoy the combination of homemade flavor and festive fun.
For Halloween Cookie Lovers
If you love soft cookies, rich chocolate centers, and creative seasonal desserts, these Milk Chocolate Stuffed Jack-O’-Lantern Cookies are a wonderful recipe to add to your autumn baking collection.
They are delicious enough for chocolate lovers, attractive enough for a party platter, and fun enough to make with the whole family.
Serve them slightly warm for a softer chocolate center, or enjoy them at room temperature as a sweet Halloween treat. Either way, these little pumpkin cookies are sure to bring plenty of smiles to your seasonal celebrations.